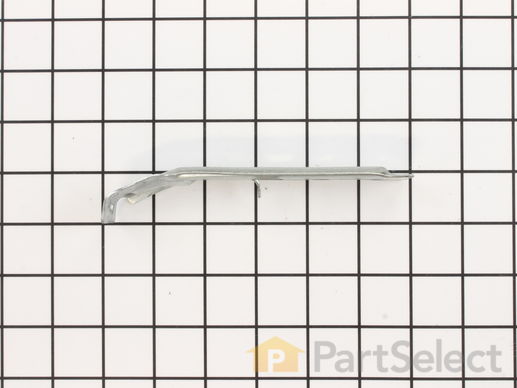
Part Location Diagram of WP64067 Whirlpool Spring Outer Bracket
See part 2 in the diagram
Replacing your Whirlpool Washer Spring Outer Bracket
( Grid squares measure 1x1 inch )
Customer Service Representative

Get in touch, we're here to help!

Monday to Saturday
8am - 9pm EST

customerservice@partselect.ca

Spring Outer Bracket

$9.67
  In Stock

Get this part fast! Average delivery time for in-stock parts via standard shipping: 1.8 days.

PartSelect Number PS11743348
Manufacturer Part Number WP64067
Manufactured by Whirlpool
Product Description

Spring Outer Bracket Specifications

Sold individually.
How Buying OEM Parts Can Save You Time and Money

How Buying OEM Parts Can Save You Time and Money

Part Videos

Replacing your Whirlpool Washer Spring Outer Bracket

Replacing your Whirlpool Washer Spring Outer Bracket
Troubleshooting
This part works with the following products:
Washer, Washer Dryer Combo.
This part works with the following products:
Whirlpool, Kenmore, KitchenAid, Roper.
Part# WP64067 replaces these:
AP6010171, 62607, 64067
Back to Top
Customer Repair Stories
 Average Repair Rating: 2.4 / 5.0, 4 reviews. What's this?
  • 1
Sort by:
Sorry, we couldn't find any existing installation instruction that matched.
unbalanced load...knocking sound.
Unbalanced load was creating a knocking sound (as if the clothes load was unbalanced). Dismantled the washer to find that one brackets had rusted out. [FYI: 3 bracket at 120 degree apart (for the 360 degree circle)]. I found that the hole (on the bracket) where the spring holds was gone. Purchased parts. Replaced them (spring, bracket, screw). Reassembled washer then ran wash for a cycle. Successful fix.
Other Parts Used:
Bracket, Spring Outer (L.F.) Screw
  • Edward from Easthampton, MA
  • Difficulty Level:
    A Bit Difficult
  • Total Repair Time:
    More than 2 hours
  • Tools:
    Nutdriver, Pliers, Screw drivers
31 of 36 people found this instruction helpful.
Was this instruction helpful to you?
Thank you for voting!
Excessive tub wobble, tubs leaning forward of normal
Washer is 29 years old. Found that tub spring hooks into a simple (non-reinforced) hole in the base frame, and it had worn the hole through through the edge of the frame (key hole style). Due to age and low cost of parts, ordered all suspension springs, brackets, & pads. Once they arrived, took the tubs out (first time for that), found that the suspension pads looked fine, but the wear pads showed a lot of wear and the front one was snapped in the middle, perhaps an after effect of the spring failure. From my lack of attention, initially tried to get front pad into the wrong set of holes, a bad fit; corrected. Simply drilled a near-by hole in the base frame for the tub spring.

While the tubs were out, took them outside and scrubbed them clean. Also cleaned agitator parts using bottle brushes. Followed the PartSelect videos and owner comments for procedures, methods. Found that some miss some important info, but if you watch others you can combine the info to find what you need re disassembly/assembly.

At one point while attempting to remove the outer tub, did not realize that the screw that holds the rear spring bracket to the tub also holds the tub to the suspension plate.

Took me most of a day for the whole process, and I ended up with pulled/spasmic muscles from all the bending over, mostly from cleaning parts I think. Very helpful to have the parts breakout drawings, videos, others' experience.
Other Parts Used:
Tub Spring Bracket, Spring Outer (L.F.) Suspension Spring Tub Wear Pads - Package of 3 Suspension Pads - Package of 3
  • David from GLEN BURNIE, MD
  • Difficulty Level:
    A Bit Difficult
  • Total Repair Time:
    More than 2 hours
  • Tools:
    Nutdriver, Pliers, Screw drivers, Socket set
16 of 16 people found this instruction helpful.
Was this instruction helpful to you?
Thank you for voting!
washer was shaking violently
Following the video that was supplied with my order was super helpful. Watching it though made the job seem very easy of which it really wasn't. My washer is about 6 years old so it had a LOT of build up on EVERYTHING making the disassembly harder than you may think. Once apart I needed to really scrub everything clean before reassembly as well. Getting the tub off without cracking it was a challenge for sure. Eventually rocking it and adding a bit of WD-40 to the shaft if eventually came off. Once it was off I was able to replace the Tub Wear Pads quite easily. Getting to it was the challenge. Installing new wear pads and new suspension springs fixed the problem. Once I had the casing back together I replaced the agitator cam set as well. I figured as long as I already had it apart why not be proactive and fix the next to fail and boy am I glad I did. Once I had it out it just fell apart in my hands with the cams showing almost no ribs at all left to latch onto.
Other Parts Used:
Tub Spring Bracket, Spring Outer (L.F.) Suspension Spring Agitator Cam Kit Tub Wear Pads - Package of 3
  • Russell from WHEATON, IL
  • Difficulty Level:
    Difficult
  • Total Repair Time:
    1- 2 hours
  • Tools:
    Nutdriver, Pliers, Screw drivers, Socket set, Wrench (Adjustable)
3 of 3 people found this instruction helpful.
Was this instruction helpful to you?
Thank you for voting!
tub tilted forward. Some fill water would miss the tub
Removed cabinet found tub spring had worn thru rear frame, spring was also almost worn thru. Checked suspension springs very very worn at mounting points.
Ordered needed parts. All in Stock. First bracket came the next day took 5 days to get the rest 1 part at a time.
Forgot to order suspension spring clips, order them next day shipping came the next day .
Just because parts are in stock doesn't mean you will receive in a timely fashion if you need parts better order next day freight.
Videos, parts diagrams and instruction are great, regular freight is not good
Other Parts Used:
Tub Spring Suspension Spring Leveling Spring
  • Craig from HOLDREGE, NE
  • Difficulty Level:
    Very Easy
  • Total Repair Time:
    30 - 60 mins
  • Tools:
    Screw drivers, Socket set, Wrench set
3 of 4 people found this instruction helpful.
Was this instruction helpful to you?
Thank you for voting!
  • 1
Questions and Answers

We're sorry, but our Q&A experts are temporarily unavailable.
Please check back later if you still haven't found the answer you need.

Related Parts
Model Cross Reference
This part works with the following models:
PartSelect Number: PS11743348
Manufacturer Part Number: WP64067
Brand
Model Number
Description
Kenmore
10682872600
Washer - Kenmore Washing Machine Model 106.82872600 (10682872600, 106 82872600) Parts
Kenmore
11010202000
Washer
Kenmore
11010202001
Washer
Kenmore
1101050299
Washer - Kenmore Washing Machine Model 110.1050299 (1101050299, 110 1050299) Parts
Kenmore
11010502990
Washer
Kenmore
11010502991
Washer
Kenmore
11010852990
Washer
Kenmore
11010852991
Washer
Kenmore
11012202100
Washer
Kenmore
11012502100
Washer
Kenmore
11012852100
Washer
Kenmore
11013202200
Washer
Kenmore
11013212200
Washer
Kenmore
11014102300
Washer
Kenmore
11014112300
Washer
Kenmore
11014202300
Washer
Kenmore
11014212200
Washer
Kenmore
11014222300
Washer
Kenmore
11014502300
Washer
Kenmore
11014852300
Washer
Kenmore
11015732400
Washer
Kenmore
11015842400
Washer - Kenmore Washing Machine
Kenmore
11015852400
Washer
Kenmore
11015862400
Washer
Kenmore
11015864400
Washer
Kenmore
11015942400
Washer
Kenmore
11015942401
Washer
Kenmore
11015944400
Washer
Kenmore
11015944401
Washer
Kenmore
11015952400
Washer
Customer Service Representative

Get in touch, we're here to help!

Monday to Saturday
8am - 9pm EST

Contact Customer Service