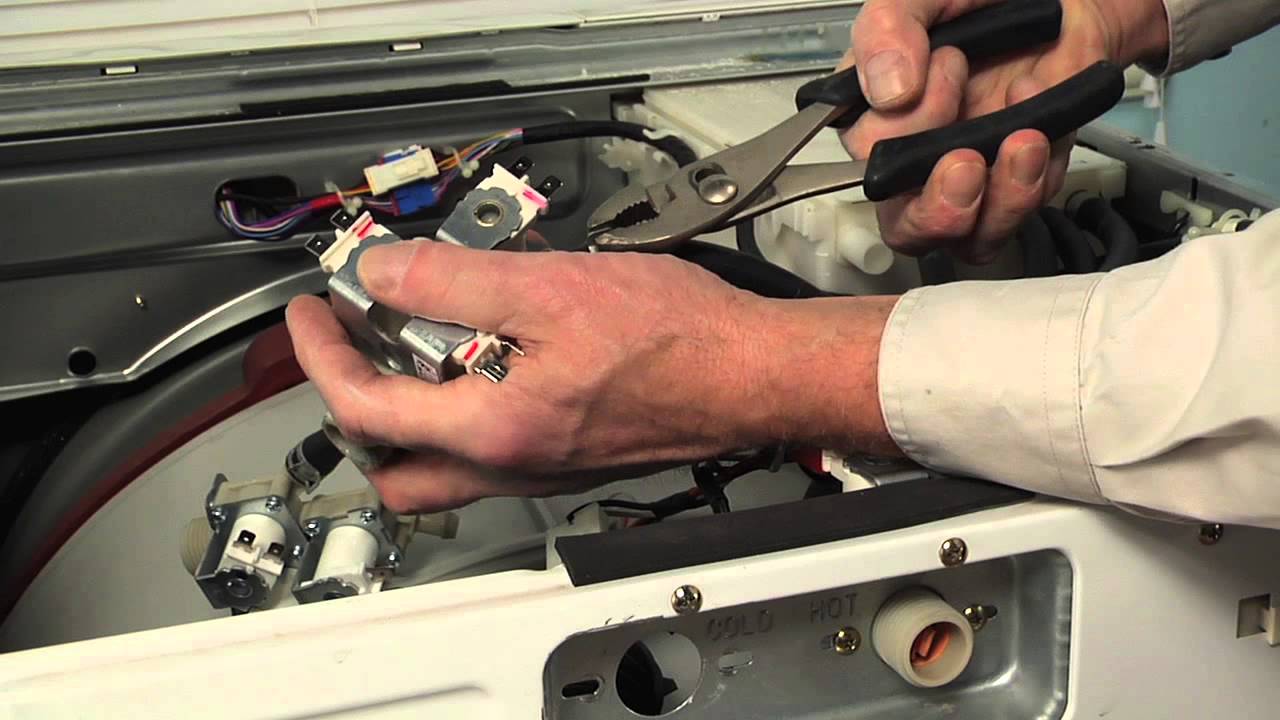
If your washer isn’t filling properly or skipping parts of the cycle, this water valve might be the issue. It controls cold water flow for the bleach dispenser and prewash cycles. The valve connects with a standard hose and has three outlets—two pointing to the right and one to the left—all at a 45-degree angle. It’s a genuine part and easy to install, but be sure to unplug your washer and turn off the water before starting.
Keep searches simple. Use keywords, e.g. "leaking", "pump", "broken" or "fit".
Sorry, we couldn't find any existing reviews that matched. Try using some different or simpler keywords.
★★★★★
★★★★★
Laurianne N - April 17, 2026
Verified Purchase
Inlet valve for a Samsung Washington machine
It was exactly the piece we needed and it resolved the problem we had with filling the washing machine.
It came in earlier than expected.
Thank you!
★★★★★
★★★★★
Matthew W - January 5, 2023
Verified Purchase
Part was perfect, easy fix
That part was the perfect replacement for the broken piece, and solved my washing machine issues.
★★★★★
★★★★★
Mike H - April 8, 2021
Verified Purchase
Worked perfect, easy to change, exactly the correct part.
I got the package, arrived a day early, installed next day and back up and running.
★★★★★
★★★★★
Trevor F - March 6, 2021
Verified Purchase
Super easy repair!
Video shown made it easy to troubleshoot the leak, and very easy to fix. Two tools needed, and no more than 15 minutes to complete the repair
★★★★★
★★★★★
Patricia P - August 29, 2021
Verified Purchase
Easy repair and worked as expected
Brand new part, easy and super fast shipping!! Second time we have purchased a part from your business and we will continue to always check you guys first! Thank you
★★★★★
★★★★★
Pleun D - June 21, 2025
Verified Purchase
No more water leak!
The part was in great condition and in perfect working order.
★★★★★
★★★★★
Robb S - February 11, 2022
Verified Purchase
Very Easy Repair
Part was shipped and received very quickly. Watched the video and made the repair very easy.
★★★★★
★★★★★
Hugo L - June 1, 2022
Verified Purchase
Right part, great video, all worked.
Was what I wanted, as advertised. Works great. Feels solid.
★★★★★
★★★★★
Nancy G - March 19, 2024
Verified Purchase
Just as promised!
The part was a perfect fit and my washer no longer collects water in the drum. The video link was an excellent step by step demonstration that aided in our repair. Thank you.
★★★★★
★★★★★
Richard C - September 26, 2020
Verified Purchase
Good quality and fast Delivery
Received in 2 days and had it up and running in 10 minutes.
< Prev
1
2
Next >
Customer Repair Stories
Average Repair Rating: 4.3 / 5.0, 28 reviews.
What's this?
< Prev
1
2
3
Next >
Sort by:
Search filter:
Clear Filter
Your search term must have 3 or more characters.
Keep searches simple. Use keywords, e.g. "leaking", "pump", "broken" or "fit".
Sorry, we couldn't find any existing installation instruction that matched.
Inlet valve leak
Followed directions on the video and went like a charm. Very impressed with service and video
Other Parts Used:
John from Northport, NY
Difficulty Level:
Really Easy
Total Repair Time:
30 - 60 mins
Tools:
Pliers, Screw drivers
34 of 37 peoplefound this instruction helpful.
Was this instruction helpful to you?
Thank you for voting!
Inlet valve was leaking
1 - Remove 3 electrical connections 2 - Slide spring clamp back an inch or so on 1 hose. Pull hose off of old unit. Attach the same hose to new unit and reclamp. 3 - Repeat with other 2 hoses 4 - Reconnect electrical connections
Other Parts Used:
Steven from MOBILE, AL
Difficulty Level:
Really Easy
Total Repair Time:
15 - 30 mins
Tools:
Pliers, Screw drivers
11 of 11 peoplefound this instruction helpful.
Was this instruction helpful to you?
Thank you for voting!
Water was filling the tub when washer was not in use.
I followed the video and my repair went just like the expert showed on the video. The hardest part was pulling the washer away from the wall and getting enough elbow room to be able to work on the washer. I will definitely come back to this site for my next appliance repair.
Very simple. Watched video. Pulled the washer out to get behind it. Turned off water supply, unplugged it. Unscrewed the screwesholding the top in place, slid top back, lifted it off. Used pliers to open the clamps holding the pipes to the valve - one at a time. And fitted the pipes to new valve, one at a time. SOME WATER REMAINS IN THESE PIPES, SO PUT A TOWEL UNDERNEATH TO CATCH IT. Removed the electrical connectors one at a time and fitted them to the new valve one at a time. Did same to the hot valve - not leaking but decided to replace it before it did leak. Reattached water supply hoses and electric plug. Tested the washer cycle to make sure no leaks. Put top back on and pushed washer back to wall. Apart from the testing, the whole job took 25 minutes. The parts arrived on Day 2 after the order. VERY PLEASED WITH EVERYTHING!
Water was leaking into washing machine after the washer was shut off
Removed the cover from the washing machine, the two valves(cold & hot) are located in the read top of the machine, removed the hoses to the valves, removed the nut that holds on the valve to the washer and placed new valve into washer and placed the nut back onto new valve, placed the hoses back onto the new valve.
Water was collecting in the machine after it finished its cycle.
Turned off hot and cold water supply. Pulled out machine and disconnected hoses, unplugged power.
Unscrewed 4 screws at back top of machine (holding plastic bracket to cover). Pulled out trays from front where detergent is poured, and removed small screws under trays.
Slid cover back and up. This was the only tricky part. There are pegs that must line up with large holes in cover before you can easily lift cover up. Helps to look from underneath and find pegs on each side.
Using pliers, fully open clamps holding hoses to the inlet valves, and carefully pull off hoses while keeping clamps open with pliers… making sure to keep track of which hose goes to each motor. Take a picture of electrical connectors noting color and sequence of connectors on each inlet valve motor. Pull all connectors off.
Unscrew screws holding each inlet valve to machine. Put new inlet valves in place of old, and screw in place. Reconnect hoses (using pliers to hold open clamps, then slide clamps over tubing and inlet valve connector). Reconnect electrical connectors carefulljng lining up colors of wires and sequence using picture taken in previous step.
Replace cover. Screw all screws back to secure cover. Replace trays.
First unplug the machine. Turn the water off to the hoses. Remove the hoses from the machine to make it easier. Remove the screws from the back of the top cover. Pry the front sides with a screwdriver and lift. Standing behind the machine on the left side you’ll see the three solenoids or inlet assembly. Remove the two screws so as to take the inlet assembly out. There are hoses attached to the assembly.
Other Parts Used:
Millie from MANORVILLE, NY
Difficulty Level:
Really Easy
Total Repair Time:
30 - 60 mins
Tools:
Pliers, Screw drivers, Wrench (Adjustable)
5 of 6 peoplefound this instruction helpful.
Was this instruction helpful to you?
Thank you for voting!
Hot & Cold Water Inlet Valves Leak
YouTube is your friend for many such repairs. See this link for an overall description:
https://www.youtube.com/watch?v=WuvLuC8x4_s
I had to remove the top panel to determine exactly which valve was leaking. It turned out both hot and cold-water valves were defective.
After unit is unplugged and top is removed, it's a simple matter to remove/replace hose connections and electrical connections. It took me less than an hour to complete the task once parts were in hand.
Again, YouTube is your friend for such repairs.
Other Parts Used:
Dennis from Prescott, AZ
Difficulty Level:
Really Easy
Total Repair Time:
30 - 60 mins
Tools:
Pliers
3 of 3 peoplefound this instruction helpful.
Was this instruction helpful to you?
Thank you for voting!
< Prev
1
2
3
Next >
Questions and Answers
Ask our experts a question about this part and we'll get back to you as soon as possible!
3 questions answered by our experts.
< Prev
1
Next >
Sort by:
Search filter:
Clear Filter
Your search term must have 3 or more characters.
Keep searches simple. Use keywords, e.g. "leaking", "pump", "broken" or "fit".
Sorry, we couldn't find any existing answers that matched.Try using some different or simpler keywords, or submit your new question by using the "Ask a Question" button above!
Caster
October 4, 2022
My washer is leaking from underneath, I took the back & top off, 1 the cold water value was wet and kind of corroded on the top. On that side of the washer water was on the side & in the bottom could this be my problem?
For model number WM2650HRA
Hello Caster, thank you for your question. We have researched your model and found that the issue is probably with the Inlet Valve Assembly, part number PS3527452. If you require assistance to place an order, please contact customer service. We hope that helps!
3 peoplefound this helpful.
Was this helpful?
Thank you for voting!
Gilda
September 6, 2021
Part f160 will it stop a leak at hose that leads from bleach dispenser to washer rinse spicket?
For model number Wm427ohwa
Hello Gilda, Thank you for your inquiry. The inlet valve is the part that pumps the water through the dispenser into the machine. We would recommend checking the hoses and connectors first for any cracks or damage. Hope this helps.
Do you sell the dome shaped wire mesh screens only for the water inlet connections at the back of the washer?
For model number WM2233HW
Hello Larry, thank you for your question! Yes, the water inlet valve screens for your model are part number PS3618281. If you need help placing an order, customer service is open 7 days a week!
This hot water inlet valve is designed to regulate water flow into the washing machine during operation. Featuring a standard hose fitting inlet and a single water outlet, it opens as needed to allow hot water into the a...
Affresh Washing Machine Cleaner includes three slow-dissolving tablets that help remove odor-causing residue from inside the washer. Suitable for all washer brands, including high-efficiency (HE) machines, the formula is...
Fresh Flow Produce Preserver is made for your refrigerator to help keep produce fresh for longer by absorbing the chemical, ethylene, that causes your fruits and vegetables to ripen quicker. Your produce could be fresh f...
Affresh dishwasher Cleaner is specially formulated to help remove limescale and mineral build-up that can be unsightly and could affect your dishwasher's performance. Each tablet is designed to clean inside your machine ...
Make your cooktop shine with Frigidaire ReadyClean Glass and Ceramic Cleaner. Our scratch-free, streak-free formula removes smudges, grease, burnt-on food, dirt and oil, while protecting and polishing to repel dust and d...