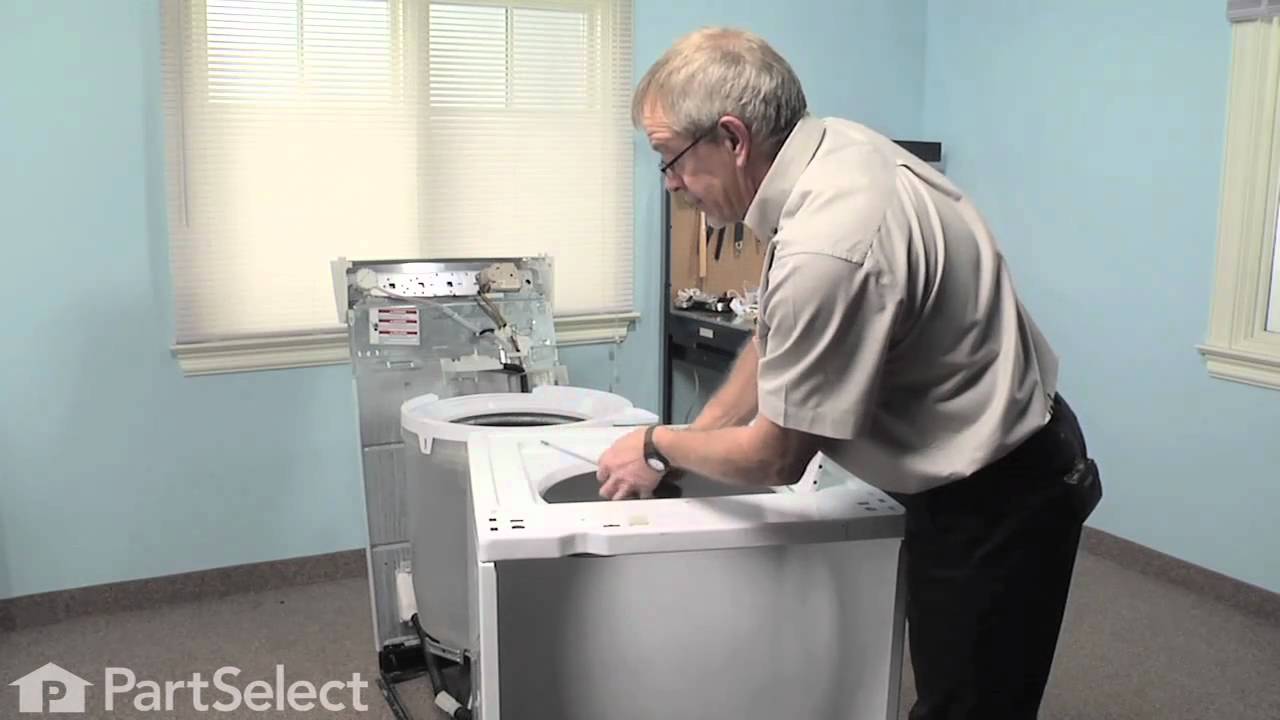
If your washer won’t start, spin, or drain, the lid switch might be the problem. This part makes sure the lid is closed before the machine runs. It’s a simple safety feature that keeps everything working smoothly. Just unplug your washer before installing, and check that it fits your model.
How Buying OEM Parts Can Save You Time and Money
Troubleshooting
This part fixes the following symptoms:
Will not drain | Will Not Start | Will not agitate | Spinning Issues
Keep searches simple. Use keywords, e.g. "leaking", "pump", "broken" or "fit".
Sorry, we couldn't find any existing reviews that matched. Try using some different or simpler keywords.
★★★★★
★★★★★
Denis B - August 30, 2019
Verified Purchase
Top o the line. PatSelect number one!
Lightning fast shipping. My 26 year old Kenmore was back in operation in 20 minutes.
★★★★★
★★★★★
MICHAEL E - September 10, 2021
Verified Purchase
It was the right one! A miracle!
The part was perfect, the time you took to ship it out was great! (right on it) Unfortunately it took 14 days for Purolator to deliver it! Canada post is better!
★★★★★
★★★★★
James S - August 23, 2020
Verified Purchase
Lid switch assembly easy replacement.
Replacement as easy to do with the aid of the on-line video. Service was fast and simple.
★★★★★
★★★★★
Jeanguy B - April 22, 2020
Verified Purchase
Lid Switch Assembly replacement
Excellent service!
★★★★★
★★★★★
Denis F - February 13, 2020
Verified Purchase
Lid Switch
It was the right part and it worked out good.
★★★★★
★★★★★
Robyn K - July 20, 2022
Verified Purchase
It was exactly what I needed!
I have zero experience fixing a washing machine but when mine stopped working I used google to figure out what was wrong and what I needed to do to fix it. The part came in perfect condition and 1 day earlier than expected. I was able to install it myself with the help of YouTube and catch up on my laundry! I would definitely order from here again. Thank you!
★★★★★
★★★★★
Tracey W - August 12, 2020
Verified Purchase
Perfect fit
This was the exact same part as i needed
★★★★★
★★★★★
Mike B - January 14, 2021
Verified Purchase
Fast repair with your parts.
The parts were were easy to install. I will get all my parts from them. They ship fast.
★★★★★
★★★★★
STEVE K - February 11, 2021
Verified Purchase
Perfect match
The switch was a perfect match and it arrived only 3 days after I ordered it. Thanks.
★★★★★
★★★★★
Cam M - May 7, 2019
Verified Purchase
lid switch
Good service and prompt delivery. The switch is not installed yet but looks identical.
< Prev
1
2
Next >
Customer Repair Stories
Average Repair Rating: 3.4 / 5.0, 37 reviews.
What's this?
< Prev
1
2
3
Next >
Sort by:
Search filter:
Clear Filter
Your search term must have 3 or more characters.
Keep searches simple. Use keywords, e.g. "leaking", "pump", "broken" or "fit".
Sorry, we couldn't find any existing installation instruction that matched.
Washing Machine kept cutting off mid-cycle
I had to remove the washing machine from the laundry room (our laundry room is pretty small).
I read the do-it-yourself explanation posted by Paul From Glendale CA and followed his instructions.
1. Unplugged the Washer and disconnected the hoses, so I could slide the washer into the kitchen.
2- Unfastened the two screws in the front lower corners of the controls panel and tilted is back. Unfastened the old lid-switch wiring from the control panel.
3. Remove the clips at the two corners under the control panel. I rotated the cover forward to clear it from the back and lifted it off and set it off to the side.
4. While I had the Washer disassembled I vacuumed out all the accumulation of dust, etc.
5. Removed the lid switch and unfastened the ground wire.
6. Installed the new switch and reassembled the Washer.
7. I did not read Paul's reassembly instructions closely enough. The front flange of the cover goes UNDER the steel frame on the washer. I spent 30 minutes trying to get the cover on, then finally figured that out on my own. Once I got the flange under the frame, it took about five minutes to get the cover on, the clips in and the control panel back into positions and reassembled.
The entire process is not particularly difficult. Had I read the "UNDER the frame" part earlier, the entire repair would have taken no more than 45 minutes.
Having another person to help reinstall the cover would be helpful. The cover is not heavy but it is a little awkward to handle and having another person to help line up the back cover, etc. will make the reassembly even easier.
Lid switch broke off (plastic housing broke in half at the screws). This definitely gets easier after doing it just once. Took me a while to figure out I needed to pop off the plastic caps on the sides of the top control panel, to expose the two screws that others mention. Remove the two screws, lay the control panel forward exposing the two metal clips on top holding the cabinet in place. Unhook the clips, voila. The plastic connector of the replacement switch didn't exactly match the old one so I cut and splice (wire nuts and tape). Cleaned everything well while I had it all apart. If I ever have to do this again, it should take a fraction of the time.
Other Parts Used:
Bart from Houston, TX
Difficulty Level:
A Bit Difficult
Total Repair Time:
30 - 60 mins
Tools:
Nutdriver, Screw drivers
38 of 45 peoplefound this instruction helpful.
Was this instruction helpful to you?
Thank you for voting!
Lid Switch
Removed all screws to electronic knob panel, unplugged lid switch from panel. Removed washer surround and unclipped wires. Since I had the surround removed, I was able to view the washer drum. Decided to remove all tub clips and clean tub and removed all built up soap and lint. Did the reverse and re-clipped, rescrewed and put surround back together. Hardest problem was putting the washer surround back on the tub. I'm not an extremely strong woman - but did it just the same. Neglected to advise I'm unemployed and recently had a quadrouple bypass. Needed to save money, Sears quoted me $300.00 to fix the machine. No way would I pay that amount of money so I did it myself. Thank you very much!
Other Parts Used:
Diane from South Windsor, CT
Difficulty Level:
Easy
Total Repair Time:
1- 2 hours
Tools:
Pliers, Screw drivers
25 of 28 peoplefound this instruction helpful.
Was this instruction helpful to you?
Thank you for voting!
would not change steps during washing cycle
1. unplug washer 2. move washer out from wall. 3. remove 4 screws that hold control panel; 2 screws on face and 2 screws an back 4. lift control panel to reach plug for lid switch and unplug old switch 5. open lid and remove 2 screws that hold lid switch on top opening; remove nut that holds ground wire from lid switch 6. remove old lid switch 7. new lid switch needs to be modified to fit in position,i.e. break tube surrounding wires of lid switch to be 1/2 length. 8. plug in new switch at control panel 9. screw in lid switch at lid opening and reattach ground wire. 10. screw control panel in place
Other Parts Used:
Timothy from St. Petersburg, FL
Difficulty Level:
Really Easy
Total Repair Time:
30 - 60 mins
Tools:
Pliers, Screw drivers
15 of 20 peoplefound this instruction helpful.
Was this instruction helpful to you?
Thank you for voting!
Lid Switch failed
I didn't think this would be particularly difficult but it was easier than I expected.
UNPLUG THE MACHINE
Remove the two screws (one on the right , one on the left) That allows the control panel to swing up.
Lift the panel up. There is a plastic wiring connector that is secured in the top of the washer housing. Press the sides of the top of the connector and remove the top connector. (The bottom part of the connector will still be secured to the housing)
There will be two clamps one on the right side under the control panel, and one on the right. Use a screwdriver to pop out these clamps. This is where I used the washcloth to place between the screwdriver and the washing machine body to avoid scratching the surface.
Once you pop out these clamps, the housing is free from the tub frame. Twist the housing just a little and tilt it forward. IT will just slide off the frame. You can now take the housing wherever you want to more easily get to the switch. It is mounted in the housing. Take a good look at the way the switch is mounted and the wiring tube is secured because you will need to at least have an idea how to put it back into place.
There will be two clips that hold the wiring tube in place. One on the side and one on the top. Use a screwdriver (and the washcloth if necessary) to loosen and remove the clips.
There are two screws that hold the switch to the housing. Remove these and keep the screws. You will need them to attach the new switch.
Now the only thing keeping you from removing the switch is the connector which you saw earlier before removing the housing. Squeeze the sides of the clip and free it from the housing.
Mount the new switch into the housing and route the wiring. You may have to use a small pair of pliers to squeeze the clips back together to hold the wiring tube to the housing. Attach the green ground wire to the housing frame just like the one you removed to get the wring tube off the housing.
Push the connector end through the hole designed for it until it snaps into place.
Replacing the Housing back on the frame: Let the housing all the way down, and slide the front lip of the housing UNDER the front brace of the tub frame. Carefully let the housing lower onto the side rails (the housing will go on TOP of the side rails). You may have to gently twist the housing to let it fall into the proper place. Take the clips and secure the housing back to the tub frame. These just POP back into place with applied pressure. Re-connect the lid switch to the control panel wiring connector. Swing the control panel back down into place and replace the screws on the left and right sides.
PLUG IN THE MACHINE
Viola!! You are ready to perform your favorite laundry task.(Yeah RIGHT!!) Or just yell "HONEY the washing machine is ready for you." Anyway, after the swelling in your eyes go down you will see that your washer is ready to use.
This took me about 40 minutes but some of that time was spent understanding just what to do. With these instructions, you may be able to do it in 30 minutes.
I hope this helps you. Kudos to the Whirlpool Engineers who made this machine easy to work on. This is the 3rd repair I have done on mine. (Rebuilt the agitator drive and replaced the timer) For 18 years of use.. that ain't bad. I think it is good for another 5 years at least. Total cost for this repair: Part=$37, Shipping=$7, Time spent=40 minutes. Not bad considering a serviceman is going to charge $90 labor for the first hour plus parts.
Other Parts Used:
David from Roanoke, VA
Difficulty Level:
Easy
Total Repair Time:
30 - 60 mins
Tools:
Pliers, Screw drivers
13 of 17 peoplefound this instruction helpful.
Was this instruction helpful to you?
Thank you for voting!
Plastic holding the Lid Switch screws broke
Removed the 2 screws holding the control panel. Tilt the control panel back to expose the spring clips. Disconnected the Lid Switch Harness plug from the control panel. Pry out the 2 spring clips, each located on either side of the top of the cabinet. Openned top lid, placed one hand into the lid openning and pulled the cabinet forward. Disconnected ground wire. Installed new switch while cabinet was off. Reconnected Harness connector after re-installing the cabinet.
Other Parts Used:
Ronald from North Brunswick, NJ
Difficulty Level:
Easy
Total Repair Time:
15 - 30 mins
Tools:
Screw drivers
11 of 13 peoplefound this instruction helpful.
Was this instruction helpful to you?
Thank you for voting!
Wouldn’t switch cycles
Unplug the washing machine. Remove screws from the washing machine control console and lift it up. Then removed medal springs that connect the back of the washing machine to the cabinet. Then removed the cabinet about 3/4 of an inch forward. Then unscrew the old Lid Switch Assembly and put in the new one. Then slide the cabinet back on the washer and screw it back together and replug it and it worked.
Other Parts Used:
Vandyke from Harvey, LA
Difficulty Level:
Easy
Total Repair Time:
15 - 30 mins
Tools:
Screw drivers
7 of 8 peoplefound this instruction helpful.
Was this instruction helpful to you?
Thank you for voting!
washer kept stopping - had to hit lid
first I had to work in a closet, so couldn't get body off, just the back. The part removed and replaced really easy. Dropped a socket and a clip, had to get my reacher to get them. Difficulty was in getting the back, back on. Now everything works just fine and all the laundry is almost done.
Other Parts Used:
Nancy from Montgomery City, MO
Difficulty Level:
A Bit Difficult
Total Repair Time:
30 - 60 mins
Tools:
Nutdriver, Pliers, Screw drivers
7 of 9 peoplefound this instruction helpful.
Was this instruction helpful to you?
Thank you for voting!
Lid Switch Case was Broken and would not hold screws. Not draining or spinning.
I watched a youtube video made by the site on how to replace the lid switch assembly. It showed you exactly how to do this repair. Without watching the video, it would probably have stumped me. After watching the video a couple of times, it was really pretty easy to do. The timer on our washer also needed replacing. I followed the instructions by Joe from Covington, GA. That repair was really easy. Thanks, Joe, for the easy to follow, complete instructions.
Other Parts Used:
Michael from ATASCADERO, CA
Difficulty Level:
Really Easy
Total Repair Time:
30 - 60 mins
Tools:
Screw drivers
4 of 4 peoplefound this instruction helpful.
Was this instruction helpful to you?
Thank you for voting!
Woudn't spin when on the spin cycle and or drain.
First thing I did was remove the 2 phillip head screws from the lid switch control inside under the lid, then I removed 2 phillip head screws on the control panel, one the bottom far right corner of the controls and one on the far left corner. After removing the screws I removed the 2 other Phillips head screws from the back that held the remaining of the switch control panel. These also hold 2 small white hinges of some sort. After removing the switch controls by wiggling it a bit (which its good to do very gently since there are still wires attach inside). After I moved the switch on top of the lid I detach/ unplugged a plug that was connected to the metal which gives the power that goes to the lid switch. After removing the lid plug the first half of the plug remains on the top the bottom half is the one you have to press down to remove it. After the bottom half is press down and out of that space there are too metal clips on the corner of the each side of the washing machine with the same screw driver I unclipped it by putting it under the metal clip and lift it out, same goes for the other side. Once these are removed the metal casing can be moved towards you so you can have access under the lid, make sure you tape the lid so it does wack you in the head or have some one hold it for you. Once you have access to it, you can remove the the remaing wire attached, if it seems stuck it means you have metal clips holding the plastic down you can unclip them pushing them out towards you. Once removed final step is to remove the screw that had the ground wire, also a phillips head screw, remove the old lid switch and replace with new one, make sure you first break the plastic apart as the old one was. Screw back the 2 screws that hold lid switch back one and then do the ground wire or which ever you find easier to do first. Then put everything back exactly how you took apart. I was able to do this in less that 15 min.
Other Parts Used:
Javier from North Providence, RI
Difficulty Level:
Really Easy
Total Repair Time:
Less than 15 mins
Tools:
Screw drivers
4 of 7 peoplefound this instruction helpful.
Was this instruction helpful to you?
Thank you for voting!
< Prev
1
2
3
Next >
Questions and Answers
Ask our experts a question about this part and we'll get back to you as soon as possible!
16 questions answered by our experts.
< Prev
1
2
Next >
Sort by:
Search filter:
Clear Filter
Your search term must have 3 or more characters.
Keep searches simple. Use keywords, e.g. "leaking", "pump", "broken" or "fit".
Sorry, we couldn't find any existing answers that matched.Try using some different or simpler keywords, or submit your new question by using the "Ask a Question" button above!
Beverly
September 7, 2017
How do i remove the lid assembly switch ?
For model number L SR7233BWI
Hello Beverly, thank you for contacting us. We have a video that shows how to remove and install the lid switch, you can follow the link below, hope this helps!
https://www.youtube.com/watch?v=pbQU-NlkHcw
14 peoplefound this helpful.
Was this helpful?
Thank you for voting!
Selena
July 20, 2017
Is this the same as the door strike/ interlock assembly?
For model number 11092588210
Hi Selena, great question! They are two separate parts that function together, this is the lid switch assembly. The door strike for this model, which activates the switch, is known as a lid switch actuator assembly. Part number 350733 is compatible with the model number you provided. I hope this helps!
9 peoplefound this helpful.
Was this helpful?
Thank you for voting!
James
November 27, 2017
Will that fit my washer what is the part number for that model number
For model number AL4132VL1
Hi James,
Thank you for your inquiry. Yes, this lid switch is listed under your model number and it will work with your appliance. I hope this helps. Thank you and have a great day!
3 peoplefound this helpful.
Was this helpful?
Thank you for voting!
Chester Welch
January 28, 2019
Please provide installation instructions for a lid safety switch....thanks, Chester !
For model number 92581210
Hello Chester, thank you for contacting us. We have a video that shows how to remove and install the lid switch, you can follow the link below, hope this helps! https://www.youtube.com/watch?v=pbQU-NlkHcw
3 peoplefound this helpful.
Was this helpful?
Thank you for voting!
Earnestine
February 7, 2019
Hi, washer will not start when the door is closed. What part do i need to replace it.?
For model number 11091521210
Hello Earnestine, Thank you for your question! I suggest checking the following parts: PS334600 Lid Switch Assembly, PS1485646 Direct Drive Motor Coupling, and PS347797. Good luck with your repair!
2 peoplefound this helpful.
Was this helpful?
Thank you for voting!
Dave
November 28, 2017
Will this lid switch work in my machine?
For model number LLR6144BW0
Hi Dave,
Thank you for your question. Yes, this part works with your appliance. I hope that helps. Good luck with your repair.
2 peoplefound this helpful.
Was this helpful?
Thank you for voting!
Arlene
March 7, 2018
Where do I find the model/part number? Thank you
Hi Arlene, Thank you for the question. Please see the link below for help locating the appliance model number. Hope this helps!
https://www.partselect.com/Model-Number-Locator+11+repair.htm
2 peoplefound this helpful.
Was this helpful?
Thank you for voting!
Matthew
December 18, 2017
Do replacement part fit all washers. I need a Kenmore 90 series washer lid switch they inter change able mod.# 110.20922 990 ser.# ck 3928819 type 111
For model number 110.20922990
Hello Matthew, Thank you for your inquiry. We do so that this part will fit multiple models, but the one that was specifically for the model number 110.20922990 is part# WP3949238. Hope this helps!
1 personfound this helpful.
Was this helpful?
Thank you for voting!
Alejandra
April 15, 2019
Is it compatible with my washer mod WTW8040DW0?
For model number WTW8040DW0
Hello Alejandra, thank you for your question. Our system does not show that this part will work on your model. For your model you will need Lid Lock Assembly part PS11722981.
1 personfound this helpful.
Was this helpful?
Thank you for voting!
Rick
May 13, 2019
What is the exact part number for the lid acuator and lid latch?
For model number 11021102013
Hello Rick, Thank you for contacting us. I have researched the model you have provided and have found the part you are looking for is PartSelect Number PS11750882 for the Lid Latch Strike/Actuator and PartSelect Number PS3497627 for the Lid Latch Assembly. Thank you for your inquiry, good luck with this repair!
Fresh Flow Produce Preserver is made for your refrigerator to help keep produce fresh for longer by absorbing the chemical, ethylene, that causes your fruits and vegetables to ripen quicker. Your produce could be fresh f...
Having a problem with a funky-smelling washing machine, or one that just doesnt seem to clean your clothes as well as it used to? Say hello to the Affresh Washing Machine Cleaner by Whirlpool. This powerful washing helpe...
Affresh dishwasher Cleaner is specially formulated to help remove limescale and mineral build-up that can be unsightly and could affect your dishwasher's performance. Each tablet is designed to clean inside your machine ...
Make your cooktop shine with Frigidaire ReadyClean Glass and Ceramic Cleaner. Our scratch-free, streak-free formula removes smudges, grease, burnt-on food, dirt and oil, while protecting and polishing to repel dust and d...