

Get in touch, we're here to help!
1-866-883-8386
Monday to Saturday
8am - 8pm EST
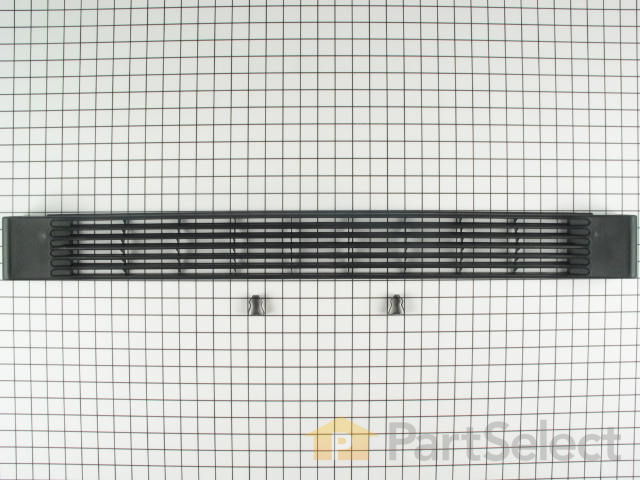
Kickplate Grille Kit R0131553
Fits your SB520SW!
Rated by 2 customers
Easy
15 - 30 mins
Ratings submitted by customers like you who bought this part.
$73.03
Special Order
Fits your SB520SW!
PartSelect Number
PS1725277
Manufacturer Part Number
R0131553
Manufactured by
Whirlpool
Product Description
Kickplate Grille Kit Specifications
This black refrigerator kick plate grille comes with the attaching grille clips.
How Buying OEM Parts Can Save You Time and Money
Troubleshooting
This part works with the following products:
Refrigerator.
This part works with the following products:
Amana, Kenmore, KitchenAid, Whirlpool.
Part# R0131553 replaces these:
AP4246824, 900731, 10470301, 10470308, 10470320, 10810903, 12321806, 12321806Q, 12321813, 12321813Q, 4343607, R0131553
Customer Repair Stories
Average Repair Rating: 3.6 / 5.0, 2 reviews.
What's this?
- < Prev
- 1
- Next >
Sort by:
Search filter:
Clear Filter
Your search term must have 3 or more characters.
Keep searches simple. Use keywords, e.g. "leaking", "pump", "broken" or "fit".
Sorry, we couldn't find any existing installation instruction that matched.
Ice maker tray would overfill tray and create large clumps of ice.
Repair Refrigerator Kick Plate Grill:
No tools were required. I removed old grill with hands. I attached two clips to new grill, and re-installed the new grill. (less than 5 minutes very easy)
Repair Crushed Ice Bucket:
You will need sockets or nut driver. Remove the Ice crusher dispenser and metal rod from the existing unit. You will then re-install with the new Ice Bucket. There were two scews that held the front cover. You will need to remove four screws to remove the ice crusher mechanism and re-install with new bucket. (10 minutes to replace)
Repair Ice Maker Assembly:
I removed the plastic cap on the top left edged of the ice maker. You will need to use your existing cap with the replacement unit. I then loosened the top two screws on the ice maker assembly. You do not need to remove the top two screws. There is one screw on the bottom that will need to be removed. This will allow you to get to the wiring harness. I pulled out the white tube that fills the ice maker with water. I then used a small bucket to pour existing water out of the ice maker. I used a small screw driver to depess the clip on the wiring harness. You can not pull out the wiring harnes unless the plastic clip is depressed. The new ice maker assembly did not have the same type of water line attachment. It looks like it is made for different assemblys. For my water tube, I noticed a notched area on the new unit that could be cut out to work like my existing unit did for the water line. I used a box knife to cut out the notched area. On the new water tray, there was a hole in the side that my existing unit did not have. It does not affect the installation of the water tube. I installed the new ice maker assembly by attaching the wiring harness. Installed the bottom screw using my original bracket instead of the new bracket that came with the new unit. Tightened the top screws and bottom screw. Attached the water tube to the ice maker assembly. Attached plastic cap between the refrigerator wall and left side of the ice maker assembly. (15 minutes)
No tools were required. I removed old grill with hands. I attached two clips to new grill, and re-installed the new grill. (less than 5 minutes very easy)
Repair Crushed Ice Bucket:
You will need sockets or nut driver. Remove the Ice crusher dispenser and metal rod from the existing unit. You will then re-install with the new Ice Bucket. There were two scews that held the front cover. You will need to remove four screws to remove the ice crusher mechanism and re-install with new bucket. (10 minutes to replace)
Repair Ice Maker Assembly:
I removed the plastic cap on the top left edged of the ice maker. You will need to use your existing cap with the replacement unit. I then loosened the top two screws on the ice maker assembly. You do not need to remove the top two screws. There is one screw on the bottom that will need to be removed. This will allow you to get to the wiring harness. I pulled out the white tube that fills the ice maker with water. I then used a small bucket to pour existing water out of the ice maker. I used a small screw driver to depess the clip on the wiring harness. You can not pull out the wiring harnes unless the plastic clip is depressed. The new ice maker assembly did not have the same type of water line attachment. It looks like it is made for different assemblys. For my water tube, I noticed a notched area on the new unit that could be cut out to work like my existing unit did for the water line. I used a box knife to cut out the notched area. On the new water tray, there was a hole in the side that my existing unit did not have. It does not affect the installation of the water tube. I installed the new ice maker assembly by attaching the wiring harness. Installed the bottom screw using my original bracket instead of the new bracket that came with the new unit. Tightened the top screws and bottom screw. Attached the water tube to the ice maker assembly. Attached plastic cap between the refrigerator wall and left side of the ice maker assembly. (15 minutes)
Other Parts Used:
-
Billy from Edmond, OK
-
Difficulty Level:Easy
-
Total Repair Time:15 - 30 mins
-
Tools:Nutdriver, Screw drivers, Socket set
7 of 10 people
found this instruction helpful.
Was this instruction helpful to you?
Thank you for voting!
replace the kick plate on refigerator
Had to get the clips onto the plastic knob, which once done the clip would go in the hole which held the kick plate on, had a problem getting the clips on, no directions, finally h
I held the clips closed and hit them with a hammer and they went right on. I was afraid that I would break the knob where the clip went which had happen and is why I needed a new kick plate. A short description of how to do this would had been very helpful.
Other Parts Used:
-
Timothy from Liverpool, NY
-
Difficulty Level:A Bit Difficult
-
Total Repair Time:15 - 30 mins
4 of 7 people
found this instruction helpful.
Was this instruction helpful to you?
Thank you for voting!
- < Prev
- 1
- Next >
Questions and Answers
Be the first to ask our experts a question about this part!
✖
Ask a Question
Ask our experts a question on this part and we'll respond as soon as we can.
Sorry, we couldn't find a match for "".
Here's a guide for finding your model number.
Something went wrong. Please try again later.
Your Question Has Been Submitted!
Our experts will send you an email as soon as your question has been answered.
Related Parts
Produce Preserver Filter
$34.95
PartSelect Number: PS3503014
Fresh Flow Produce Preserver is made for your refrigerator to help keep produce fresh for longer by absorbing the chemical, ethylene, that causes your fruits and vegetables to ripen quicker. Your produce could be fresh f...
Affresh Washing Machine Cleaner - 3 pack
$25.31
PartSelect Number: PS1960673
Having a problem with a funky-smelling washing machine, or one that just doesnt seem to clean your clothes as well as it used to? Say hello to the Affresh Washing Machine Cleaner by Whirlpool. This powerful washing helpe...
Affresh Dishwasher Cleaner Tablets - 6
$27.95
PartSelect Number: PS12345667
Affresh dishwasher Cleaner is specially formulated to help remove limescale and mineral build-up that can be unsightly and could affect your dishwasher's performance. Each tablet is designed to clean inside your machine ...
Refrigerator Deodorizer
$35.15
PartSelect Number: PS12739141
Refrigerator deodorizers help to reduce bacteria growth and therefore reduce smells and extend the life of food.
Cooktop Cleaning Cream
$35.95
PartSelect Number: PS12717774
Make your cooktop shine with Frigidaire ReadyClean Glass and Ceramic Cleaner. Our scratch-free, streak-free formula removes smudges, grease, burnt-on food, dirt and oil, while protecting and polishing to repel dust and d...
Model Cross Reference
This part works with the following models:
PartSelect Number: PS1725277
Manufacturer Part Number: R0131553
Brand
Model Number
Description
Kenmore
56957085791
Refrigerator
- Kenmore Refrigerator Model 569.57085791 (56957085791, 569 57085791) Parts
Kenmore
56957087791
Refrigerator
- Kenmore Refrigerator Model 569.57087791 (56957087791, 569 57087791) Parts
Kenmore
56957089791
Refrigerator
- Kenmore Refrigerator Model 569.57089791 (56957089791, 569 57089791) Parts
Kenmore
56959082791
Refrigerator
- Kenmore Refrigerator Model 569.59082791 (56959082791, 569 59082791) Parts
Get in touch, we're here to help!
1-866-883-8386
Monday to Saturday
8am - 8pm EST
[{"position":0,"name":"Home","title":"Home","url":"/"},{"position":1,"name":"Grate","title":"Grate","url":"/Refrigerator-Grates.htm"},{"position":2,"name":"R0131553","title":"R0131553","url":""}]