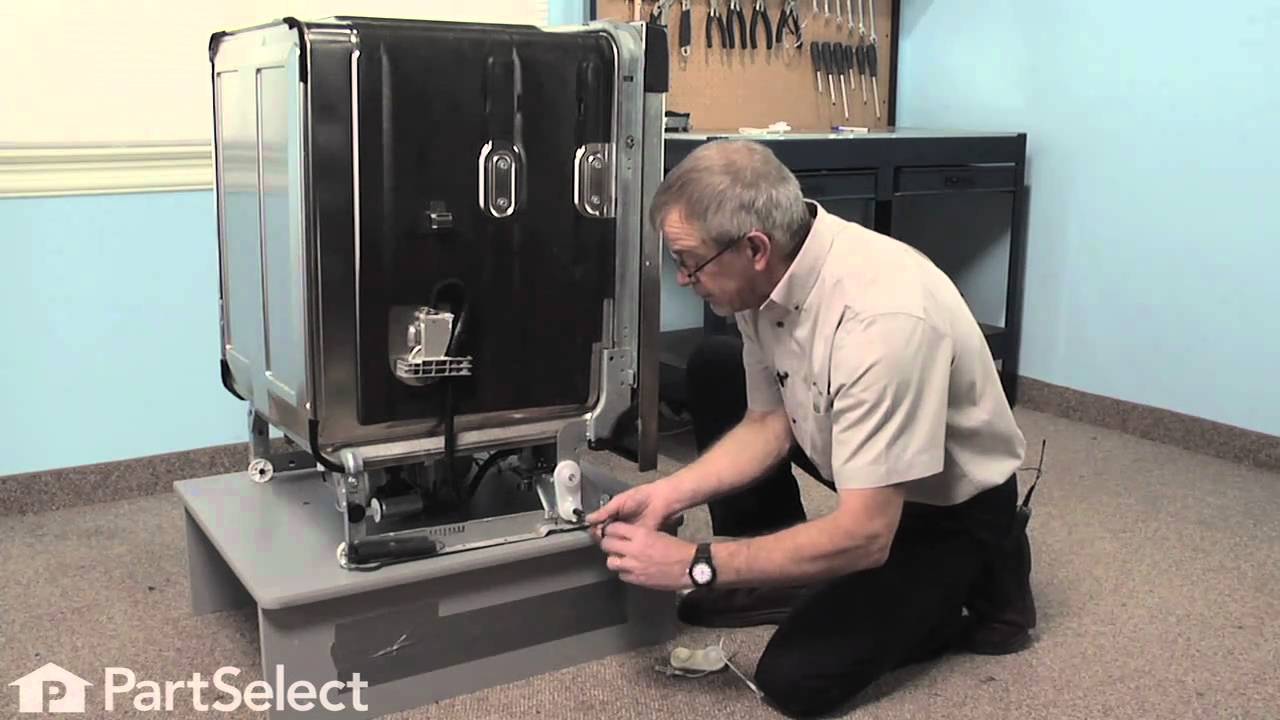
This dishwasher door spring is sold individually. It is recommended if you are replacing one side, to replace both.
How Buying OEM Parts Can Save You Time and Money
Troubleshooting
This part fixes the following symptoms:
Door latch failure | Door won’t close | Noisy
This part works with the following products:
Dishwasher.
This part works with the following products:
KitchenAid, Kenmore, Whirlpool, Maytag.
Part# WP8270020 replaces these:
AP6012319, 8270020
Customer Reviews
Average Rating:
★★★★★
★★★★★
5 Reviews
4.4
Filter By Rating:
5 Stars
2
4 Stars
3
3 Stars
0
2 Stars
0
1 Star
0
< Prev
1
Next >
Sort by:
Search filter:
Clear Filter
Your search term must have 3 or more characters.
Keep searches simple. Use keywords, e.g. "leaking", "pump", "broken" or "fit".
Sorry, we couldn't find any existing reviews that matched. Try using some different or simpler keywords.
★★★★★
★★★★★
Blais F - July 25, 2018
Verified Purchase
Door spring as the original one
Easy to repair by yourself
★★★★★
★★★★★
Brian F - August 20, 2021
Verified Purchase
Perfect match
Exactly what I needed and easy to install.
★★★★★
★★★★★
Malcolm G - January 31, 2019
Verified Purchase
Spring repair
Part received quickly and in good condition. Helpful video, too!
★★★★★
★★★★★
Mark J - July 1, 2021
Verified Purchase
Spring for dishwasher
The part was exact fit and delivery was good. The only complaint I have is that the part was extremely overpriced - $50.
★★★★★
★★★★★
Lawrence S - February 3, 2021
Verified Purchase
Wrong part ordered - pull dishwasher out before ordering.
Part needed was connecting plastic roller and cord which attached to this part. According to our plumber spring rarely breaks - it is the connecting part that hooks on to the spring that breaks. Can’t see which part is needed until dishwasher pulled out from under counter and we assumed it was the spring when door dropped. We then bought the connecting part and then replaced the springs at the same time just because we had them. We got what we ordered and were happy with the service - just ordered the wrong part initially.
< Prev
1
Next >
Customer Repair Stories
Average Repair Rating: 4.1 / 5.0, 10 reviews.
What's this?
< Prev
1
Next >
Sort by:
Search filter:
Clear Filter
Your search term must have 3 or more characters.
Keep searches simple. Use keywords, e.g. "leaking", "pump", "broken" or "fit".
Sorry, we couldn't find any existing installation instruction that matched.
The Door Just Falls Down
After unscrewing the dishwasher, I pulled out the washer, I saw that the springs were attached just by strings that were broken... I just used the strings from an old lanyard, retied everything, and did not need the springs! works well!
Other Parts Used:
Neil from Winchester, VA
Difficulty Level:
Easy
Total Repair Time:
15 - 30 mins
Tools:
Nutdriver, Screw drivers
53 of 85 peoplefound this instruction helpful.
Was this instruction helpful to you?
Thank you for voting!
Kids loved to make squeaky sounds opening and closing the doors, finally snapped the door balance link on one side.
1) clear out the dishwasher 2) remove unit securing screws from top or sides of DW and cabinetry near the top or under the counter top 3) gently pull the dishwasher from the cabinetry about 20" is plenty, mind the connecting hoses and electrical connection 4) close the door! pull back the insulation from the area of the hinge and photograph both sides - this will save you the pain of going online 5) you will see the cord, the tensioning wheel assembly and the door balance spring on both sides 6) with the door closed to relieve tension on the cord, remove the cord from the balance spring - this can be done w/o tools at this point 7) remove the 5/16" screw from the plastic tensioning wheels and remove the tensioners, cord - leave the springs in place if not replacing them 8) install the door end of the cord to its hook on the hinge, install the new tensioning wheel assembly, install the old 5/16" self tapping screw through the lower wheel and into the outer hole in the frame 9) thread the cord from the door over the upper wheel and lower wheel. the lower wheel has cord retaining tabs to hold the cord on the assembly 10) hook the eye end of the cord to the balance spring and you are finished with the first side - repeat operations for the other side, reposition the insulation and slide the washer back in its cavity - do not forget to reinstall the stabilizing screws in the upper washer frame 11) you've done it! 12) have a cuppa and do your second washer that hasn't failed yet - it will soon.
Remove 2 screws on lower baseplate. Remove 2 screws that hold dishwasher inside cabinet( may be attached to counter top or side cabinets). Turn off water supply to dishwasher. Remove any connections such as water supply, electrical connection, or waste water line that prevent dishwasher from being pulled out about 3/4 of the way. With the dishwasher door closed, remove broken parts and replace with new parts. Pull on spring to make final connection of nylon cable. Reverse the above instructions for re-installing the machine.
Remove the mounting screws that hold the dishwasher under the counter top. Remove dust cover plates at the bottom of the machine. The machine will have to be pulled out, so turn off the water to the machine. Usually under the kitchen sink. Disconnect water supply and push it out of the way so the dishwasher can be pulled out. Pull machine out enough so you have access to the door cables and springs. The door will have to be in the closed(up) position to do the repair. Usually only one side is broken. Start with the broken side and copy the working side when installing new parts. Then repair the working side. To get the working side apart just pull on the spring and disconnect it from the cable. Do the reverse to reinstall.
Other Parts Used:
Peter from JERICHO, NY
Difficulty Level:
Easy
Total Repair Time:
15 - 30 mins
Tools:
Screw drivers, Socket set, Wrench (Adjustable)
6 of 8 peoplefound this instruction helpful.
Was this instruction helpful to you?
Thank you for voting!
Door just fell down
Hardest part was pulling dishwasher away from cabinet, making sure to not disturb water and drain line. I replaced both door springs which are on the two sides and attached to the dishwasher frame towards the back. This necessiatated pulling the dishwasher about 2/3 out of cabinet. After attaching both springs to frame, replacing the balance kit was a breeze .One screw to remove and then replace with new pulley unit. Attach the supplied cord with attached fittings to spring and then around two pulleys and mounting point on frame. Done . Push dishwasher back into cabinet, reattach two screws to underside of counter. Probably did not require new springs as they seem heavy duty and were not broken upon examination but ordered them also and replaced just in case. Most problem would be with broken cord in balance link kit
pulled the dishwasher out (took the most time-1 hour) and 30 min. to install new door balance kit and springs. Replace both sides while the unit was out.
Due to the way I installed the appliance originally it was not necessary to disconnect supply water nor the drain connections. When the cord broke the spring came out of the point of connection to the appliance. It some "finagelling" to reattach the spring.After some "select vocabulary" it hooked into the correct spot and the rest was history.
Tension spring loop on right side door tensioner was broken
Unscrewed two fixing screws keeping dishwasher located. Pulled out dishwasher. Removed broken spring & pulley wheel. Placed new spring on frame loop at great of side panel. Replaced cracked pulley wheel. Connected cord to spring. Tensioned cord stretching spring. pulled cord around two pulleys & connected it to door hook. Replaced dishwasher & replaced holding screws.
We're sorry, but our Q&A experts are temporarily unavailable.
Please check back later if you still haven't found the answer you need.
7 questions answered by our experts.
< Prev
1
Next >
Sort by:
Search filter:
Clear Filter
Your search term must have 3 or more characters.
Keep searches simple. Use keywords, e.g. "leaking", "pump", "broken" or "fit".
Sorry, we couldn't find any existing answers that matched.Try using some different or simpler keywords, or submit your new question by using the "Ask a Question" button above!
Thomas
November 7, 2017
Parts for 'my door falls down' thank you !
For model number KUDA03CTBS2
Hi Thomas, Thank you for the question. To prevent the door from falling down when opening, I suggest replacing the Door Balance Link Kit. Good luck with the repair!
The door is very loud when i open or close it...i've ordered new springs, should that solve my problem?
For model number KUDS01DLSS2
Hello Patrick, Thank you for your inquiry. It could. The other things it could be are the door balance link kit part# 8194001 or the hinges part# WP8534854-left side and part# WP8534853-right side. Hope this helps!
4 people found this helpful.
Was this helpful?
Thank you for voting!
Frances
January 7, 2022
My dishwasher door was making a lot of noise for a long time, then the door just dropped.. Do I need new springs and spring grip retainers ? that is what it would seem like, the dishwasher is old.
Thank you
For model number KUD101ILBL4
Hello Frances, thank you for your question. It could be the springs, or cables, or the hinges. You will need to investigate to see if any of them look broken or faulty. The Door Balance Link Kit is PartSelect Number PS972325. The Door Hinge - Left Side PartSelect Number PS11746184. The Door Hinge - Right Side is Number PS11746183. We have an installation videos for you to access. We hope to hear from you soon.
My soap dispenser isn't opening during the cycle. I can manually open it by pressing the release...seems a bit "sticky" but it opens by hand. what could it be?
For model number KUDC20CVSS0
Hi Bri, thank you for your question. It sounds like you have a physical problem with the dispenser. You would need to replace the entire part itself as the parts that make up your door and the latch are not sold separately. Good luck with your repair.
Door falls down when opened
Do I need the door balance link kit or a new spring or door hinge?
Thank you
For model number KUDS03STSS2
Hi Diane, thank you for reaching out. To solve this issue, you may need to replace the door balance link kit, part number PS972325. Please submit a new question if you have any follow-ups!
My dishwasher door is noisy when opening and closing. Sounds like the springs. Is it possible just to oil the springs instead of replacing them?
Thank you!
For model number Maytag MDB7759SAS4
Hi Diane, thank you for reaching out. Yes, we would suggest cleaning and lubricating the spring. If it does not work, you may need to replace the spring, part number PS11745526, to fix the issue. We hope that helps!
Fresh Flow Produce Preserver is made for your refrigerator to help keep produce fresh for longer by absorbing the chemical, ethylene, that causes your fruits and vegetables to ripen quicker. Your produce could be fresh f...
Having a problem with a funky-smelling washing machine, or one that just doesnt seem to clean your clothes as well as it used to? Say hello to the Affresh Washing Machine Cleaner by Whirlpool. This powerful washing helpe...
Affresh dishwasher Cleaner is specially formulated to help remove limescale and mineral build-up that can be unsightly and could affect your dishwasher's performance. Each tablet is designed to clean inside your machine ...
Make your cooktop shine with Frigidaire ReadyClean Glass and Ceramic Cleaner. Our scratch-free, streak-free formula removes smudges, grease, burnt-on food, dirt and oil, while protecting and polishing to repel dust and d...
[{"position":0,"name":"Home","title":"Home","url":"/"},{"position":1,"name":"Spring or Shock Absorber","title":"Spring or Shock Absorber","url":"/Dishwasher-Springs-and-Shock-Absorbers.htm"},{"position":2,"name":"WP8270020","title":"WP8270020","url":""}]