Support & Information
Back
Back

How to replace a defrost timer

Common refrigerator defrost timer 
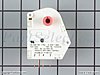
Directions for replacing a defrost timer.

Before you begin to replace your defrost timer, make sure you disconnect the appliance's power supply. The easiest way to do this is to unplug the unit from the wall. Alternatively, you could trip the appropriate switch in the circuit breaker panel, or you could remove the appropriate fuse from your home's fuse box.

Consult with an appliance repair technician if you do not feel you have the skill or the ability to successfully complete this repair.

  1. Locate your refrigerator's defrost timer. It can be located behind the refrigerator's lower kickplate, in the refrigerator's control panel, or even behind the refrigerator on its back wall. Defrost timers almost always have four metallic terminals extending from the bottom. Remove the timer once you have located it.
  2. A defrost timer is usually secured inside a refrigerator with at least one screw, but sometimes more. Remove all the screws you find and pull the timer carefully out of the refrigerator. Pull it out far enough so that you can disconnect its wires. Pull firmly on the wire's connectors to remove them. You may need to rock them back and forth a little to ease the motion. Don't worry about which way the connector comes out because there is only one way it can go back in.
  3. Connect the wire connector to the new defrost timer. Return the new timer to the place of the old timer and secure it in place with screws if required. Replace the timer's cover (if it has one) and restore power to your refrigerator.