This lower dishrack roller is less than two inches in diameter. It is made entirely of plastic.
How Buying OEM Parts Can Save You Time and Money
Part Videos
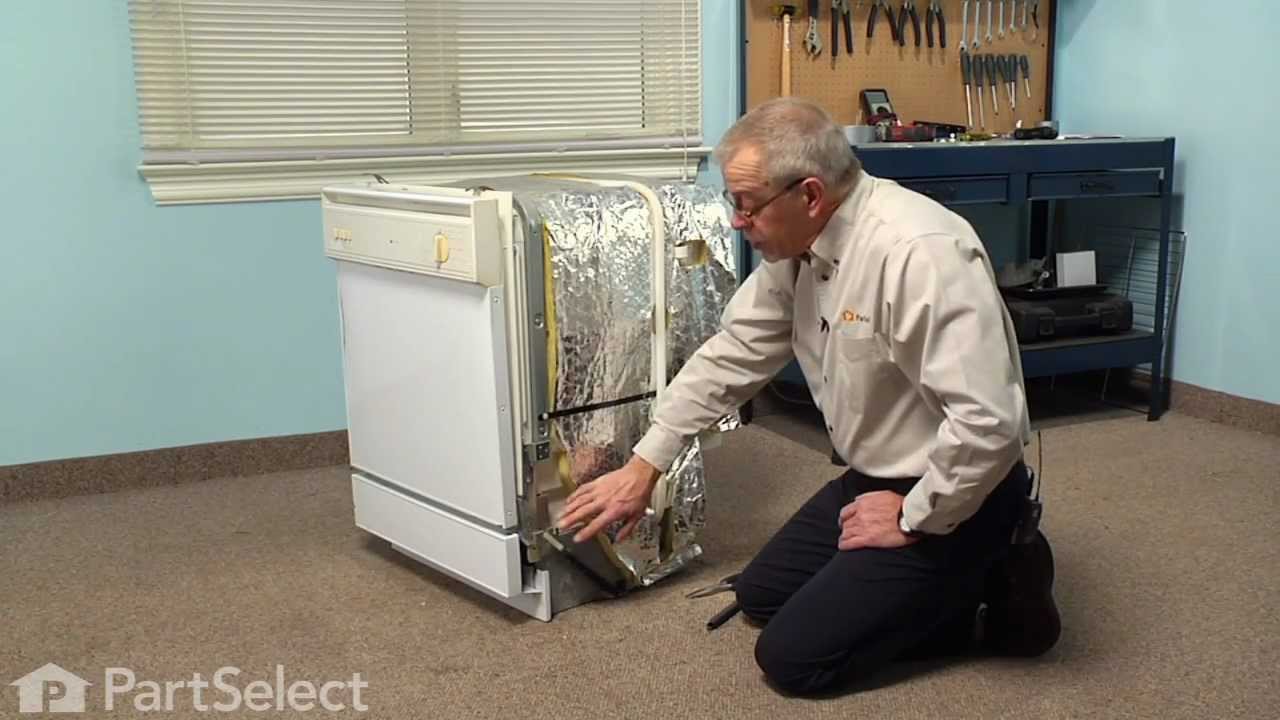
Replacing your Maytag Dishwasher Lower Wheel Assembly
Troubleshooting
This part works with the following products:
Dishwasher.
This part works with the following products:
Maytag, Jenn-Air, Amana.
Part# WP99002780 replaces these:
AP6014478, 9-3095, 903095
Customer Reviews
Average Rating:
★★★★★
★★★★★
4 Reviews
5.0
Filter By Rating:
5 Stars
4
4 Stars
0
3 Stars
0
2 Stars
0
1 Star
0
< Prev
1
Next >
Sort by:
Search filter:
Clear Filter
Your search term must have 3 or more characters.
Keep searches simple. Use keywords, e.g. "leaking", "pump", "broken" or "fit".
Sorry, we couldn't find any existing reviews that matched. Try using some different or simpler keywords.
★★★★★
★★★★★
Bill T - February 26, 2021
Verified Purchase
the part was perfect; easy repair.
all good; dishwasher working great again.
★★★★★
★★★★★
John N - October 5, 2018
Verified Purchase
Easy peasy
Great company to keep an old dishwasher running
★★★★★
★★★★★
Indrajati S - January 2, 2023
Verified Purchase
Easy install
Great replacement, my appliance is better
★★★★★
★★★★★
Daniela C - September 1, 2020
Verified Purchase
Easy repair, worked as expected
The parts were shipped quickly. Was an easy repair since it was just the lower dishwasher rack wheels .
< Prev
1
Next >
Customer Repair Stories
Average Repair Rating: 5.0 / 5.0, 1 reviews.
What's this?
< Prev
1
Next >
Sort by:
Search filter:
Clear Filter
Your search term must have 3 or more characters.
Keep searches simple. Use keywords, e.g. "leaking", "pump", "broken" or "fit".
Sorry, we couldn't find any existing installation instruction that matched.
The dishwasher handle was broken. This has happened before, a few years ago. It was over 150.00 to fix
This was incredibly easy. First of all the part came in just a few days and I could have had it earlier if I wanted expedited shipping. I turned off the main power to the dishwasher from the fuse box. I used a screwdriver to take the screws out of the door, unplugged the handle (literally one piece) and plugged the new one in, replaced the screws in the door and DONE! The part was 50.00 and I saved 100.00 in labor. If I can do this anyone can. They have a nice tutorial on you tube as well.
We're sorry, but our Q&A experts are temporarily unavailable.
Please check back later if you still haven't found the answer you need.
5 questions answered by our experts.
< Prev
1
Next >
Sort by:
Search filter:
Clear Filter
Your search term must have 3 or more characters.
Keep searches simple. Use keywords, e.g. "leaking", "pump", "broken" or "fit".
Sorry, we couldn't find any existing answers that matched.Try using some different or simpler keywords, or submit your new question by using the "Ask a Question" button above!
Adam
November 19, 2018
How many wheels are there in the model?
For model number mdb7100awq
Hello Adam, Thank you for the question. As Per Whirlpool, this substituted part only has 6 wheels instead of 8. If you have the Original rack, you will need 8 wheels. Thank you for your inquiry, good luck with this repair!
2 people found this helpful.
Was this helpful?
Thank you for voting!
Adam
November 19, 2018
The rack part in which the wheel pushed into is rusted and broken.Is there a new replacement "wheel assembly" will fit in the existing rack(lower)?
For model number MDB7100AWQ
Hello Adam, Thank you for contacting us. I have researched the model you have provided and have found the part you’re looking for is Part Number: PS11746834, but if the rack is rusted and broken it will need to be replaced. Part Number: PS1960964. Thank you for your inquiry, good luck with this repair!
Does this come with both set of wheels for the bottom rack? front and back?
For model number MDB8750AWS
Hello AJ, Thank you for the question. This is one individual Wheel Assembly. We hope this helps, good luck with this repair!
1 person found this helpful.
Was this helpful?
Thank you for voting!
Joseph
November 22, 2022
Does the lower rack wheel need to be purchased in pairs
For model number MDB8951BWS
Hello Joseph, thank you for your question. It does not need to be but it is recommended. These rollers tend to wear down at the same speed, so it is recommended to replace both pairs at the same time. Thank you and have a great day
1 person found this helpful.
Was this helpful?
Thank you for voting!
Garnell
February 11, 2018
Left door spring attachment with 16 inch broken cable. How do I install them. You don't show the cable on the diagram. Is it available?
For model number JDB6510AWP
Hi Garnell, Thank you for the question. The Door spring is PartSelect Number PS11746856 and the cable is PartSelect Number PS11747654. Please see the video link below for the spring. We do not have a video for the cable but here are some steps. Attach cable to the hinge. Then attach cable to cable link. Route under the roller. Attach to the short hook of the spring. Place large hook of spring into spring adjustment. Hope this helps!
https://www.youtube.com/watch?v=YPF4ckYRZRc
Fresh Flow Produce Preserver is made for your refrigerator to help keep produce fresh for longer by absorbing the chemical, ethylene, that causes your fruits and vegetables to ripen quicker. Your produce could be fresh f...
Having a problem with a funky-smelling washing machine, or one that just doesnt seem to clean your clothes as well as it used to? Say hello to the Affresh Washing Machine Cleaner by Whirlpool. This powerful washing helpe...
Affresh dishwasher Cleaner is specially formulated to help remove limescale and mineral build-up that can be unsightly and could affect your dishwasher's performance. Each tablet is designed to clean inside your machine ...
Make your cooktop shine with Frigidaire ReadyClean Glass and Ceramic Cleaner. Our scratch-free, streak-free formula removes smudges, grease, burnt-on food, dirt and oil, while protecting and polishing to repel dust and d...
[{"position":0,"name":"Home","title":"Home","url":"/"},{"position":1,"name":"Wheel or Roller","title":"Wheel or Roller","url":"/Dishwasher-Wheels-and-Rollers.htm"},{"position":2,"name":"WP99002780","title":"WP99002780","url":""}]