


Get in touch, we're here to help!
1-866-883-8386
Monday to Saturday
8am - 8pm EST
Product Description
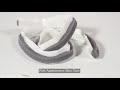
Dryer Blower Housing Seal Specifications
This part seals between the blower housing and the blower housing cover.

How Buying OEM Parts Can Save You Time and Money
Part Videos
Replacing your Whirlpool Dryer Dryer Blower Housing Seal

Troubleshooting
This part fixes the following symptoms:
Noisy
This part works with the following products:
Dryer, Washer Dryer Combo.
This part works with the following products:
Whirlpool, Kenmore, Maytag, KitchenAid.
Part# WP697770 replaces these:
3391685, 697770
Customer Reviews
Filter By Rating:
- < Prev
- 1
- Next >
Sort by:
Search filter:
Clear Filter
Your search term must have 3 or more characters.
Keep searches simple. Use keywords, e.g. "leaking", "pump", "broken" or "fit".
Sorry, we couldn't find any existing reviews that matched. Try using some different or simpler keywords.
Martin D - August 24, 2021
Verified Purchase
Fast shipping/right part
Third purchase from partsSelect. Gives extra years to our appliances. Always parts available for older model units.
- < Prev
- 1
- Next >
Customer Repair Stories
Average Repair Rating: 3.3 / 5.0, 3 reviews.
What's this?
- < Prev
- 1
- Next >
Sort by:
Search filter:
Clear Filter
Your search term must have 3 or more characters.
Keep searches simple. Use keywords, e.g. "leaking", "pump", "broken" or "fit".
Sorry, we couldn't find any existing installation instruction that matched.
wouldn't heat
watched videos on this site
Other Parts Used:


-
Tammy from PINEVILLE, MO
-
Difficulty Level:A Bit Difficult
-
Total Repair Time:30 - 60 mins
-
Tools:Screw drivers, Socket set
13 of 21 people
found this instruction helpful.
Was this instruction helpful to you?
Thank you for voting!
Unit not spent
Just replaced part
Other Parts Used:


-
Boonkham from SMYRNA, TN
-
Difficulty Level:Really Easy
-
Total Repair Time:30 - 60 mins
-
Tools:Nutdriver
4 of 4 people
found this instruction helpful.
Was this instruction helpful to you?
Thank you for voting!
Idler Pulley squealing - Worn out
Before anything unplug the dryer
1) Remove the back panel to include electric cable. 2) Remove the lower front panel. 3) Remove top panel. 4) Remove control panel 5) remove door assembly to include metal frame and front panel of the blower housing. (much easier than trying to do this separately. 6) Remove drum belt by pulling back on the idler pulley (spring). 7) Remove drum. 8) Remove idler pulley retaining ring and pulley. 9) remove old seal on blower housing. 10) I added high temp grease to the pulley shaft and installed new pulley. 11) Install new blower seal. 12) Install drum and new belt. 13) Re-install all the panels.
1) Remove the back panel to include electric cable. 2) Remove the lower front panel. 3) Remove top panel. 4) Remove control panel 5) remove door assembly to include metal frame and front panel of the blower housing. (much easier than trying to do this separately. 6) Remove drum belt by pulling back on the idler pulley (spring). 7) Remove drum. 8) Remove idler pulley retaining ring and pulley. 9) remove old seal on blower housing. 10) I added high temp grease to the pulley shaft and installed new pulley. 11) Install new blower seal. 12) Install drum and new belt. 13) Re-install all the panels.
Other Parts Used:
-
Thomas E from PERRYSBURG, OH
-
Difficulty Level:Easy
-
Total Repair Time:30 - 60 mins
-
Tools:Nutdriver, Screw drivers
2 of 2 people
found this instruction helpful.
Was this instruction helpful to you?
Thank you for voting!
- < Prev
- 1
- Next >
Questions and Answers
We're sorry, but our Q&A experts are temporarily unavailable.
Please check back later if you still haven't found the answer you need.
- < Prev
- 1
- Next >
Sort by:
Search filter:
Clear Filter
Your search term must have 3 or more characters.
Keep searches simple. Use keywords, e.g. "leaking", "pump", "broken" or "fit".
Sorry, we couldn't find any existing answers that matched.Try using some different or simpler keywords, or submit your new question by using the "Ask a Question" button above!
LT
April 1, 2019
What are the dimensions of this product?
For model number GEW9200LW0

Hello LT, thank you for your question. This part is approximately 26 inches long. I hope this helps!
3 people found this helpful.
Was this helpful?
Thank you for voting!
Renee
May 2, 2023
what are the width and height of the weatherstripping seals?
For model number wgd8300sb1
Hi Renee,
Thank you for your question. The blower housing seal, part number PS11743810, measures 26 inches by 0.75 inches. The seal outlet housing, part number PS11743812, measures 15.25 inches by 0.75 inches. The front panel seal, part number PS11741410, measures 24 inches by 0.75 inches. We hope this helps!
1 person found this helpful.
Was this helpful?
Thank you for voting!
Related Parts:
Seal Panel


$32.19
In Stock
Dryer Seal Outlet Housing

$14.58
In Stock
- < Prev
- 1
- Next >
Related Parts

$30.59
In Stock
Multi Rib Belt
$30.59
PartSelect Number: PS382430
The Drive Belt is a 93 1/2" belt which wraps around the dryer drum to allow tension and movement. If broken the dryer will not turn properly, or there may be loud noises. The part is rated as "medium" difficulty to insta... 
$70.28
In Stock
Blower Wheel
$70.28
PartSelect Number: PS11743811
The blower wheel pulls air over the heat source, through the clothes drum, and past the thermostats, then pushes it out the exhaust duct. The blower wheel, which is usually plastic, may wear out over time. But if it's no... 
$14.58
In Stock
$60.44
Special Order

$27.28
In Stock
Produce Preserver Filter
$27.28
PartSelect Number: PS3503014
Fresh Flow Produce Preserver is made for your refrigerator to help keep produce fresh for longer by absorbing the chemical, ethylene, that causes your fruits and vegetables to ripen quicker. Your produce could be fresh f... 
$25.31
In Stock
Affresh Washing Machine Cleaner - 3 pack
$25.31
PartSelect Number: PS1960673
Having a problem with a funky-smelling washing machine, or one that just doesnt seem to clean your clothes as well as it used to? Say hello to the Affresh Washing Machine Cleaner by Whirlpool. This powerful washing helpe... 
$21.95
In Stock
Affresh Dishwasher Cleaner Tablets - 6
$21.95
PartSelect Number: PS12345667
Affresh dishwasher Cleaner is specially formulated to help remove limescale and mineral build-up that can be unsightly and could affect your dishwasher's performance. Each tablet is designed to clean inside your machine ... 
$37.89
In Stock
Refrigerator Deodorizer
$37.89
PartSelect Number: PS12739141
Refrigerator deodorizers help to reduce bacteria growth and therefore reduce smells and extend the life of food. 
$32.93
In Stock
Cooktop Cleaning Cream
$32.93
PartSelect Number: PS12717774
Make your cooktop shine with Frigidaire ReadyClean Glass and Ceramic Cleaner. Our scratch-free, streak-free formula removes smudges, grease, burnt-on food, dirt and oil, while protecting and polishing to repel dust and d... 
$35.68
In Stock
Model Cross Reference
This part works with the following models:
PartSelect Number: PS11743810
Manufacturer Part Number: WP697770
Manufacturer Part Number: WP697770
Brand
Model Number
Description
Get in touch, we're here to help!
1-866-883-8386
Monday to Saturday
8am - 8pm EST