


Get in touch, we're here to help!
1-866-883-8386
Monday to Saturday
8am - 8pm EST
Product Description
Range Interior Oven Door Glass Specifications
The interior oven door glass is the innermost heat resistant piece of glass that faces in your oven when the door is closed. The glass measures approximately 9.99-inchx16.99-inch. If the glass is cracked it should be replaced. This is a genuine OEM part.

How Buying OEM Parts Can Save You Time and Money
Part Videos
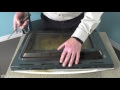
Replacing your KitchenAid Wall Oven Range Interior Oven Door Glass

Troubleshooting
This part works with the following products:
Wall Oven, Microwave Oven Combo.
This part works with the following products:
KitchenAid, Whirlpool.
Part# WP4449253 replaces these:
AP6009382, 4449252, 4449253
Customer Reviews
Filter By Rating:
- < Prev
- 1
- 2
- Next >
Sort by:
Search filter:
Clear Filter
Your search term must have 3 or more characters.
Keep searches simple. Use keywords, e.g. "leaking", "pump", "broken" or "fit".
Sorry, we couldn't find any existing reviews that matched. Try using some different or simpler keywords.
GAIL P - May 13, 2019
Verified Purchase
Excellent, thanks for the vidio
Very fast service, works great. Thanks
Edward K - April 15, 2019
Verified Purchase
The glass is great. Fighting with the hinges, not so much.
One of the hinges wouldn't cooperate with putting the door together and back on. Turned into a death match. The glass on the other hand is awesome.
JEANETTE G - August 30, 2020
Verified Purchase
Just the part
My appliance is working well again. Thank you for great service. I found the staff I dealt with helpful and polite. I would certainly recommend Part Select.
Ginette M - December 23, 2022
Verified Purchase
Received quickly and product was perfect
Easy to change
Tony F - October 14, 2021
Verified Purchase
Easy repair
The inside glass of our oven cracked after 20 years. The new glass was shipped quickly and it was very well packaged, It took 10-15 minutes to replace the glass…very easy repair.
Royal B - June 27, 2020
Verified Purchase
The part was exactly what was needed; however, eventhough a video was provided my oven had 4 glasses which took longer than anticipated to make the repair
Between the time i ordered the part and when I received it , it was really fast. The glass was well package, secured and identified as fragile. I'm very happy to have done business with PartSelect.
Rene M - October 8, 2022
Verified Purchase
Part well packaged!! Correct size!!!
Fast shipping!!!
André G - February 11, 2020
Verified Purchase
Great original part
The part came realy fast and in prerfect condition
DEBORAH G C - November 29, 2018
Verified Purchase
Part fit perfectly
The part came very fast and my oven door was fixed in no time. Thanks!
CHRISTOPHER P. H - 8 days ago
Verified Purchase
Oven back in full working order.
Once we had replaced the glass, the door put together again, and everything back in place, it was terrific to have an oven that functioned and looked as it should. Thank you PartSelect.
- < Prev
- 1
- 2
- Next >
Customer Repair Stories
Average Repair Rating: 3.7 / 5.0, 13 reviews.
What's this?
- < Prev
- 1
- 2
- Next >
Sort by:
Search filter:
Clear Filter
Your search term must have 3 or more characters.
Keep searches simple. Use keywords, e.g. "leaking", "pump", "broken" or "fit".
Sorry, we couldn't find any existing installation instruction that matched.
Inner window glass cracked
The first thing I did was to remove the oven door by releasing the two latches on the hinges (by hand). I then raised the door toward the vertical position and lifted up. The hinges slide out of the oven housing. I laid the door, inside face up on my island counter top. This ensures that none of the parts will fall when disassembling the door. Next I unscrewed the screws 4 top and bottom and four on the inside face. This releases the frame from the front housing. Lift the frame off the door, exposing the glass pieces. Lift off the broken inside glass and place the new piece in the glass retaining housing. Replace the outside frame and replace all screws. Take door back over to oven and slide hinge bottoms back into slots on oven. Rotate to horizontal position and flip latches back to locked position. Total time was about 10 minutes mainly because I was curious how the door was constructed and I poked around while it was disassembled.
Other Parts Used:
-
Evan from Albuquerque, NM
-
Difficulty Level:Really Easy
-
Total Repair Time:Less than 15 mins
-
Tools:Screw drivers
129 of 158 people
found this instruction helpful.
Was this instruction helpful to you?
Thank you for voting!
Broken inside glass on oven door
Very easy once we figured out how to remove the oven door - which was insert the Allen keys in the holes in the hinges and pull the door out. We thought there was some way of using the Allen key to undo a pin or bolt but it was as simple as putting it through the hole in the hinge !!!!!
Other Parts Used:
-
Janet from Scottsdale, AZ
-
Difficulty Level:A Bit Difficult
-
Total Repair Time:15 - 30 mins
-
Tools:Screw drivers
25 of 31 people
found this instruction helpful.
Was this instruction helpful to you?
Thank you for voting!
Cracked Door glass
Ordered the glass and read the other reviews/instructions on the PartSelect site. Also read the instructions in my owner's manual for removing the oven door. The hardest part of replacing the glass was the removal and replacement of the door. Once I had the door out, replacing the glass was as simple as removing about 8 or so screws, lifting off the cover and replacing the glass, then replacing the screws. One of the hinges on the door had closed and I was not able to open it to replace the door, so I had to have a neighbor come over to over his muscle power. The hinge problem should not have happened and without that little issue, this is a simple repair that I'm sure saved me at least $100.00 on repairman! And - I'm a woman!
Other Parts Used:
-
Linda from Hilton Head Island, SC
-
Difficulty Level:Easy
-
Total Repair Time:15 - 30 mins
-
Tools:Pliers, Screw drivers
13 of 16 people
found this instruction helpful.
Was this instruction helpful to you?
Thank you for voting!
Cracked inner glass of oven
I used the instructions from another user on this site and the instructions were great. First look in your oven manual to see how to get the oven off-hardest part of repair. Before removing door-duct tape the broken glass. Remove door. Lay door down on flat surface and keep track of screws as you take them out. Remove outer liner-we removed 6 screws total. Replace glass with new glass. Reattached outer liner back onto door. Replace door. This is a GREAT site. Thanks.
Other Parts Used:
-
Amanda from Indian Harbour Beach, FL
-
Difficulty Level:Easy
-
Total Repair Time:15 - 30 mins
-
Tools:Screw drivers
12 of 17 people
found this instruction helpful.
Was this instruction helpful to you?
Thank you for voting!
broken glass door
Took longer to take door off than replace glass.The door would have come off easy if I had read the instructions that came with the oven
Other Parts Used:
-
Dallas from Andrews, TX
-
Difficulty Level:Easy
-
Total Repair Time:15 - 30 mins
-
Tools:Screw drivers
11 of 17 people
found this instruction helpful.
Was this instruction helpful to you?
Thank you for voting!
inner oven door glass was cracked
Removed the door and laid it flat with the cracked glass facing up. applied duct tape to the broken glass to help hold it together. Removed the screws from the frame holding the glass. lifted the frame off,removed the broken glass and replaced it with the new piece. replaced the frame. and put the door back on the oven.
Other Parts Used:
-
Milton from Pasadena, TX
-
Difficulty Level:Easy
-
Total Repair Time:15 - 30 mins
-
Tools:Screw drivers
6 of 9 people
found this instruction helpful.
Was this instruction helpful to you?
Thank you for voting!
Inner glass on the oven door was broken
First remove the side trimmings by opening the oven door and taking out the two screws near the bottom. Remove the bottom trim by removing the two screws now exposed. Here's the hard part .. The outer glass is held by 4 screws 2 at the top and 2 through U brackets at the bottom. You must remove the 2 bottom ones first and then VERY carefully, whilst supporting the glass remove the 2 top ones and then gently pull from the bottom to release the glass at the top and pull away. The rest is straightforward. There are 4 glass pieces to remove, make sure you clean the finger marks off as you replace them. I would suggest 2 people to replace the final outer glass 'to be safe"
Other Parts Used:
-
Stephen from Sunnyvale, CA
-
Difficulty Level:A Bit Difficult
-
Total Repair Time:15 - 30 mins
-
Tools:Screw drivers
6 of 16 people
found this instruction helpful.
Was this instruction helpful to you?
Thank you for voting!
Broken inside oven door glass
We followed the instructions given by Parts Service. The only problem we had (Whirlpool left two screws out of spacer bracket and it fell out requiring further removable of inner glass to replace spacer. Process took about twenty minutes.
Other Parts Used:
-
Bobby from Waterloo, SC
-
Difficulty Level:Easy
-
Total Repair Time:15 - 30 mins
-
Tools:Screw drivers
4 of 11 people
found this instruction helpful.
Was this instruction helpful to you?
Thank you for voting!
Interior glass on oven door.
Thanks to video provided by PartSelect the repair was fast and easy. My second experience with an appliance repair with parts and video from PartSelect. I am a happy customer.
Other Parts Used:
-
Colie from Gainesville, GA
-
Difficulty Level:Very Easy
-
Total Repair Time:30 - 60 mins
-
Tools:Screw drivers
2 of 2 people
found this instruction helpful.
Was this instruction helpful to you?
Thank you for voting!
Inner door glass was cracked
My oven (late 90's/early 2000's model) didn't have the flip-down hinge locks shown in the video. It seems Whirlpool/Kitchenaid changed the hinges even though they didn't change the model number of the oven. With my style hinges, you have to put Allen wrenches or bent nails in the holes just behind the hinge pins. Then close the door almost all the way and lift it out to separate the hinges. Spring force holds the nails in tightly until you replace the door. This video was very helpful:
https://www.youtube.com/watch?v=p7oRZdIN6m0
Also, my door had 3 different kinds of sheet metal screws. Two of them have similar heads but different threads. Keep track of which is which for when you put everything back together.
https://www.youtube.com/watch?v=p7oRZdIN6m0
Also, my door had 3 different kinds of sheet metal screws. Two of them have similar heads but different threads. Keep track of which is which for when you put everything back together.
Other Parts Used:
-
Richard from ANNAPOLIS, MD
-
Difficulty Level:A Bit Difficult
-
Total Repair Time:30 - 60 mins
-
Tools:Screw drivers
2 of 2 people
found this instruction helpful.
Was this instruction helpful to you?
Thank you for voting!
- < Prev
- 1
- 2
- Next >
Questions and Answers
We're sorry, but our Q&A experts are temporarily unavailable.
Please check back later if you still haven't found the answer you need.
Related Parts

$27.28
In Stock
Produce Preserver Filter
$27.28
PartSelect Number: PS3503014
Fresh Flow Produce Preserver is made for your refrigerator to help keep produce fresh for longer by absorbing the chemical, ethylene, that causes your fruits and vegetables to ripen quicker. Your produce could be fresh f... 
$25.31
In Stock
Affresh Washing Machine Cleaner - 3 pack
$25.31
PartSelect Number: PS1960673
Having a problem with a funky-smelling washing machine, or one that just doesnt seem to clean your clothes as well as it used to? Say hello to the Affresh Washing Machine Cleaner by Whirlpool. This powerful washing helpe... 
$21.95
In Stock
Affresh Dishwasher Cleaner Tablets - 6
$21.95
PartSelect Number: PS12345667
Affresh dishwasher Cleaner is specially formulated to help remove limescale and mineral build-up that can be unsightly and could affect your dishwasher's performance. Each tablet is designed to clean inside your machine ... 
$37.89
In Stock
Refrigerator Deodorizer
$37.89
PartSelect Number: PS12739141
Refrigerator deodorizers help to reduce bacteria growth and therefore reduce smells and extend the life of food. 
$32.93
In Stock
Cooktop Cleaning Cream
$32.93
PartSelect Number: PS12717774
Make your cooktop shine with Frigidaire ReadyClean Glass and Ceramic Cleaner. Our scratch-free, streak-free formula removes smudges, grease, burnt-on food, dirt and oil, while protecting and polishing to repel dust and d... 
$35.68
In Stock
Model Cross Reference
This part works with the following models:
PartSelect Number: PS11742541
Manufacturer Part Number: WP4449253
Manufacturer Part Number: WP4449253
Brand
Model Number
Description
Get in touch, we're here to help!
1-866-883-8386
Monday to Saturday
8am - 8pm EST