WM6998HVA (ASSEEUS) LG Washer - Overview

Sections of the WM6998HVA

[Viewing 4 of 4]
Keep searches simple, eg. "belt" or "pump".
Clamp Assembly – Part Number: ACA56078801
Clamp Assembly
★★★★★
★★★★★
(1)
PartSelect #: PS3530864
Manufacturer #: ACA56078801
$26.65
  In Stock
Washer Gasket – Part Number: MDS62058301
Washer Gasket
★★★★★
★★★★★
(2)
PartSelect #: PS3535219
Manufacturer #: MDS62058301
This part is the replacement rear tub gasket for your washer. It is made of black plastic and is approximately 3-1/4 inches in diameter. The rear tub gasket forms a watertight seal between the rear tu...
$56.87
  In Stock
Washer Switch Assembly – Part Number: EBF61315802
Washer Switch Assembly
★★★★★
★★★★★
(1)
PartSelect #: PS7792232
Manufacturer #: EBF61315802
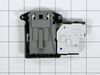
This door lock switch is a key component in compatible washing machines, designed to signal the control board when the door is securely closed. Once engaged, it enables the locking mechanism and allow...
$205.79
  In Stock
Bearing,Ball – Part Number: 4280FR4048N
Bearing,Ball
★★★★★
★★★★★
(1)
PartSelect #: PS3522899
Manufacturer #: 4280FR4048N
Tub bearing. This part is very difficult to install. The manufacturer recommends replacing the complete rear tub and bearing assembly.
$128.78
  In Stock
SENSOR ASSEMBLY – Part Number: EBD48922821
SENSOR ASSEMBLY
PartSelect #: PS16878771
Manufacturer #: EBD48922821
Having trouble with your LG appliance? It might be time to consider replacing the sensor assembly. This genuine OEM sensor assembly is designed and built to the highest standards by LG, allowing your ...
$121.00
  In Stock
CAP,DRAIN HOSE – Part Number: 5006EN3015A
CAP,DRAIN HOSE
★★★★★
★★★★★
(1)
PartSelect #: PS3635866
Manufacturer #: 5006EN3015A
This drain hose plug, also known as a hose cap, is a genuine OEM part for your washing machine. This plug caps the drain hose from the pump housing, and helps prevent leaks from your washer. Before be...
$13.26
  In Stock
Locking Pin – Part Number: 4774FR3118B
Locking Pin
PartSelect #: PS3523451
Manufacturer #: 4774FR3118B
The locking pin is used to hold the shock absorber on the washer. There is a pin used at the bottom and top of the shock absorber. Sold individually.
$21.76
  Special Order
Air Chamber – Part Number: 3504ER3002A
Air Chamber
PartSelect #: PS3519061
Manufacturer #: 3504ER3002A
$30.20
  In Stock
Bolt Assembly – Part Number: 4040FR4051C
Bolt Assembly
PartSelect #: PS3522868
Manufacturer #: 4040FR4051C
$26.35
  In Stock
Heater Assembly – Part Number: AEG33121501
Heater Assembly
PartSelect #: PS3532212
Manufacturer #: AEG33121501
This heater assembly generates the heat required for proper appliance operation and performance. Consistent heat output supports reliable results and efficient operation. Replacing a failing heater re...
$150.47
  In Stock
Motor Stator Bolt – Part Number: 4011FA4353B
Motor Stator Bolt
PartSelect #: PS3522804
Manufacturer #: 4011FA4353B
$17.44
  In Stock
Ball Bearing – Part Number: 4280FR4048Z
Ball Bearing
PartSelect #: PS7785071
Manufacturer #: 4280FR4048Z
Ensure your washing machine runs smoothly and quietly with this ball bearing and seal set, designed for use in the tub assembly. The bearing stabilizes the drum as it spins, reducing noise and vibrati...
$125.83
  In Stock

Questions And Answers for WM6998HVA

Be the first to ask our experts a question about this model!

Common Symptoms of the WM6998HVA

[Viewing 6 of 6]
Leaking
Fixed by
these parts
Fixing Fixing Fixing
Show All
Locking Issues
Fixed by
these parts
Fixing
Show All
Lid or door won’t close
Fixed by
these parts
Fixing
Show All
Spinning Issues
Fixed by
these parts
Fixing
Show All
Will Not Start
Fixed by
these parts
Fixing
Show All
Water Filling Issues
Fixed by
these parts
Fixing
Show All
Keep searches simple. Use keywords, e.g. "leaking", "pump", "broken" or "fit".
Washer did not recognize the door was shut
I removed the Wire and spring from the tub seal and then removed the seal on the side of the washer that contains the Door switch. I removed the two screws that held the door switch in place while holding the switch with my other hand. Once the screws where out I pulled the switch assembly out thru the gap and removed the wires from old assembly. I then plugged the wires into the new assembly aligned the holes up and put the screws back in the new door switch assembly. I then put the door seal and tub seal holder back on. This took about 15 minutes. I do recomend that you unplug the washer before starting this process.
Parts Used:
Washer Switch Assembly
  • CURTIS from OLIVE BRANCH, MS
  • Difficulty Level:
    Really Easy
  • Total Repair Time:
    15 - 30 mins
  • Tools:
    Nutdriver, Screw drivers
8 of 9 people found this instruction helpful.
Was this instruction helpful to you?
Thank you for voting!
TE error. Replaced heater / thermistor assembly.
removed top and front. heater is at the base of the tub. the nut compresses the rubber seal and may take some wiggling to remove the old one.
Parts Used:
Heater Assembly
  • Andrew from BOTHELL, WA
  • Difficulty Level:
    Easy
  • Total Repair Time:
    30 - 60 mins
  • Tools:
    Screw drivers, Socket set
4 of 7 people found this instruction helpful.
Was this instruction helpful to you?
Thank you for voting!
Instructions on how to turn Clamp counter clockwise to get back on tube assembly
Watched videos but didn’t show the clamp had to be placed on counterclockwise
Parts Used:
Clamp Assembly
  • Timothy from SCOTTSBORO, AL
  • Difficulty Level:
    A Bit Difficult
  • Total Repair Time:
    More than 2 hours
  • Tools:
    Pliers, Screw drivers
2 of 2 people found this instruction helpful.
Was this instruction helpful to you?
Thank you for voting!