Introducing the Samsung Washer Shock Damper Front, a vital component for optimal washer performance. This part maintains the stability of your washer, helping minimize vibration and noise during opera...
Introducing the Hex Head Bolt, a vital component designed to keep your Samsung, Kenmore, or Maytag washer functioning at its best. Manufactured with strict quality controls, this part ensures you rece...
Introducing the Drawer Tub Hose for your Samsung Washer, a vital piece to ensure efficient functioning of your appliance. This genuine Samsung part is designed with the highest attention to detail and...
Add exceptional longevity and superb performance to your Samsung washer and dryer with the high-quality Water Temperature Thermistor. Specially designed by Samsung, this exceptional product ensures ac...
Is your Samsung washing machine door glass broken or cracked? We've got just what you need to fix that problem. Introducing our Samsung Washer Door Glass ? a reliable, high-quality replacement part cr...
As a vital component of your Samsung Washer, this Assembly Flange Shaft (purple) significantly enhances the overall performance and efficiency of your laundry machine. Crafted with caution by Samsung,...
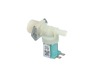
Introducing the highly efficient Water Inlet Valve, exclusively designed for your Samsung, Maytag, and Kenmore washers. This essential component ensures a controlled and steady water flow into your wa...
Enhance the performance of your Samsung or Kenmore washer with the Outer Seal Clamp. This essential part is expertly crafted by Samsung, ensuring excellent quality and a fit precise like original equi...
Improve the performance of your Samsung or Kenmore Washer with this genuine Guide Spring. This crucial component ensures smooth operation by assisting in the suspension system of the washer's drum. As...
Upgrade the performance of your Samsung or Maytag washer with the Rear Tub Oil Seal designed for smooth operation and durability. This premium part delivers superior sealing to prevent leaks in your w...
An initial issue was getting the door to unlock. I tired several things but finally was able to pull the door as if to open it and put something between the door handle and the front of the washer while I ran a washer cycle. There is a way to take the washer top off and reach down inside the unit and pull down on a release, but I did not try that.
The washer has a rubber boot between the washer frame and the wash tub. There is a metal wire ring that secures the outer edge of the boot to the washer frame. Peel back the outer edge of the boot at the bottom to reveal a metal ring that has its ends connected by a small spring. Use a flat tip screw drive to pry this ring off. Peel back the boot from the washer frame.
Next use a Phillips screw drive to remove the two screws that protrude through the wash frame on the right side of the door.
Reach between the washer tub and the frame and the tub and pull the switch through the opening and the washer tub. You will have to wiggle the switch around to remove it. There are three sets of wires attached to the switch by plugs.
The switch is covered with a plastic protective cover. Remove this. You will have to use a screw driver to release various catches to do this.
Remove the three set of wires. There are catches that secure the wire plugs in place. pry them back with a small screw drive.
Attach the new switch to the sets of wires.
Attach the protective cover to the switch. The wires feed through a small slot toward the bottom of the switch.
Slide the switch through the opening where you removed it. and re-attach it using the two screws.
Put the rubber boot in the channel in the washer frame. Replace the metal ring. This was the most challenging part of the repair for me. I had to play around with this to get it into position. You have to work it around the gasket and stretch out the spring.
By the way, The service was great and exceeded by expectations.
The part did not fit this model. The flap part fit the hole but the seal ring is too big. I cut 1\4inch out and used super glue the make it small enough to fit and seal the hose. Make sure you only use a drop of glue and keep the seal even and flat so it will seal
The new hose arrived without a plug, so I found a golf tee that fit securely. I put a few drops of dish soap on the machine end and it slid on with a little resistance. I ran a few light cycles, and the leak has stopped. Thank you


 – Part Number: DC61-00201A")