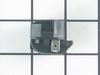
Ensure your refrigerator or freezer door opens and closes smoothly with this door hinge cam riser. Positioned on the door itself, this component helps align and pivot the door for proper sealing and q...
This valve comes with 1/4" compression inlet.
NOTE: This part comes with new quick connections. To install - cut retaining nuts off of existing plastic water lines and gently push them into new valv...
This part is the replacement water line for your refrigerator. It is a long plastic tube, which is 5/16 of an inch in diameter. If your refrigerator is leaking, or will not dispense water or ice, you ...
This ice maker assembly is used to make ice in your refrigerator. The ice maker receives water from the water inlet valve and will freeze until ice cubes are formed. Once the water has been frozen the...
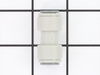
This is the replacement door hinge shim, or riser cam shim for your refrigerator. It is made of metal and is approximately 2 inches in length, and 1 inch in width. Your refrigerator will have a door h...
This part comes with 3 round pin connection terminals.
This fan motor circulates the air through the refrigerator grille and cools the compressor and condenser coils. It also helps to evaporate extra...
1. Turn off water supply, and electrical ( unplug it) to fridge. 2. Remove water line to valve. Watch for water to pour out of the line. Have a towel handy. 3. Remove the cardboard cover on the bottom of the fridge. 4. Remove the screws that hold the valve in place. 5. Remove the valve, be careful the waterlines are still attached. 6. Place a towel under valve to catch any water that leaks out from water lines. 7. Remove electrical lines, make sure to mark which went where. One is for the ice, and one is for the water. Make sure the power is off, there is 120 volts present at those connections. - now my waterlines attached using a compression type fitting. The new valve I got used just a push in type of attachment. But, easy enough I just removed the pieces for the compression and the waterlines pushed right in and worked fine. - the mounting harness for the valve was alittle different but the parts I need were in the right location and she fit in fine. 8. Attach water lines. They are different sizes so you can't get those mixed up. 9. Attach electrical lines. - the new valve came with adaptors for my electrical connection. Just snapped them on and kept on going. 10. turn on watersupply for fridge. Plug it back in. 11. Test for leaks, and proper operation. ie. When you push the water does the water valve open? 12. Unplug fridge 13. Now is a good time to clean out any dust or dirt that has accumallated in under around your fridge. 14. reassemble, valve, then cover. move fridge back into place. 15. Plug fridge back in. 16. Take a clean glass. 17. Fill with water from the front. 18. Take full glass of water and go watch tv. You've earned it, and saved yourself probably $100.00 in labor costs. Good Job.
Symptom: Door did not close automatically. Also had found small chunks of black plastic on the floor. Refrigerator door was slightly lower than the freezer door.
One false start because I did not realize both of the door-closing cams had disintegrated and I had only ordered the cam without the hinge.
Purchased part 290199 Hinge Assembly. It came with matching door-closing cam. (Had not known so I also purchased the cam 297995 separately). Next time I will know to only purchase the Hinge Assembly.
Replacement procedure took about 20 minutes including removing and replacing door shelves and their contents. Two people involved.
1. Remove all door shelves with contents and other contents on door.
2. Remove the top Phillips head screw holding the decorative plastic on the top.
3. Remove the two top hinge screws on top of refrigerator using metric #8 socket wrench. Second person made sure door did not fall off.
4. Lift the door off the bottom hinge pin. Second person holds door on it’s side.
5. Take off the bottom refrigerator cover
6. Remove the bottom hinge assembly screws using metric #8 socket wrench.
7. Mount the replacement bottom hinge assembly and tighten the two screws.
8. On the door bottom, remove the outer screw and loosen the inner screw using metric #8 socket wrench.
9. Replace the door-closing cam (or what is left of it) with the cam in line with the door and cam bumps away from the door.
10. Place the door back on the hinge pin (one person holds while the other person maneuvers the door bottom).
11. Replace the top hinge and reinsert the screws on top of the refrigerator. Dress the door so that it does not press hard on the rubber door gaskets (or the door will fail to shut automatically). Tighten the screws.
12. Replace the decorative plastic over the top hinge.
13. Open the door and replace the bottom refrigerator cover.
First of all, the larger white plastic tubes in this thing are 5/16" OD, which no plumbing store seems to stock. At the lower left rear end there are 2 tubes, one for water and one for ice, that are doomed to fail being in proximity of a heat source - they essentially get cooked to the point of becoming brittle and cracking. The smaller tube and union can be easily found, but do yourself a favor if the larger one cracks and order the plastic tube and water tube union here, and just cut off the brittle part and amend the old tube using the union.