These agitator directional cogs are commonly referred to as dog ears. They come four to a package and are usually used with direct drive washing machines.
The agitator kit is most commonly used if the top part of the agitator is not moving correctly but the bottom is. This kit now includes all pieces shown in photo plus the thrust spacer, inner cap seal...
This 18 ml bottle of white appliance touch-up paint is used to cover scratches or marks on your appliance. The white touch-up paint can be used on refrigerators, microwaves, ranges, clothes dryers, an...
If your washer is noisy, spins slowly, or leaves clothes soaking wet, this splutch cam kit might be the fix. It helps your machine switch between washing and spinning by connecting the motor to the ba...
This white thrust spacer is made of plastic and is also commonly referred to as a retainer ring. It is used in the agitator assembly of many direct drive washing machine models. This is the retaining ...
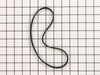
If your washer isn’t spinning or making strange noises, the drive belt might be worn out. This genuine replacement belt connects the motor to the drum, helping it spin and tumble your clothes properly...
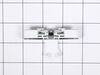
This lid switch assembly is for a top load washer. The lid switch assembly detects if the washer lid is open or closed and prevents the washer from spinning when the lid is open.
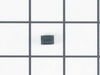
This 6-pin shift actuator is a genuine replacement part designed for use in select washing machines. It plays a critical role in controlling the movement of the transmission, allowing the appliance to...
This water inlet valve is for washers.
The water inlet valve controls the water flow into the washer.
Unplug the washer and shut off the water supply before installing this part. Wear work glove...
$100.66
In Stock
Questions And Answers for RTW4516FW1
Ask our experts a question about this model and we'll get back to you as soon as possible!
21 questions answered by our experts.
< Prev
1
2
3
Next >
Sort by:
Search filter:
Clear Filter
Your search term must have 3 or more characters.
Keep searches simple. Use keywords, e.g. "leaking", "pump", "broken" or "fit".
Sorry, we couldn't find any existing answers that matched.Try using some different or simpler keywords, or submit your new question by using the "Ask a Question" button above!
Dawn
May 1, 2023
My wash cycle hangs up on the rinse cycle, will not advance to spin and drain. If I press the Cancel/Start red button, it will cancel the cycle. I then move dial to Spin and Drain, and press start it will do the Spin and then drain. What can be causing this?
For model number RTW4516FW1
Hi Dawn, thank you for reaching out. According to our research, the issue is most probably related to the control board, part number PS12347386, which might be malfunctioning. We hope this solves your problem!
Hi Angelsea, thank you for reaching out. Based on the description that you have provided, we would recommend checking the drive pulley, part number PS10057144, to fix this issue. We hope this solves your issue!
Hi Deborah, thank you for the question. According to our research, the lint filter is located under the inner tub. You may need to remove the inner tub to access the lint filter. We hope this helps!
1 personfound this helpful.
Was this helpful?
Thank you for voting!
Sean
March 27, 2024
Washer shakes like crazy, replaced the suspension rods and added centering springs even though this model doesn’t come with them. Upper tub ring is not damaged and still has liquid in it. What else could it be?
For model number RTW4516FW1
Hi Sean, thank you for getting in touch. We would suggest using the model compatible parts only. As you have already replaced the suspension rods, the issue could be with the balancing ring. It comes as a part of the inner tub, part number PS8691481. You may need to replace it to fix the issue. We hope this solves your problem!
Need a new suspension rod kit for machine. Serial # C70224340. There are 2 different sizes. 25.34 and 26.7. Which are correct size for the make and model?
For model number RTW4516FW1
Hi Lynn, thank you for contacting us. The suspension rod kit for your model is part number PS11703288. We hope that helps!
First pry off the cap of the agitator. Then using a socket remove the bolt that holds the plastic cup in place. Remove this cup by prying it loose from the two tabs that hold it in place. Once this cup is removed you can get to the broken cogs. Slip the new cogs into the underside of the cup, and slide the cup back down in the agitator housing using the slots on the side for a guide. (You may want to remove the entire agitator and assemble everything upside down, then flip it all back over to mount, so the cogs don't fall out). Tighten the bolt, snap the cap back in place on top of the agitator and your'e done. Easy repair.
The instructions came with the repair kit, it was fairly simple and straight foward.
One bolt held the entire agitator unit in the washer, as well as held the upper and lower halves together. Once that nut was removed the two halves seperated and the plastic clutch pieces could easily be replaced wtih the new onces in the repair kit.
Very easy do-it-yourself repair! Took about 20 minutes because I was being cautious. Next time I could do it in 5 minutes.
On top of the agitator is a flat cap that is held in place by the friction of an o-ring, there are no fasteners. I would imagine one could get under the lip with a small screwdriver or butter knife to pop it off but I chose simply using my fingernails so as to not disfigure the cap. Under the cap you will find the head of the only bolt that holds the assembly together it is a 7/16 head and because it is in a 4" deep well your will need a 6" extension for your ratchet. Once the bolt is out the top of the agitator, the assembly with the cogs removes by hand. Set the assembly upside down on the counter, slide the black plastic ring off, pull the cogs out with your fingertips, install the new cogs put a new black ring on and set the assembly back in the agitator. Reinstall bolt. As the bolt is down in a tube, you cannot set it in place with your fingers and it will fall out of the socket. To hold the bolt in the socket during positioning you can either put a gob of Vaseline on the bolt head to hold it in the socket or form a small piece of paper over the bolt head and set it into the socket, the friction of the paper will hold the bolt into the socket. Took me less then 10 minutes, good luck


 Diagram and Parts List for Roper Washer")