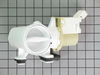
This pump helps expel water from the washing machine and is activated after the spin speed is maintained for a specific period of time. It has two ports for water to pass through: a large one, and a s...
This 18 ml bottle of white appliance touch-up paint is used to cover scratches or marks on your appliance. The white touch-up paint can be used on refrigerators, microwaves, ranges, clothes dryers, an...
Sold individually. These shock absorbers keep the washer from vigorous shaking during its cycles. This shock absorber is for washers.
Shock absorber absorbs the vibrations and movements of the oute...
This is a replacement tub-to-pump hose for your washer. This hose runs from the bottom of the tub to the water pump, and is used to transport water. The hose can develop a hole, and when this happens ...
Water inlet valve controls the water flow into the washer.
Fits some washers in the following series: Kenmore 110; Whirlpool CHW, WFW and YWFW; Maytag CHW, MHN, MHP, MHWE, MHWZ and YMHWE; Amana NFW...
This is the replacement bellow clamp for your washer. It is approximately 18 inches in diameter and is sold individually. The bellow clamp goes around the bellow in your washer and holds it in place o...
The door boot spring clamp or outer bellow clamp on your washer is designed to keep the door boot in place. It is circular in shape, and you will find it wrapped around the bellow. To remove the old c...
This hose clamp extends from half an inch to an inch in diameter. It is made entirely of metal and is intended for use with Maytag brand washing machines.
$10.95
In Stock
Questions And Answers for MHN30PDBWW0
Ask our experts a question about this model and we'll get back to you as soon as possible!
3 questions answered by our experts.
< Prev
1
Next >
Sort by:
Search filter:
Clear Filter
Your search term must have 3 or more characters.
Keep searches simple. Use keywords, e.g. "leaking", "pump", "broken" or "fit".
Sorry, we couldn't find any existing answers that matched.Try using some different or simpler keywords, or submit your new question by using the "Ask a Question" button above!
Richard
February 2, 2020
I get an error code f20. I checked the pump and the inlet screens.
For model number MHN30PDBWW0
Good Day Richard. Thank you for your question in regards to your unit (Model Number MHN30PDBWW0). Based on our research, we have found the following information that may be able to assist you with the issue that you are having: 1) Be sure to open both the valves completely so the water can fill. Remember that both the hot and cold water supply needs to be connected to the washer water inlet valve. The washer will not work properly if you have only one water hose connected. The water inlet valve that the water hoses connect to must have the pressure from both hoses for the washer to operate properly. When you select a cold water wash then the washer is adds hot water to keep the temp optimized for a cold water wash. 2) If both water hoses are connected, check to see if the water hoses are bent and restricting the water flow. 3) Also ensure that you check the filter screens where the hoses connect to the washer and inspect to see if they need to be cleaned or not. 4) It may also that there is a error with the control board of your unit, if you unplug your unit from it's power source for two to three minutes and plug it back in, this may reset the control board and solve the issue. We recommend referreing to your Owner's Manual for further information. We hope this helps! Best Regards.
1 personfound this helpful.
Was this helpful?
Thank you for voting!
James
January 26, 2024
Cannot clear F21 code. Cleaned drain valve. Checked hose. Has a coin box connected,
For model number MHN30PDBWW0
Hi James, thank you for reaching out. Based on our research, the error code F21 indicates a drain problem. As you have already checked the drain hose, we would recommend replacing the drain pump, part number PS11757304, to fix the issue. It removes water from the washer during the drain portion of the cycle. We hope this helps!
Hello Mike, Thank you for the question. This indicates there is a suds build up. This can be caused by using to much detergent or the wrong type of detergent. You can try to run the rinse cycle again and check the pump and filter for a suds build up. We hope this helps.
Was this helpful?
Thank you for voting!
< Prev
1
Next >
✖
Ask a Question
Ask our experts a question on this model and we'll respond as soon as we can.
Removed the front panel unplugged The washer drained water out, lift the washer up to un screw the drain pump. Then unhooked the hoses from pump put the other pump in.
Pump started making noises like ball bearings grinding. took the lower front cover off pulled the strainer out of the pump housing and found $2.55 in nickles dimes and quarters. Some 223 bullets and about 20 bobby pins. Together they had destroyed the impeller, so ordering a new one and installing it did the trick. Easy installation about 15mins.
This do it yourself repair saved me the cost of a repair man's service call plus time to put it in. 1. First of all, make sure the unit is unplugged. On this type of front loading washer you will need to remove the bottom panel, which is secured by 3 nut screws. 2. Once the panel is removed you will need to use pliers to unscrew the drain plug and allow for excess water to drain out before removing the drain pump (get a pan or something that will fit underneath the drain). This is the area in which all the loose stuff, like coins and everything else falling out of pockets, gets trapped. The trap works well and needs to be checked periodically or if left unchecked it will probably be the cause of burning up the drain pump. 3. Once the water is drained you will need to use pliers to unsecure the two hoses attached to the drain pump. The pliers will pinch the wire clamps open and you can remove the hose easily. 4. The dryer is stacked on top of my washer and in order to get to the two screws holding the drain pump I needed to put a block of wood under the washer to give myself room to get a wrench to the screws. Once the dryer and washer were unloaded and nothing on top I was able to lift the washer and slide a block of wood underneath. 5. The pump has a power supply on the right hand side (a small white box with a wire attached) Remove the wire by gently pulling on the end of it. It is a plug type end. 6. Using a wrench (or socket driver) I took out the two screws (about an 1.5"). The drain pump slides to the right and out it comes. It is also secured by two rubber seals which are easy to remove as well as to install. 7. Now all you do is work backwards, installing the new drain pump by sliding the seals in place and wrenching the screws back in to hold the drain pump, followed by putting the two hoses back on with the pliers and placing the wire back into the power supply box on the drain. I would recommend anyone being able to do this on their own or at least with another person to help with a bit of lifting. The only way I knew to replace this part was because it was making all the noise, so it doesn't take much rocket science :)


 Diagram and Parts List for Maytag Washer")