This temperature sensor, also referred to as a thermistor, is a genuine replacement component compatible with various appliance models. It works in coordination with the control board to monitor inter...
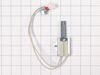
This gas range oven igniter is compatible with various models of LG gas ranges. It is made up of the igniter element, wire harness, connector and mounting bracket. The igniter is responsible for gener...
This clear inner glass lets you see inside your LG oven while keeping the heat in. If your oven glass is cracked or chipped, replacing it helps restore energy efficiency and safe cooking. It’s made to...
Having issues with your LG range? Try our Display PCB Assembly'it's a real game-changer. Specifically formulated for specific models in LG's oven range, this genuine OEM product guarantees a seamless ...
Help your LG gas range get back to peak performance with the LG Valve Assembly. Designed just for gas ranges, this genuine LG part controls the gas flow to your right rear burner, ensuring the flame i...
If your cooktop grates are cracked or wobbly, this replacement grille can help. It gives your pots and pans a stable surface and protects the burners underneath. It’s built tough to handle heat and ev...
$225.01
In Stock
Questions And Answers for LRGL5823S
Ask our experts a question about this model and we'll get back to you as soon as possible!
2 questions answered by our experts.
< Prev
1
Next >
Sort by:
Search filter:
Clear Filter
Your search term must have 3 or more characters.
Keep searches simple. Use keywords, e.g. "leaking", "pump", "broken" or "fit".
Sorry, we couldn't find any existing answers that matched.Try using some different or simpler keywords, or submit your new question by using the "Ask a Question" button above!
Michael
December 5, 2024
Do you carry the oven door outer glass? If so, how much does it cost?
For model number LRGL5823S
Hello Michael, Thank you for writing. The Outside Glass is listed as PartSelect Number PS16222565. Please see the website for the current price and availability. Thank you for the inquiry, good luck with the repair!
Can you purchase the plastic piece that covers the control panel display and if so what exactly is it called or what is the part number I need to order it?
For model number LRGL5823S
Hello Jackie, thank you for contacting us. The part you are looking for is not sold separately, it comes as a part of the control board overlay, part number PS16223046. Glad to be of assistance!
Took off the oven door then took out the racks and two screws in the oven bottom and removed it . Then removed the heat deflector. Then un plugged the old igniter and removed the burner to make it easier to remove the old igniter. Then installed the new igniter and reversed the process
This is a gas stove with 110v electric. Unplug cord before beginning.
Remove back cover. There Phillip approx 15 Phillips screws. Back cover slides up off of tabs to remove .
You need to get the main board out of the way to get to the Display PCBA. There were three wiring harness connectors on the right side of the board you need to disconnect which allows the Board to slide out to the right. Use plastic pry bar to pop tabs slightly on top and right side of board that will allow you to slide the board out to the right. You need to take care to not break these tabs.
I did not disconnect the other wiring harnesses on left side of board. I lifted the board and laid it out of the way on the top of the back of stove. I held it in place with a piece of duct tape holding it to top by wiring harness to give me room.
Now you have access to the Display PCBA. This board is held in place by 5 screws. Remove screws and place new board in place with the 5 screws.
Now put the main board back in place by sliding in place from right to left and under the tabs on all sides. This is a little tricky but with a plastic pry bar and going slowly not to difficult. Be careful not to pinch wires behind the main board. There are relief openings that wiring should be routed through.
Plug the cord back in and make sure all is working on the Display and push buttons on front pad.
Finally place the back cover on and secure with screws.
As soon as my husband put it in the oven, the very thin prongs broke. There was no guard on either side of the prongs for protection like the one that had been in there. Very costly to us of $185 with no fix. Very disappointed in that ignitor. It would have been an easy fix. Had replaced one previously but it only lasted 6 months. Now we have a new stove