This temperature sensor, also referred to as a thermistor, is a genuine replacement component compatible with various appliance models. It works in coordination with the control board to monitor inter...
$59.35
In Stock
Order within the next 37 mins and your part ships today!
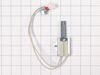
This gas range oven igniter is compatible with various models of LG gas ranges. It is made up of the igniter element, wire harness, connector and mounting bracket. The igniter is responsible for gener...
$317.43
In Stock
Order within the next 37 mins and your part ships today!
This clear inner glass lets you see inside your LG oven while keeping the heat in. If your oven glass is cracked or chipped, replacing it helps restore energy efficiency and safe cooking. It’s made to...
$125.28
In Stock
Order within the next 37 mins and your part ships today!
Upgrade your oven with this durable gliding shelf rack, designed to provide a stable surface for baking, roasting, and broiling. Its smooth sliding design makes it easy to insert and remove dishes, of...
$99.52
In Stock
Order within the next 37 mins and your part ships today!
Help your LG gas range get back to peak performance with the LG Valve Assembly. Designed just for gas ranges, this genuine LG part controls the gas flow to your right rear burner, ensuring the flame i...
$60.45
In Stock
Order within the next 37 mins and your part ships today!
Took off the oven door then took out the racks and two screws in the oven bottom and removed it . Then removed the heat deflector. Then un plugged the old igniter and removed the burner to make it easier to remove the old igniter. Then installed the new igniter and reversed the process
As soon as my husband put it in the oven, the very thin prongs broke. There was no guard on either side of the prongs for protection like the one that had been in there. Very costly to us of $185 with no fix. Very disappointed in that ignitor. It would have been an easy fix. Had replaced one previously but it only lasted 6 months. Now we have a new stove
Remove oven bottoms Removed burners Remove igniters Pull out oven removed back disconnect wiring Installed new parts on burner made wiring hook ups Installed oven back and oven bottoms Tested and both work Took so long because I’m 75 years old Thanks for the proper parts