This temperature sensor, also referred to as a thermistor, is a genuine replacement component compatible with various appliance models. It works in coordination with the control board to monitor inter...
This rotary switch helps you control the heat on your range burner. It adjusts the power when you turn the knob, giving you the right temperature for cooking. If your burner isn’t responding or the kn...
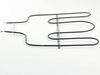
As an avid home cook, you know the importance of a properly working oven and how crucial the Bake Element is to your range cooker's heating process. That's where this LG Bake Element comes in. Located...
Is your LG range oven stove not heating quite like it used to? The Radiant Surface Element could be just what you need. This genuine LG part is specifically designed to provide heat directly to your r...
This genuine heating element fits select LG ovens and ranges, providing heat for broiling and baking. Located at the top of the oven, it ensures even cooking and reliable performance. It replaces olde...
This oven door panel helps keep heat inside your LG range so your food cooks evenly and efficiently. It also gives your appliance a clean, finished look. If the outer door is damaged or loose, replaci...
This display control board is a high-quality replacement component designed to restore full functionality to your range’s digital interface. It provides clear, accurate readings for temperature, time,...
Go onto youtube, such as https://www.youtube.com/watch?v=-ITkrwhDNMQ and watch similar videos for DYI. The process is very similar to other models.
Once the door is removed, place oven door on a towel or soft place so it does not scratch the door. Unscrew the screws and make sure you notice where each screw goes, so you know the process of where each screw goes when you re-assemble.
Once the inner cover is removed, remove the insulation, too so you don't damage it. Use Wet/Dry Shop Vac to clean the shattered glass. (WORD OF ADVICE: I did not remove the insulation and the suction of the Shop Vac removed part of the insulation, so now instead of a quick turn around repair turns into a few weeks repair, because the insulation is on back order 10-14 days from the supplier. DON"T MAKE THE SAME MISTAKE!)
Once the glass has been removed, the new inner glass is replaced, begin by re-assemble the oven door with the correct screws and attached the oven door to the range.
Dropped a hammer on the range while removing a ceiling light. Viewed a How-To video on Google. Ordered the needed parts. Followed the steps from the How-To video. Reinstall was a bit tricky by myself - could have used an extra set of hands. I have a few words of caution: 1) Put something between the range top and range - like a sheet or drop cloth - to prevent a dropped screw from falling into a crevice in the stove. I dropped a screw and was unable to retrieve it, even with a magnet. 2) Makes sure you remove all bumpers, screws, clips, etc. from the item being replaced and put them on the new item if the new item does not come with replacement bumpers, screws, etc.
UN PLUGED UNIT UNSCREWED AOO 15 SCREWS UN PLUGED TOP CERIT BOARD-4 SCREWS 5 SCREWS HOLD BOARD , RE ATACH WIRES ,REATACH TOP BOARD ,PUT BACK SCREWS ON BACKING , RE PLUG IT SHOULD WORK