This air filter helps keep your fridge smelling fresh and your food lasting longer. It uses carbon to trap odors and clean the air inside your refrigerator. If you notice bad smells or your fridge tel...
This refrigerator water filter replacement is for 2010 LG refrigerators that have either forward French doors or are the four-door dispensing models. This filter is designed to minimize impurities tha...
This handle screw, also known as a mounting bolt, is a mounting screw to help secure the door handle to your refrigerator door. If your handle is loose, you may just need to tighten the screw. If your...
Having trouble with your LG fridge's ice or water dispenser? We have a solution: the Refrigerator Ice Water Line Tube Assembly is ready to get your fridge back in top shape. Why is this part crucial...
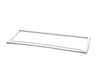
This refrigerator door shelf bin is a clear, gallon-sized storage accessory designed for installation on the right-side door of select refrigerator models. Crafted from durable, food-safe resin, it fe...
Are you tired of wrestling with a sagging freezer basket? Say goodbye to these days thanks to the Left Side Connector Rail, a genuine replacement part from LG. This freezer basket support rail speeds ...
Ask our experts a question about this model and we'll get back to you as soon as possible!
1 question answered by our experts.
< Prev
1
Next >
Sort by:
Search filter:
Clear Filter
Your search term must have 3 or more characters.
Keep searches simple. Use keywords, e.g. "leaking", "pump", "broken" or "fit".
Sorry, we couldn't find any existing answers that matched.Try using some different or simpler keywords, or submit your new question by using the "Ask a Question" button above!
Dale
December 26, 2022
HOW TO REMOVE WATER FILTER
For model number LFXS25973D
Hi Dale, thank you for your question. Slowly turn the old cartridge to the left. When the cartridge is released, you will feel it click out of place. Replacing the filter causes a small amount of water (around 1 oz. or 25 cc) to drain. Remove the old cartridge. Take the new cartridge out of its packaging, and remove the red cap. Line up the cartridge ears so that it can be inserted into the filter head. Twist the cartridge right about 1/4 turn. You will feel a stop, and the locked symbol should now be lined up with the indicator line. After replacing the filter, flush 2.5 gallons through the filter before use (flush for approximately 5 minutes). Check the filter for leaks. We hope this helps, good luck with this repair.
Was this helpful?
Thank you for voting!
< Prev
1
Next >
✖
Ask a Question
Ask our experts a question on this model and we'll respond as soon as we can.
For this model the ice maker is very easy to replace. All it takes is a phillips head screwdriver. There are two wire connections you have to unplug. Easy out easy in. You do not have to disconnect the water line, just make sure the line is lined up correctly when you reinstall the new icemaker. It seems to take approximately 8 hours before you start getting ice again. If you have this same model, you already know this ice maker is very slow in making ice and is not able to keep up with daily usage of ice for a household of 3.
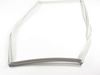
Watch YouTube videos on this topic if you are uncertain before tackling the job. The right door was easy to replace. Just pull the gasket with your fingers and it will come off easily. Place new gasket over door and use fingers to press it inside the groove few inches at a time. Pay attention to gasket orientation.
The left door is a bit harder because you need to remove the mullion at the door edge using a screw driver. Remove two screws on the center hinge and then slide the mullion up to disengage. Then unplug the wires to remove the mullion. Replace the gasket as described above and replace the mullion reversing the directions shown above.
For the right side of the refrigerator door, just pulled off the old gasket and replaced it with the new one. Old gasket came off easily. Just had to pull it off. No screws on the right side. Just pushed the new one in place in the groove on the door.
For the left side, needed a Phillip’s screwdriver to remove the flap first. Helps to have a second person hold the door from moving. Once flap was off, pulled the old gasket off and installed the new one just like the right side. Then screwed the flap back on once the gasket was in the groove properly.
Initially after install, it seemed like the magnet on the door was not strong enough but after a couple of days, the magnet seems a lot stronger, sealing the air out. Very happy I replaced it. It was a lot simpler to replace than I thought it would be.