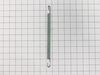
The door hinge cable works in conjunction with the dishwasher door by connecting the door hinge to the door spring and helping to support and balance the weight of the door as you open and close it. I...
The dishwasher roller assembly connects to the dishrack, and is located in the lower level of the dishwasher. It allows the dishrack to easily slide in and out. If the lower rack keeps falling off the...
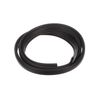
If your dishwasher is leaking or not cleaning as well as it used to, the door gasket might be the culprit. This flexible rubber seal fits around the tub and keeps water and steam inside during each cy...
This flexible, corrugated drain hose assembly is designed to efficiently channel wastewater from your dishwasher to the household drainage system. Installed at the rear of the unit, it connects the di...
This dishrack roller assembly is designed to facilitate smooth movement of the dishwasher rack, allowing it to glide in and out with ease. Engineered for durability, it attaches securely to the rack a...
Finding the right parts for your dishwasher can be tricky, but were here to help. Consider this Dishrack Roller Bracket by LG? an authentic, OEM part designed to keep your dishwasher operating at opti...
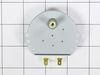
This part is the replacement inlet valve for your dishwasher. It is approximately 4-1/2 inches by 3-1/2 inches. The water inlet valve in your dishwasher connects to the water source and solenoid wire...
This lower dishrack assembly is designed to securely hold dishes and cutlery during the wash cycle in select LG dishwasher models. Constructed from coated metal, it resists rust, cracking, and peeling...
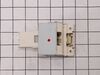
If your dishwasher won’t start or is leaking during a cycle, the door latch might be the problem. This genuine LG latch assembly keeps the door closed tight, helping prevent water from escaping and ma...
$64.85
In Stock
Questions And Answers for LDF7774WW
Ask our experts a question about this model and we'll get back to you as soon as possible!
3 questions answered by our experts.
< Prev
1
Next >
Sort by:
Search filter:
Clear Filter
Your search term must have 3 or more characters.
Keep searches simple. Use keywords, e.g. "leaking", "pump", "broken" or "fit".
Sorry, we couldn't find any existing answers that matched.Try using some different or simpler keywords, or submit your new question by using the "Ask a Question" button above!
Donat
March 25, 2024
Have a code OE when draining. filter clean and hose ok. What other possible causes
For model number LDF7774WW
Hello Donat, thank you for reaching out. Based on our research, the error code OE indicates that the dishwasher may not be draining properly. We would recommend checking the drain pump assembly, part number PS11706890, to fix the issue. We hope that helps!
Ow was working fine but now the "Low-on rinse air light" is ON even when filled.
I have not adjusted the rinse aid dispenser rate.
Seeing white deposits inside non-stick pans and on silicone handles.
Is this more than a bad rinse aid level sensor?
For model number LDF7774WW
Hi Paul,
Thank you for your question. If your rinse aid light will not turn off, the dispenser may have a leak in it. You will need to remove the dispenser from the door and check for any leaks. If there are no leaks, reset the dishwasher by turning the circuit breaker for a few minutes. We hope this helps!
Was this helpful?
Thank you for voting!
Rick
April 11, 2025
What year was it made
For model number LDF7774WW
Hello Rick, thank you for reaching out. Based on our research, your model was manufactured approximately in 2015. For us to locate the exact age of manufacture, we will require the serial number of the unit. Once you have located the serial number, please feel free to resubmit the question and we will be happy to help you. We look forward to hearing from you!
Was this helpful?
Thank you for voting!
< Prev
1
Next >
✖
Ask a Question
Ask our experts a question on this model and we'll respond as soon as we can.
Simple, removed screws securing machine in the cabinet, then pull the unit out of the cabinet space about 10 inches. Springs are accessible within this extension. You need strong hands to extend the springs and attach them. Once attached, push machine back in place and re-install the anchor screws. In my situation, only one spring was broken, so the attached side revealed the correct slot to place the hook on the top position, the bottom position has a plastic lead for the spring, and that lead is attached to a rope to the door hinge. Note: Replace BOTH springs, even if only one is broken.
The inside gasket deteriorates over time - However replacement is easy. the main thing you have to remember is after you remove the old gasket, install the new one starting at the middle top of the tub and work your way down both sides. Also, don't push the gasket all the way in...only enough to hold in place. When you close the door the gasket will form a better seal around the door.