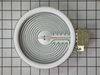
This is a heating element compatible with various makes of ranges and ovens and is sold as an individual part. Measuring 20.5-inches wide and 20.25-inches (with terminals) long, this heating element i...
$79.97
In Stock
Order within the next 11 hrs and your part ships today!
This is a multi-use and multi-appliance screw. It can be used on a microwave, refrigerator, range/oven, air conditioner, dehumidifier, washer, or dryer. The measurements of this screw are 8 x 1/2 inch...
$28.95
In Stock
Order within the next 11 hrs and your part ships today!
This oven temperature sensor is designed to monitor and regulate the internal heat levels of your range, ensuring consistent and accurate cooking performance. It communicates directly with the control...
$164.98
In Stock
Order within the next 11 hrs and your part ships today!
This dual surface element control switch is a critical component in select electric stoves, ovens, and ranges, responsible for regulating heat output and powering the surface element. It enables users...
$245.14
In Stock
Order within the next 11 hrs and your part ships today!
Order within the next 11 hrs and your part ships today!
Questions And Answers for JES1750ML0
Ask our experts a question about this model and we'll get back to you as soon as possible!
1 question answered by our experts.
< Prev
1
Next >
Sort by:
Search filter:
Clear Filter
Your search term must have 3 or more characters.
Keep searches simple. Use keywords, e.g. "leaking", "pump", "broken" or "fit".
Sorry, we couldn't find any existing answers that matched.Try using some different or simpler keywords, or submit your new question by using the "Ask a Question" button above!
Rich
October 16, 2024
What is the part # & price for the Outer Door glass?
For model number JES1750ML0
Hi Rich, Thank you for reaching out. The Outer Door Glass for this model is listed as PartSelect Number PS17215757. All current prices and availability are showing on the site. Thank you for the question!
Took 2 screws under front edge of smooth top. Unscrewed ground wire from back of smooth top unit. Unplugged 2 wire bundles, from back. Took bad element out , put in new one. Put back together. About 10 min's tops. Easy peasy.
First, we turned on broil and the upper element turned orange and obviously worked. We figured the bottom element went out. The diagram on this site showed a bottom heating element that looked nothing like ours, but after reading other reviews, and reading that part that goes through the back of the oven was in the middle, and not off to the side, we ordered this element. It was perfect. All you have to do is unplug the oven, take out the bottom pan covering the element by removing 2 screws in the back, remove the lower small cover on the back of the oven and then unplug the old element, unscrew the old element on the inside of the stove, then install the new element and put everything back like it was. Nothing to it. It worked like a charm and my oven now heats up fast again. Easiest appliance repair job ever!
1. Unplugged stove 2. Removed two (2) screws from bottom panel in oven cavity 3. Lifted out bottom panel 4. Removed two (2) screws from bake element standoffs. 5. Removed two (2) screws from bake element (Rear of oven cavity) 6. Removed Terminal Block Cover Box by removing two (2) screws and lifting up on it. 7. Removed lugs from the ends of the bake element. 8. Extracted bake element. 9 Inserted bake element through rear opening and attached the two lugs removed in step 7. 10 Inserted two screws removed in step 5. 11. This bake element only had a standoff bracket in the front. Used one (1) screw from step 4. for front standoff. 12 Replaced bottom panel and two screws. 13 Reinstalled Terminal Block Cover Box and two screws. 14. Plugged oven in and tested oven.