This front rack support helps stabilize and securely position a rack within the appliance. Its sturdy design ensures proper alignment and safe support during loading and unloading.
This microwave line fuse is a genuine replacement part designed to protect your appliance from power surges and overheating. It helps restore power when a blown fuse prevents the microwave from turnin...
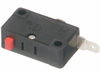
Keep your microwave safe with this door interlock switch. It stops the microwave from running when the door is open, protecting you from accidental exposure. If your microwave won’t start or acts up, ...
This black metal tray helps your microwave heat food evenly by rotating during cooking. It fits on rollers and sits on the coupler inside the microwave, turning smoothly to make sure everything gets h...
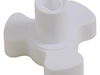
Keep your microwave working like new with this easy-to-install turntable coupler. It links the motor to the glass tray so your food rotates evenly for better cooking. If your tray wobbles or doesn’t t...
This waveguide cover protects the interior of the microwave by shielding key components from food splatter and moisture. Made from durable mica material, it helps prevent sparking and keeps the applia...
This microwave door hinge helps your appliance open and close smoothly while keeping the door sealed tight. It’s an important part that makes sure the microwave only runs when the door is shut, keepin...
The left door interlock support keeps the microwave’s door switch properly aligned so the appliance can detect when the door is fully closed and operate safely. If the switch becomes loose or misalign...
This support is a replacement structural component designed to hold or stabilize internal assemblies during operation. It helps maintain alignment and durability and is commonly replaced when bent, cr...
This hinge helps your microwave door open and close smoothly and safely. It’s made for the left side and is built to last, but if your door is hard to open, won’t stay closed, or makes strange noises,...
$143.05
In Stock
Questions And Answers for HMC80151UC
Ask our experts a question about this model and we'll get back to you as soon as possible!
5 questions answered by our experts.
< Prev
1
Next >
Sort by:
Search filter:
Clear Filter
Your search term must have 3 or more characters.
Keep searches simple. Use keywords, e.g. "leaking", "pump", "broken" or "fit".
Sorry, we couldn't find any existing answers that matched.Try using some different or simpler keywords, or submit your new question by using the "Ask a Question" button above!
Shawna
February 24, 2020
My convention feature isn't working on the Bosch speed oven, the elements are not heating up. Do you have any idea what part i might need. Thanks
For model number HMC80151UC
Hello and thank you for writing.
It certainly sounds like it could be a faulty thermistor PS8730839 and/or possibly a malfunctioning temperature regulator PS10060775 you should check the part(s) for signs of damage or test with a multimeter, and replace the part(s) as needed. We hope this helps. Please contact us anytime if you require further assistance.
There is a solid short-circuit at the power input line
For model number HMC80151UC
Hi Vladimir,
Thank you for your question. If there is a short circuit, check the fuse to if it has shorted. Make sure also that the microwave has it's own dedicated circuit and it is not sharing the same circuit with other appliances. We hope this helps. Thank you and have a great day.
Was this helpful?
Thank you for voting!
Derrick
May 1, 2023
Microwave dead, outlet is good, could it be the control panel or door switches. Do you stock the control board
Thanks
For model number HMC80151UC
Hi Derrick, thank you for contacting us. The most common cause for a microwave oven not working at all is a blown main fuse, part number PS10060777. The microwave main fuse will cut the flow of electricity if too much current passes through it. We hope this helps.
I just ordered the convection heater ring for my Bosch convection microwave oven from your website. I did this after i took the microwave out to see how to access the heater ring. As i was putting the microwave back in the cabinet, the door shifted up and now will not close properly. How do i get it to go back into position?
For model number HMC80151UC
Hello Douglas and thank you for writing.
The door hinges have little springs PS12072005 and a pin PS11704749, it is possible the spring or the pin got loose or lost. Check if all the parts are in place.
For your convenience, we have attached the link to your service manual. We hope this helps. Good luck with your repair.
https://www.manualslib.com/manual/1441527/Bosch-Hmc80151uc.html
Symptom: No power. Replaced main fuse. Replace two door switches. Tested all 3 door switches. Two are normally open (red ones). One is normally closed (Green one). When I connected power, I saw panel came on but turned off. Troubleshot, door switches area still testing ok. Main fuse is blown. Tested using a multimeter. What can be blowing the main fuse?
For model number HMC80151UC
Hello Dario, Thank you for the question. If too much current passes through the microwave circuitry it will blow the fuse. This can be caused by a defective Fan Motor, Control Board or a Wall Outlet. We hope this helps!
I installed a new right hinge (PartSelect part number PS10060784), since the integrated return spring failed. To remove the door, I made two of the special tools required in the Bosch repair manual. I fabricated two square pieces of aluminum, about 30mm on a side and ¼” thick. With the door open (it is horizontal) you place one square in each of the cavities that the hinges close into and close the door far enough that the squares take up the force of the springs and allow you to lift the door out. Of course, if one spring is broken, you will not need a square on that side to remove the door but will need it later to install the door with the new hinge. In fact, I installed the square in the replacement hinge before I installed the hinge in the door. Next remove the ventilation duct (Part number PS8770410). There are three screws. When re-installing the duct later, do not overtighten the screws, because they can pull through the duct. This will require longer screws and small flat washers to repair (‘don’t ask me how I know’). The next step is to remove the plastic cover (PartSelect part number PS11705124). It will be impossible to save the plastic cover (‘don’t ask me how I know’). Purchase a new one ahead of time. It will be easier to not scratch the door if you recognize that you are going to destroy the cover. When removing the plastic cover, pieces of some of the tabs that hold the cover in place will break off. The broken-off pieces of the tabs that fit into cavities at the top of the door may remain in the cavities. IF YOU DO NOT PICK OUT THOSE PIECES, THE NEW COVER WILL NOT SNAP HOME DUE TO THE PRESENCE OF THE BROKEN PIECES. You will break the new cover in removing it to figure out why it wouldn’t snap home and will have the pleasure of purchasing a second new cover (‘don’t ask me now I know’). Also, when removing the cover try not to bend the metal fingers of the frame (part number PS8770415), particularly along the top of the door. It is important that the gap between the metal fingers and the frame holding the glass be correct, since that is where the seal (part number PS10061106) must fit when replacing the cover. On the other hand, if the metal fingers are bent too far away from the frame holding the glass, the cover will not line up with the cavities along the top where the tabs go home. It will be easier to protect the metal fingers if you recognize that you will be destroying the cover when you remove it. I did pinch and damage the seal when trying to force the first new cover in place (it didn’t go home, as described above), and had the pleasure of purchasing another seal (currently unavailable). You only get one chance per cover. Once the cover is removed the frame can be removed from the outer door by removing the screws holding the two parts together.
Next, replace the spring.
Next re-attach the frame to the outer door.
Next, be sure the seal is positioned correctly on the cover. The seal has a flap that holds it in place on the cover, such that the seal will be pulled into place when installing the cover. This is essential, since you will not be able to reposition the seal once the cover snaps home (particularly along the top of the door).
Now, carefully position the cover so that it is going to remain parallel with the door when you push it home. You do not want the cover to be cocked, since the seal may not install correctly. Be sure all the tabs are falling into place as you install the cover. Hopefully, the tabs will all snap into place and the seal will stay in place.
Replace the door by feeding the hinges into place with the squares still installed. Open the door fully and remove the squares. The door will close correctly if the hinges are placed correctly. This may take several tries.
Finally, microwave yourself a fresh cup of coffee or other beverage.
This door is not meant to be repaired, in my opinion. I believe Bosch offers only the option of buying a new door. A DIY repair is not risk free.
Replaced the wave cover. Unscrewed existing cover that is at the top inside the microwave. Screwed in the new cover. Took about 30 seconds to do. Bosch service wanted over $100 for a service call plus parts and labor. Did it myself in seconds for under $10.