Restore full functionality and a clean look to your dryer with this genuine control knob, designed to fit a D-shaped shaft for easy cycle selection. Featuring a white finish with chrome accents, this ...
If your dryer’s taking longer to dry clothes or the lint screen looks damaged, it might be time for a new lint filter. This easy-to-install replacement works with both electric and gas dryers and help...
This washer or dryer selector knob allows you to easily choose cycles by connecting to the control panel’s rotary shaft. Made from durable white plastic with a chrome accent, it provides a secure fit ...
This Drive Belt is 89.5" long and comes in black, featuring four ribs on the inside for a better grip. This is a long belt that wraps all the way around the dryer drum, around a tension pulley, and th...
This genuine OEM mechanical timer regulates the length of drying cycles and controls power to different settings, ensuring proper operation of your dryer. It is a direct replacement for worn or faulty...
This drum glide bearing is an authentic OEM replacement part that is compatible with dryers. It is white in color and made of highly durable plastic. The bearing allows the drum to rotate smoothly and...
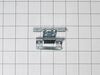
Restore dependable startup functionality to your dryer with this replacement push-to-start switch, designed to activate the appliance when pressed and released. Compatible with a range of dryer models...
The rubber bumper sits between the burner and the range itself to ensure the burners do not scrape the stove top. This OEM replacement bumper is sourced directly from the manufacturer, and is sold individually.
Having trouble with your wobbly GE range? Our adjustable leveling leg is the simple solution you've been looking for. When your range isn't sitting perfectly even, it can lead to a host of issues from...
This OEM replacement dryer slide bearing is white in color, and approximately 3 inches long. The slide bearings are supportive linings for your dryer. If they have eroded, or are damaged, the drums wi...
No Longer Available
Questions And Answers for GTMP280GD5WW
Be the first to ask our experts a question about this model!
✖
Ask a Question
Ask our experts a question on this model and we'll respond as soon as we can.
Removed the front Dryer panel. Left drum in place and lifted it up slightly to get access to motor drive. Slipped belt in place and put panel back on. This was a first attempt ever at fixing an appliance and it was no big deal.
I had to take most of the dryer apart because there is no rear access to the motor. It turned out to be easy to dissasembel the dryer. The only problem that I had was that I could not figure out how to route the belt around the motor and the idol pullies. I could not find anywhere that gave instructions on how to properly tension the belt. I finally figured out that the idoler pulley needs to be locked in place on the right side of the engie mount. Then the belt needs to be routed over idoler pulley and under the motor pulley. Finally release the idoler pully from the locked postion to put tension on the belt. It really turned out to be pretty easy.
Pryed off the top with a flat head screwdriver and removed the 2 screws holding the front panel to the sides. Then lifted the front panel off of the bottom brackets. Belt fit perfectly and followed the provided instructions to loop it around the motor and pulley. PartSelect got the part to me within a couple of days and the repair was a snap.


 – Part Number: WE03X37319")


 – Part Number: WE03X37320")