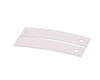
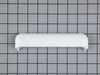
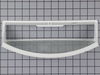
This authentic, white Drum Bearing Slide, also known as the bearing drum slide, glide, or pad, is a plastic, easy-to-install part for your dryer. It replaces the dryer's front drum slide to allow for ...
This original equipment manufacturer Drum Bearing Slide is a plastic, green, easy-to-install part for your dryer. It replaces the dryer's front drum slide to allow for easier movement. You'll know if...
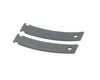
This drum bearing helps your dryer operate as quietly as possible.The drum slides should also be replaced when replacing the drum bearing. The slides are NOT included with this part this is the bearin...
This Drive Belt is 89.5" long and comes in black, featuring four ribs on the inside for a better grip. This is a long belt that wraps all the way around the dryer drum, around a tension pulley, and th...
If your dryer’s making loud noises or the drum seems shaky, this rear bearing sleeve might be the fix. It helps the drum spin smoothly and stay in place. When it wears out, you might hear squeaks or n...
TThe door strike for your dryer is mounted on the dryer frame that the door shuts onto. It fits into the door catch on the door and keeps the door closed. If the door strike is damaged or missing, the...
This Genuine OEM door latch is designed for use with a wide range of GE clothes dryers. Constructed from a combination of durable metal and plastic, the latch is mounted onto the dryer frame to secure...
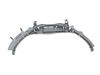
This rear drum bearing kit comes with a shaft, bearing and installation instructions. The bearing plate comes with a slot in it for the ground strap. Helps keep your dryer running as smoothly as poss...
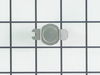
Restore dependable startup functionality to your dryer with this replacement push-to-start switch, designed to activate the appliance when pressed and released. Compatible with a range of dryer models...
This part is the replacement high-limit thermostat or safety thermostat for your dryer. The high-limit thermostat is found on the upper right-hand side of the heater housing, and it cuts off power to ...
This is a replacement O-ring for the drum bearing retainer on your dryer. The drum bearing is found at the back of the dryer drum. The O-ring is designed to create a seal on the drum bearing. The O-r...
$35.58
Special Order
Questions And Answers for GTDP300EM1WS
Ask our experts a question about this model and we'll get back to you as soon as possible!
4 questions answered by our experts.
< Prev
1
Next >
Sort by:
Search filter:
Clear Filter
Your search term must have 3 or more characters.
Keep searches simple. Use keywords, e.g. "leaking", "pump", "broken" or "fit".
Sorry, we couldn't find any existing answers that matched.Try using some different or simpler keywords, or submit your new question by using the "Ask a Question" button above!
Wayne
March 9, 2023
drum has started to squeak in operation, looking for most likely cause
For model number GTDP300EM1WS
Hi Wayne, thank you for the question. First, you may need to check the drive belt, part number PS16542496. Over time, the drive belt can become frayed or otherwise damaged. If the drive belt is frayed or damaged, the drum will be noisy as it turns. Inspect the drive belt for signs of wear. If the drive belt is worn, you may need to replace it. If there is no issue with the drive belt, you may need to check the drum bearing, part number PS266777, which might be worn out. The drum bearing supports the rear of the dryer drum. Over time, the drum bearing wears out. If the drum bearing is worn out, the drum may make a squealing noise. If the drum bearing is not faulty, then you may need to check the idler pulley, part number PS265721. If it does not solve the issue, you may need to check the drum glides, part number PS755842. The drum glides are small plastic pieces that support the front of the dryer drum. As the drum rotates, it slides on these plastic pieces. Over time, the drum glides wear out. If the drum glides are worn out, the drum will make noise. If the problem persists, you may need to check the drive motor, part number PS11699355. We hope this helps!
I need knob for the right side easy care/ time dry/ cottons selector GTFP/GTDX300
For model number GTDP300EM1WS
Hi Colleen,
Thank you for your question. The part number listed under your model number for the timer knob is PS3487132. If you need help placing an order for it, customer service is open 7 days a week and anyone will be happy to assist you. Please feel free to give us a call. We look forward to hearing from you!
I replaced the timer control switch it ran so I pushed the dryer back and then it won't run, I have put a meter on and the only part that is not getting power from the switch is the dryer buzzer resistor. I have metered all wires behind upper control panel and all have power to them,
now when I check them A & S on the timer switch have no power so the switch I put in is bad, correct????
For model number GTDP300EM1WS
Hi Mark, thank you for your question. We have found that the dryer buzzer resistor only gives an audible signal to alert you when the dryer cycle is complete. It is not needed to run the dryer. You may need to check the push-to-start switch, part number PS3487190, for continuity using a multimeter. If there is no continuity, it means the switch has failed and you need to replace it. We hope that helps!
DRYER RUNS FOR SEVERAL MINUTES THEN STOPS. WILL RUN AGAIN AFTER SEVERAL MINUTES
For model number GTDP300EM1WS
Hello Ronald, Thank you for reaching out. This could indicate the Dryer is over heating or thinks it is over heating so it stops to cool down. We suggest testing the Cycling Thermostat, High Limit Thermostat and the Safety Thermostat. They can be tested with a Multimeter to check the continuity. We hope this helps!
It was pretty easy. After already taking apart the dryer to install a new belt I knew exactly my plan of action. I removed the two screws that hold the top panel of the dryer to the front panel. I then removed the top panel and removed the screws that hold the front to each side panel. I than pulled the front away from the cabinet and drum. I put the new slides in place and installed a new felt strip. I put it back together and that was that. Very easy.
I removed the two screws at the front above the drum opening (with the dryer door open). The top panel then lifts off. I removed the screw at each side that holds the front panel to the side panels, tilted the front panel forward, which disengages the front of the drum from the front drum glide bearing. I then lifted the front panel slightly, unhooking the bottom of the panel from the dryer base, and swung the front panel aside. I removed the existing top drum bearing guide, which was disintegrated, and snapped in the new bearing guide, with the nylon slide strips installed in the bearing guide. Next pulled out the old felt strip, and pressed the new one in place. I then put the bottom of the front panel back into the bottom of the dryer front, and while lifting the drum to asure it fit over the bearing guide, pushed the front panel back to a vertical position to mate with the side panels. I then replaced the side panel screws, replaced the top, and replaced the front top panel screws.
Basically, I followed the same steps a prior person posted. 1.Removed the two screws inside the door, on the top part of the opening. 2.Lifted up and removed the top. 3.Removed two screws holding the front panel in place. 4.Held up the drum while removing the front panel. I carefully turned the panel so I could get at the drum bearing without pulling the wires connecting it to the front panel. The wires are not very long, so I had to be careful not to pull on them. 5.Carefully pried off the old drum bearing, using just my hands. It was fairly tight, and popped out just as I started to worry if I was putting too much pressure on it. 6.Checked to see how the old felt was installed, then I pulled out the old felt. 7.Inserted the new felt, being careful to insert one end into a slot the same way the original was installed. 8.Inserted the new slides into the new drum bearing. The gray slides went in at the eleven and one o'clock positions, the white slides went in at ten and two o'clock. 9.Removed a surplus plastic piece from the new drum bearing (where the light comes through). 10.Inserted the new drum bearing, putting the bottom tabs in first, then pivoting it into place. I squeezed it into place to make sure it was tight. 11.Lifted up the drum and put the front panel back on. 12.Screwed the front panel back on, using the two screws. 13.Carefully put the top back on. 14.Screwed in the two screws inside the front door to fasten down the top. That was it! I started up the dryer and it worked fine. No more squeaking. About the only thing odd about the repair is why PartSelect sells each slide separately (i.e., I had to order 2 white slides and 2 gray slides). I can't imagine replacing just one, so why not package them in pairs, or maybe even all four in one package. At any rate, the repair was easy, and a lot cheaper than having someone come out to fix it.