This double inlet water valve has quick connections. This valve has 1/4 and 5/16 John Guest fittings for the outlet lines and a 1/4 compression fitting for the inlet line.
This 40-Watt light bulb is sold individually.
It is specially designed to withstand extreme temperatures, so this bulb is compatible with a variety of appliance types including refrigerators, ranges,...
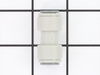
This door recess spring or dispenser lever spring in your refrigerator is used to return the ice door to the closed position or the dispenser lever to the home position once released. You will find th...
This ice maker assembly is used to make ice in your refrigerator. The ice maker receives water from the water inlet valve and will freeze until ice cubes are formed. Once the water has been frozen the...
This genuine OEM solenoid is designed for use with GE refrigerators and controls the opening and closing of the ice chute door. It serves as a direct replacement for a worn or faulty solenoid, helping...
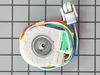
This evaporator fan motor is located in the back of the freezer, and circulates air over the refrigerator coils. These coils will convert the heat into cool air, which is then circulated.
Note: Therm...
This ice dispenser door flap, also known as a damper door, is designed to seal the ice chute in compatible refrigerator models, preventing warm air from entering the freezer compartment. Constructed f...
$29.12
Special Order
Questions And Answers for GSH25JSDBSS
Ask our experts a question about this model and we'll get back to you as soon as possible!
10 questions answered by our experts.
< Prev
1
2
Next >
Sort by:
Search filter:
Clear Filter
Your search term must have 3 or more characters.
Keep searches simple. Use keywords, e.g. "leaking", "pump", "broken" or "fit".
Sorry, we couldn't find any existing answers that matched.Try using some different or simpler keywords, or submit your new question by using the "Ask a Question" button above!
Leo
January 11, 2023
Lower light shade
For model number GSH25JSDBSS
Hi Leo, thank you for reaching out. The part you are looking for is part number PS291924. We hope this information helps! If you need help placing an order, customer service is open 7 days a week. Thanks again for your great question.
The freezer/refrigerator isn't working not getting cold, the lights inside the refrigerator and Freezer come on
For model number GSH25JSDBSS
Hi Rodney, thank you for reaching out. We would suggest checking the temperature sensor first. If it is fine, the issue could be with the evaporator fan motor, part number PS1019114. You may need to replace it to fix the issue. We hope this solves your problem!
Hi Michael, thank you for your inquiry. We have included a video that you may reference on how to replace the door switch. The refrigerator in the video may appear different from yours, but it will give you a general idea of how to replace the door switch. We hope this helps with the repair.
1 personfound this helpful.
Was this helpful?
Thank you for voting!
John
October 11, 2023
My fridge is not getting cold in the fresh food section and the freezer, what needs to be replaced
For model number GSH25JSDBSS
Hi John, thank you for reaching out. We would recommend checking the evaporator fan motor, part number PS1019114. You may need to replace it to fix the issue. We hope this will resolve your problem!
The ice lever that turns ice maker off when tray is full does not work. No spring to move it back and forth. What is it called?
For model number GSH25JSDBSS
Hi Sharon,
Thank you for your question. The part you are referring to is sometimes referred to as the lever or arm. If it is not working, you will need to replace the ice maker. The part number listed under your model number for the ice maker is PS1993870. If you would like to place an order for it, please call our customer service line and anyone will be happy to assist you. We look forward to hearing from you!
The very first symptom here is important! The door water dispenser is not working but the ice macine is working. You may only have a frozen water tube in the door so do the following before diagnosing that your solenoid valve is bad: 1) the tube usually runs under the front of the refrigerator and usually has a quick disconnect. Undo the connection and press the dispenser. If water comes out of the tube you have a frozen or blocked tube in the door. 2) Immediately adjust the temperature in the freezer and warm the freezer compartment as much as you can without destroying the freezer contents. Wait 24 hours. This will usually unfreeze the line. Do not waste your time with a hair dryer. NOW, if this doesn't work and you are convinced you need to order and replace the solenoid, follow these steps. Assemble your tools first. I needed a good ratchet set and a screwdriver. A shop towel is helpful for spilled water. A light is handy. Pull out the refreigerator to gain access to the rear of the unit. Unplug the power and close the water valve (older homes, you may need to actually shut the house water supply). Remove the screws which hold the cover over the lower half of the refrigerator. On the left you will see the solenoid. It's always good to see that your new part matches the one you feel needs replaced. They may not match perfectly due to changing design but they should be very similar. One screw holds this part in place and access is very simple. Now simply unplug the electrical connections. In my case, one blue "blade" type connection (powering the water) and one red "blade" type connection powering the ice maker. They are not the same size and this coupled with the coloring means you will not accidently switch them. pull the tubes clear of the solenoid. This is simple and needs no explantion. Grab your new solenoid and reattach both the electrical and water lines (two, remember, ice maker and drink dispencer). Replace the single screw. Re-attach the rear, lower refrigerator cover and go to the front of the unit to check the water. You can listen carefully and hear the power engage from the new part bringing you water. Clean up, replace the refrigerator back to its place and look really tired when your wife sees that you worked "so hard"! You probably saved at least $50-$80 from a service call which can now be used to take the family to dinner after your "exhausting" 15 minute workout of removing about 10 screws and wheeling the unit in and out of place. Writing this article took longer! My 4 year old worked harder holding the flash light!
I used a digital camera and photographed the assembled unit and the metal blades before I started the repair. Then, I removed the top screw on the clear shield. Flip over ice tray and removed two Phillips screws on bottom. Exterior plastic white cover comes off next. The cover sides have hard push-in white plastic tabs. Push them in; pry up top cover with small flathead screwdriver. Slide white top cover up and you will now see the metal blades and assembly. Auger is held in place with a metal c-clip and washer on the end. Use flat head screwdriver to pry off c-clip. Then you will see a nylon round slotted nut. The threads are reverse, use pliers and loosen nut. It is not that tight but pliers are needed. Then it all is loose and ready for removal. I slid all the blades off at one time and kept them stacked together. Slide out auger and clear flat shield cover. Install new auger, clear shield, and metal blade stack. When you put it all back together take a look at the long metal J-hook on the bottom make sure it is in the slot before you make everything tight. Failing to do this will prevent cubed ice from dispensing. It is not that hard to do the repair it just takes some patience and paying attention to details.
After replacing the defrost heater, main board and thermistor I still had the same problem. Called a repair guy and he (with the help of GE on the phone) diagnosed that the temperature sensor was bad. So I ordered from partselect and installed it and it fixed the problem. Been good for a couple months (knocking on wood). To install I had to cut the 2 wires to the old sensor, crimp the 2 new wires on and snap the new sensor to the clip on the evaporator. Very easy. Make sure you seal the ends of the wire crimps so moisture doesn't get in and corrode the connection.