Models > GR450LXLB0

GR450LXLB0 Whirlpool Range - Overview

Sections of the GR450LXLB0

[Viewing 5 of 5]

Manuals & Care Guides for GR450LXLB0

Click to download
Keep searches simple, eg. "belt" or "pump".
Light Bulb - 40W – Part Number: 8009
Light Bulb - 40W
★★★★★
★★★★★
(27)
PartSelect #: PS884734
Manufacturer #: 8009
This an authentic OEM 40-Watt replacement light bulb, used in a number of household appliances. It is specially designed to withstand extreme temperatures, which is why these replacement bulbs are mos...
$14.96
  In Stock
Range Inner Door Glass – Part Number: WP9781593
Range Inner Door Glass
★★★★★
★★★★★
(72)
PartSelect #: PS11747420
Manufacturer #: WP9781593
Glass only. This inner door glass is used in ranges. It creates a transparent heat barrier inside your oven door.
$125.23
  In Stock
Dual Surface Element - 2500w/1200w – Part Number: W10823692
Dual Surface Element - 2500w/1200w
★★★★★
★★★★★
(26)
PartSelect #: PS11764902
Manufacturer #: W10823692
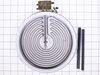
This is the replacement large surface element for your cooktop or range. It is approximately 10-inches in diameter and is 1200/2500 watts. The large surface element is installed under the cooktop and ...
$293.08
  In Stock
Touch-Up Paint - White – Part Number: 72017
Touch-Up Paint - White
★★★★★
★★★★★
(16)
PartSelect #: PS385132
Manufacturer #: 72017
This 18 ml bottle of white appliance touch-up paint is used to cover scratches or marks on your appliance. The white touch-up paint can be used on refrigerators, microwaves, ranges, clothes dryers, an...
$10.20
  In Stock
Bake Element – Part Number: WP9750213
Bake Element
★★★★★
★★★★★
(24)
PartSelect #: PS11747109
Manufacturer #: WP9750213
This bake element has push-on wire terminals and is found at the bottom of your oven cavity.
$262.55
  In Stock
Single Drawer Roller – Part Number: 814229
Single Drawer Roller
★★★★★
★★★★★
(1)
PartSelect #: PS389148
Manufacturer #: 814229
Used to slide the broiler drawer open and closed.
$57.18
  In Stock
Light Gasket – Part Number: WP3184533
Light Gasket
★★★★★
★★★★★
(2)
PartSelect #: PS11740863
Manufacturer #: WP3184533
This part creates a seal around the light lens and bulb.
$14.20
  In Stock
Burner Element - Right Front – Part Number: W10823698
Burner Element - Right Front
★★★★★
★★★★★
(5)
PartSelect #: PS11764908
Manufacturer #: W10823698
This surface element is for ranges. The surface element supplies the heat to a cooking area on top of the range. Unplug the range or shut off the house circuit breaker for the range before insta...
$280.50
  In Stock
Light Cover Lens – Part Number: WP9781049
Light Cover Lens
★★★★★
★★★★★
(20)
PartSelect #: PS11747414
Manufacturer #: WP9781049
This part goes over top of the light bulb.
$82.17
  In Stock
Dual Infinite Switch – Part Number: WP9755173
Dual Infinite Switch
★★★★★
★★★★★
(10)
PartSelect #: PS11747156
Manufacturer #: WP9755173
This switch allows you to choose which size burner you require according to the size of the pots and pans you're using.
$130.90
  In Stock
Burner Knob – Part Number: WP9752405FW
Burner Knob
PartSelect #: PS11747131
Manufacturer #: WP9752405FW
Sold individually. This knob accepts a double-flat shaft.
$35.64
  In Stock
Insulation – Part Number: WPW10208653
Insulation
★★★★★
★★★★★
(6)
PartSelect #: PS11750415
Manufacturer #: WPW10208653
Oven Wrap Insulation.
$77.41
  In Stock

Questions And Answers for GR450LXLB0

Be the first to ask our experts a question about this model!

Common Symptoms of the GR450LXLB0

[Viewing 6 of 6]
Element will not heat
Fixed by
these parts
Fixing Fixing Fixing
Show All
Little to no heat when baking
Fixed by
these parts
Fixing Fixing
Show All
Door won’t close
Fixed by
these parts
Fixing Fixing
Show All
Will Not Start
Fixed by
these parts
Fixing Fixing Fixing
Show All
Noisy
Fixed by
these parts
Fixing
Show All
Oven not heating evenly
Fixed by
these parts
Fixing Fixing
Show All
Keep searches simple. Use keywords, e.g. "leaking", "pump", "broken" or "fit".
Inside door glass broke
I removed the oven door by lifting it off with the hinges. Disassembled the door parts one at time making sure I remember where I removed the screws until I am able to get to the broken glass. The most difficult part is making sure that the insulation strip & the gasket stayed in place after I replaced the broken glass & doing the reverse process of installing the parts together. Relatively easy process as long as you remember where the parts go. When in doubt, I had to refer to the pictorial of the disassembled door shown on your website.
Parts Used:
Range Inner Door Glass
  • MANNY from LIVERMORE, CA
  • Difficulty Level:
    Easy
  • Total Repair Time:
    15 - 30 mins
  • Tools:
    Screw drivers
132 of 147 people found this instruction helpful.
Was this instruction helpful to you?
Thank you for voting!
Radiant element, 2400 watt, under Ceran glass cok top needed replacement.
turned off power
removed ceran top from cabinet
removed element
installed new element
replaced top
powered up and was done
Parts Used:
Dual Surface Element - 2500w/1200w
  • GEORGE from NEWNAN, GA
  • Difficulty Level:
    Easy
  • Total Repair Time:
    15 - 30 mins
  • Tools:
    Pliers, Screw drivers
164 of 249 people found this instruction helpful.
Was this instruction helpful to you?
Thank you for voting!
mice had made nests in the insulation wrap in the range
I numbered every part. ex: 1 L., for first part removed left side. I used a magic marker to circle the holes and wrote the number of screws used on the part, set the srews in a separete place, so that I new where these screws went to. The cleanup was pretty time consuming, but I was able to keep my stove, when every repairman I called to fix my stove told me I was better off buying a new stove. ($600.00 stove 2 years old)Please Note: The insulation blanket needed for the entire stove is two pieces, the sides and top are one part # and the bottom and back, are another part #. I did not know this. I just purchased the top and sides. I got lucky, the back and bottom were still in good shape. So I guess I should have read the description of the part more carefully to see what it covers, before I ordered it. It took two people two hours to do the work, it was really nice to have an extra set of eyes, to remember what direction pieces of metal from the stove went. I would do it all over in a heart beat instead of buying a new stove.
Parts Used:
Insulation
  • Wendy from Red Hook, NY
  • Difficulty Level:
    Easy
  • Total Repair Time:
    More than 2 hours
  • Tools:
    Screw drivers
98 of 132 people found this instruction helpful.
Was this instruction helpful to you?
Thank you for voting!