Models > GM-818DTWA

GM-818DTWA LG Refrigerator - Overview

Sections of the GM-818DTWA

[Viewing 1 of 1]
Keep searches simple, eg. "belt" or "pump".
Plastic Tube - 5/16 Inch – Part Number: MJU62070602
Plastic Tube - 5/16 Inch
★★★★★
★★★★★
(4)
PartSelect #: PS3536013
Manufacturer #: MJU62070602
$29.11
  In Stock
Order within the next 14 mins and your part ships today!
Refrigerator Door Switch – Part Number: 6600JB1010A
Refrigerator Door Switch
★★★★★
★★★★★
(1)
PartSelect #: PS3529268
Manufacturer #: 6600JB1010A
This door switch is used in refrigerators. It is activated by the closing and opening of the door
$44.95
  In Stock
Order within the next 14 mins and your part ships today!
Lower Holder Cover – Part Number: 4930JJ2021A
Lower Holder Cover
PartSelect #: PS3524311
Manufacturer #: 4930JJ2021A
"Clips"
$99.37
  In Stock
Order within the next 14 mins and your part ships today!
Refrigerator Water Filter – Part Number: 5231JA2006F
Refrigerator Water Filter
PartSelect #: PS3591904
Manufacturer #: 5231JA2006F
This OEM filter measures 2.5 inches deep, 12.5 inches high, 5 inches wide and roughly 1.5 lbs. It is recommended to replace this filter every six months or 300 gallons, whichever comes first. If you n...
$110.46
  In Stock
Order within the next 14 mins and your part ships today!
Refrigerator Crisper Cover/Shelf Frame – Part Number: 3550JJ1033A
Refrigerator Crisper Cover/Shelf Frame
★★★★★
★★★★★
(2)
PartSelect #: PS3520002
Manufacturer #: 3550JJ1033A
White. No Glass
$119.20
  In Stock
Order within the next 14 mins and your part ships today!
Defrost Thermostat – Part Number: 6615JB2005C
Defrost Thermostat
PartSelect #: PS3529338
Manufacturer #: 6615JB2005C
This part is a temperature sensing devise. It senses the rise in evaporator temperature during a defrost cycle and cycles the defrost heater off after all frost is melted. It is calibrated to permit...
$50.70
  In Stock
Order within the next 14 mins and your part ships today!
Connector,Tube – Part Number: 4932JA3014A
Connector,Tube
PartSelect #: PS3524395
Manufacturer #: 4932JA3014A
$42.49
  In Stock
Order within the next 14 mins and your part ships today!
Guide Rail Assembly - Left Side – Part Number: 4975JJ2002B
Guide Rail Assembly - Left Side
★★★★★
★★★★★
(1)
PartSelect #: PS3524812
Manufacturer #: 4975JJ2002B
$65.15
  In Stock
Order within the next 14 mins and your part ships today!
Guide Rail Assembly - Right Side – Part Number: 4975JJ2002A
Guide Rail Assembly - Right Side
PartSelect #: PS3524811
Manufacturer #: 4975JJ2002A
$65.88
  In Stock
Order within the next 14 mins and your part ships today!
Screw,Customized – Part Number: 1SZZJA3011B
Screw,Customized
PartSelect #: PS3517483
Manufacturer #: 1SZZJA3011B
$16.64
  In Stock
Order within the next 14 mins and your part ships today!
SOCKET,LAMP – Part Number: EAG62831801
SOCKET,LAMP
PartSelect #: PS3643279
Manufacturer #: EAG62831801
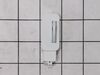
This part is a replacement light socket for your refrigerator. This model is white in color, and it has two sockets that will fit two separate light bulbs. The light socket connects to the power sourc...
$116.06
  In Stock
Order within the next 14 mins and your part ships today!
Door Shelf Bin - White/Clear – Part Number: 5005JJ2020A
Door Shelf Bin - White/Clear
PartSelect #: PS3525696
Manufacturer #: 5005JJ2020A
This bin is white in color with a clear front insert.
$142.34
  In Stock
Order within the next 14 mins and your part ships today!

Questions And Answers for GM-818DTWA

Be the first to ask our experts a question about this model!

Common Symptoms of the GM-818DTWA

[Viewing 4 of 4]
Light not working
Fixed by
these parts
Fixing Fixing
Show All
Leaking
Fixed by
these parts
Fixing Fixing
Show All
Fridge too warm
Fixed by
these parts
Fixing
Show All
Not dispensing water
Fixed by
these parts
Fixing
Show All
Keep searches simple. Use keywords, e.g. "leaking", "pump", "broken" or "fit".
Remove and replace light switch
Video makes it look easy. Kenmore refrigerator does not have "groove" along the right hand side of switch that allows for pushing down on release. Used a thin screwdriver to get under to push while holding switch edge with pliers. Kept slipping. Tape sides to avoid scratching inside of refrigerator.
Parts Used:
Refrigerator Door Switch
  • Debbie from Waltham, MA
  • Difficulty Level:
    A Bit Difficult
  • Total Repair Time:
    30 - 60 mins
  • Tools:
    Pliers, Screw drivers
36 of 58 people found this instruction helpful.
Was this instruction helpful to you?
Thank you for voting!
Water feed line running from water valve to filter housing was leaking
Shut off water supply. Disconnect main supply line. Remove rear lower panel on back of refrigerator. Remove all tubing clamps on back. Disconnect leaking tubing from water supply valve. Remove water filter and unscrew/remove water filter housing. Replace tubing - connect to water filter housing then to water supply valve. Reconnect filter housing and filter. Reinstall lower panel, then main water supply line, then all tubing clamps. Turn water back on and check for leaks after discarding several glasses of water to fill filter. Job complete!
Parts Used:
Plastic Tube - 5/16 Inch
  • Tom from EASTON, PA
  • Difficulty Level:
    Easy
  • Total Repair Time:
    30 - 60 mins
  • Tools:
    Screw drivers, Wrench (Adjustable)
11 of 18 people found this instruction helpful.
Was this instruction helpful to you?
Thank you for voting!
Changing out the Ice Maker tube
An easy way to get a refrigerator out from the wall is to use a tow strap or 1/2 to 3/4 in. rope. Throw a loop behind refer while keeping both ends in your hands. Let it settle down to the lower half of unit and pull using both hands. Comes right out.
Remove lower panel. Unscrew water valve from cabinet. Remove all tube holders Lay some rags down to catch a little water drainage.
Turn off water supply valve at wall. Unplug Power. Remove filter and filter holder. (one screw).
remove tube from valve by removing plastic C clip. Push plastic ring towards the valve and pull out tube at same time.
With the tube free, remove filter, then mount screw to remove the inside filter holder. When it is out, pull the tube doing the same process as the lower end. Pull tube out and replace with new one putting everything back in reverse order.
Before placing tube holders back on, turn on water to check for leaks.
After turning water back on and plugging in power, push refer back into place.
While I was there, I also replaced the hose from the wall to the refer.
Parts Used:
Plastic Tube - 5/16 Inch
  • HARRY from SPARKS, NV
  • Difficulty Level:
    Really Easy
  • Total Repair Time:
    15 - 30 mins
  • Tools:
    Screw drivers, Wrench (Adjustable)
8 of 12 people found this instruction helpful.
Was this instruction helpful to you?
Thank you for voting!