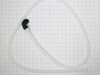
This dishwasher tub gasket creates a watertight seal between the tub and door to prevent leaks and maintain efficient performance. Made from durable rubber, it fits into the tub’s channel and is easy ...
The lower rack roller supports the smooth sliding of your dishwasher’s bottom rack. Measuring 1.5 inches in diameter and charcoal-colored, this OEM replacement part is sold individually. Replace all f...
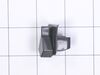
This dishwasher latch strike is a manufacturer-approved replacement part for your appliance. The latch strike is an important component in your dishwasher door assembly, and adds an extra layer of sec...
This middle conduit assembly, also known as the middle spray arm water supply tube, is an authentic OEM replacement part designed for dishwashers. It is a gray, plastic tube that connects the main wat...
This OEM part is from GE and is designed for use in your refrigerator. This part is known as a door mounting screw, and is for mounting the handles of the refrigerator to the door studs.
Are you dealing with a dishwasher that's not draining properly? The answer could lie in a simple fix -- the GE Drain Hose Assembly. This unassuming part plays a vital role in your dishwasher's efficie...
$44.40
Special Order
Questions And Answers for GDT650SMV2ES
Be the first to ask our experts a question about this model!
✖
Ask a Question
Ask our experts a question on this model and we'll respond as soon as we can.
I found it online! There were step by step instructions that were easy to understand. I have never had to do anything like this in my life, only recently had to start doing everything around the house myself due to husband's illness. The repairman came out, charged me $100 to determine what the dishwasher needed & left me with the part number. He was going to charge me $389 to install the part and they were over charging for the part. The repairman suggested I just get a new dishwasher. I ordered the part from the website at 1/2 the price that the other place charges and found it on line. With the step by step instructions and the online page, I successfully installed it MYSELF. Saved me a ton of $$. I LOVE the website Thank You!!!!
It was a simple as: attach and done! There is a ring on the part that tightens clockwise to the nipple that sprays out the water that it rests on. Twist clockwise and you are done! It is a mystery how it was unattached to begin with but not a problem in the end, it was easy to fix!
Replaced floating seal. Un plugged and Pulled washer out from the counter and laid on its left side. Pull pump out of seal by hand. Straight screwdriver to lever seal out of fitting. Clean hole and wipe seal then push into hole. Reinsert pump reverse install. To make it easier I previously extended the water supply hose to nearly 8 feet so did not have to disconnect it.