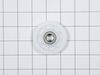
The moisture sensor, also known as a humidity sensor, works in conjunction with your dryer by helping determine the amount of moisture in the drum to reduce overdrying. If the timer doesn’t advance co...
Looking to extend the lifespan of your LG electric dryer? Our authentic LG Idle Pulley could be the missing piece you need! This little thing plays a big role in keeping your dryer working smoothly an...
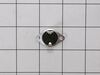
The high limit thermostat on your dyer prevents your dryer from overheating. When the dryer heats up too much, the high limit thermostat will sense it and automatically shut off the heating element. I...
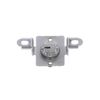
Take a look at this essential LG Dryer Safety Switch Assembly. A don't-miss fixture for your LG Dryer. This is more than just a part, it's a safeguard for you. If your dryer's door springs open, this ...
Don't let a faulty door latch disrupt your laundry routine! Our genuine LG Dryer Door Latch Replacement is just the solution you need to bring your LG dryer back to life. This essential part functio...
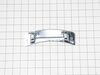
Does your LG dryer door need a little love? Our authentic LG door hinge might be your perfect fix. This hinge is specially designed for LG dryers to restore that smooth, easy swing of your machines fr...
Having trouble with your LG dryer door not closing properly? We understand how frustrating it can be. That's why we're happy to offer the LG Dryer Door Latch Hook Locker. This is not just any replacem...
$56.87
In Stock
Questions And Answers for GD1329LEU
Be the first to ask our experts a question about this model!
✖
Ask a Question
Ask our experts a question on this model and we'll respond as soon as we can.
I actually went to mr fix it on u tube. Great instruction on how to take dryer apart. First I unplugged the dryer. I found I could reach the heating system by removing the lint tube in the back of the dryer. I put my I phone with the light on inside the back of the dryer and tested the connections to see if all were working. The thermal fuse was not working. I removed the two wires , red on top and white on the bottom. Then used a small Phillips screwdriver to remove the two mounting screws and removed the fuse. I then used a vacuum to clear any lint from the back of the dryer and inside the dryer. This took me about an hour and a half. I did it this way because I did not want to disassemble the entire dryer to get to the components. I received the fuse in 3 days and tested it. It was fine. I then put it in the dryer screwed it in place, connected the wires. Replaced the lint tube. This took about 10 minutes. Dryer is running great.
I unplugged the dryer and disconnected the vent. I pulled the dryer away from the wall so I had room to work on it. Pulled the top cover off (slides back). Took the door off Took the front adjustable feet on the bottom off Unscrewed all of the face screws on the front of the dryer Took the two screws off of the back of the control panel holding the control panel to the metal frame. Gently pulled on the control panel to reveal 4 screws under the control panel to be able to take the front cover off. Pulled the front cover off (the dryer door front cover). Pulled the dryer vent cover off (two screws). I could now see the heating element with sensor/fuse (right side). Did a continuity test (beep) on all visable sensors/fuses on the heating element. No beep on the thermal fuse (used website diagram to locate parts to test and replacement part numbers). Got the part after about a week, tested the parted (it beeped), replaced with new part and put dryer back together, plugged in and the dryer heated. Problem solved.
1. Had to find out what was causing the problem by eliminating each part one by one using a multimeter. I got a video link from parts select on how to do this.
2. Then got another video link sent to me by parts select on how to take my dryer a part and replace the part.
3. Followed it step by step and it worked really well.
4. The process was great except shipping was excessively high for such a small part.