If your fridge doors aren’t sealing properly or you’re noticing cold air escaping, this front plate assembly might be the fix. Also called a mullion or flipper, it fits between the French doors to kee...
This handle screw, also known as a mounting bolt, is a mounting screw to help secure the door handle to your refrigerator door. If your handle is loose, you may just need to tighten the screw. If your...
Having trouble with your LG fridge's ice or water dispenser? We have a solution: the Refrigerator Ice Water Line Tube Assembly is ready to get your fridge back in top shape. Why is this part crucial...
This roller assembly supports smooth movement of racks, drawers, or drums during operation. Reduced friction improves ease of use and reduces wear. Replacing a worn roller restores quiet, smooth movement.
This valve helps your fridge deliver water to the ice maker and dispenser. If you’re not getting ice, the dispenser isn’t working, or you hear strange noises, this part might be the fix. It’s easy to ...
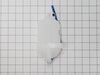
This is a manufacturer-approved refrigerator door closure for your refrigerator. It is made of white plastic and measures approximately 3 inches by 2 inches. If your old closure is damaged, your refri...
$28.96
In Stock
Questions And Answers for GC-X288NSSM
Be the first to ask our experts a question about this model!
✖
Ask a Question
Ask our experts a question on this model and we'll respond as soon as we can.
Had to buy the entire door mullion because the spring broke, wasn't happy. Got the new part very quickly and it was a new replacement part number. Somewhat tentative. Took it out of the box and looked it over. No spring! Groan! Thought I got the wrong part. Flipped the bottom hinge and it snapped open, no need for a spring! Two screws, disconnect the wire harness, throw away the old, get new, connect the wire harness, connect hinges, put in two screws! Super easy. Watch the video for some pointers along the way.
Unplug the refrigerator and empty the freezer. Remove the lower basket and roll out upper tray. Open the freezer door. I was able to lie on the floor to remove the 2 screws holding the ice maker without removing the freezer door. Depress the 2 tabs and slide the ice maker forward to remove. Install in reverse order. Change the water inlet valve at the same time.


 – Part Number: MCR66849208")