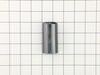
This kit includes one bearing, one ball shaft, one ball bearing, one ball bearing retainer, a small tube of high temperature lubricant, and installation screws.
The rear drum support bearing helps support the dryer drum to rotate quietly and smoothly during operation. The bearing attaches on the inside of the rear panel of the dryer cabinet. If your dryer is ...
This dryer lint screen is for laundry centers.
Dryer lint screen captures lint and debris from the exhaust air flowing from the dryer.
Follow the instructions in the owner's manual when installing this part.
The pump is what your washer uses to remove the water from the tub. This part is the pump and motor assembly which includes the red flapper to prevent drain back flow.
The upper felt seal for your dryer is attached to the top edge of the drum support area, and is held there by a high temperature adhesive. It creates a seal where the dryer door opens and closes, so t...
This ignition coil kit contains two coils. One is a two wire secondary coil, while the other is a three wire booster coil. Both should be used together in your gas clothes dryer.
$43.95
In Stock
Questions And Answers for FGX831FS1
Ask our experts a question about this model and we'll get back to you as soon as possible!
2 questions answered by our experts.
< Prev
1
Next >
Sort by:
Search filter:
Clear Filter
Your search term must have 3 or more characters.
Keep searches simple. Use keywords, e.g. "leaking", "pump", "broken" or "fit".
Sorry, we couldn't find any existing answers that matched.Try using some different or simpler keywords, or submit your new question by using the "Ask a Question" button above!
Pauline
December 17, 2019
Washer overflowing during fill
For model number FGX831FS1
Hello Pauline and thanks for writing.
It certainly sounds like a faulty water level switch PS1146954 check for signs of damage and replace it if needed. We hope this helps. Please contact us anytime.
How do I remove the igniter? I've bought a replacement part but can't figure out how to remove the old one.
For model number FGX831FS1
Hi Peter, thank you for reaching out. To reach components inside the dryer cabinet, you may use a screwdriver to un-thread the screws securing the lower access panel. Detach the panel and set it aside. Insert a putty knife above the front access panel to release the spring clips to detach the panel. Remove the lint screen and use a nut driver to un-thread the screws to release the air duct. Un-thread the four screws securing the heater shield. Now detach the shield to access the heating elements. Now you have access to the igniter. To reinstall follow the instructions backwards. We hope this helps, good luck with this repair!
Was this helpful?
Thank you for voting!
< Prev
1
Next >
✖
Ask a Question
Ask our experts a question on this model and we'll respond as soon as we can.
1. Unplug dryer from outlet 2. Using Lg. flat screwdriver, pry under the front edge of the top and release two spring tabs 3. Lift up top and tilt back out of your way 4. Unscrew two phillips scews on inside of front panel 5. Lift up and out the front panel. Two spring clips at bottom. 6. Rlease tension on drum belt at the motor. Access panel at rear of dryer. 7.Unscrew 3 screws from inside, center rear of drum. 8. Remove drum through the front of the dryer. You may have to spread the sides apart a little bit for it to fit 9. Lift up on the rear drum bearing to remove it from the bearing retainer. ( U shaped plastic socket) 10. unsrew 2 screws and remove the bearing retainer, ground ball. Ball retainer is on outside of dryer. 11. Vacuum everything--duct, blower, lint trap, ect. 12. Intall new bearing retainer and grounding ball, an assistant is helpful at this time, one to hold ball retainer on rear of dryer, one to screw it in from the inside 13. reassemble remainder of parts in reverse order.
carefully pry up on front washer top to release plastic keeper pins,remove 2 phillips screws from beneath lower front washer panel,slightly lift upward on panel to release.remove old broken belt,push new belt beneath large tub pulley,put belt on small motor pulley,push back belt tension /idler arm,start belt on large tub pulley,turn tub pulley by hand to run belt on,release tension on idler arm.replace front panel and lower top.WALAAH!!!! you are done.
uplugged washer took front off washer 2 screws pryed up top pump was mounted with 2 screws and 2 wires took off found change in pump and the fins to pump worn off ordered part off line the wait for part was longer than the amount of time to fix problem and cost of part saved me about $25-35 if I was to buy local worth wait save money and fix problem washes like new spins and drains all water from tub.