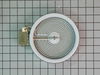
The 6” radiant cooking element with limiter fits under the glass cooktop and supplies heat to the cooking area. If your element is not heating, you can test the element for continuity with a multimete...
The white oven door handle is a genuine OEM replacement part for select Frigidaire, Electrolux, White Westinghouse, and Tappan ranges and ovens. Designed for durability, it provides a secure grip and ...
If your stove’s large burner isn’t heating properly or won’t adjust, this dual switch could be the fix. It controls the heat for a 9-inch/12-inch element and helps you cook with precision. Easy to ins...
This radiant burner element delivers powerful, even heat for your cooktop, ensuring fast and efficient cooking. Measuring 9 inches and rated at 3200 watts, it is ideal for replacing a worn or malfunct...
Experiencing issues with your oven light not switching off? We have the solution for you. Our OEM Frigidaire Oven Door Light Switch is a quandary solver. This genuine piece is perfect for specific Fri...
This range terminal block kit provides a secure connection point between the household power cord and the appliance’s internal wiring. It helps distribute electrical power safely and reliably to the r...
$81.84
In Stock
Questions And Answers for FCFE3062AWA
Be the first to ask our experts a question about this model!
✖
Ask a Question
Ask our experts a question on this model and we'll respond as soon as we can.
First we removed two screws under the rim of the range top to open the lid. Lifted the lid and removed the screws from the bracket that holds the elements, Be careful with the clips that hold the element in, if you break them or bend them there aren't any more! Also note which holes they were in, they are marked according to the different sizes of elements. Disconnected the wires, needed needlenose pliers to grip them...connected new element, popped it back in place, replaced bracket, closed top ...Easy peasy!!!
Removed screws on the sides and front. Labeled the wire sets connected to the front control panel. Gently lifted up the stove top and flipped it over on to a towel. Removed the piece of metal holding down the burner. Disconnected the cables to the old burner. Repeated steps above in reverse.