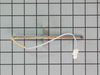
Also known as Probe. The quick connect on this part may be different than your original part. If it doesn't fit, you have to cut off the quick connect and wire together with porcelain wire nuts.
This 40-watt appliance light bulb is a reliable replacement for use in select ranges, refrigerators, freezers, and microwaves. It provides bright, consistent lighting to help you see clearly inside yo...
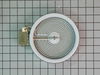
The 6” radiant cooking element with limiter fits under the glass cooktop and supplies heat to the cooking area. If your element is not heating, you can test the element for continuity with a multimete...
This oven door hinge is designed for use on a range and can be installed on either the left or right side of the oven door. It controls the rate at which the door opens and closes while allowing the d...
This convection element generates heat to support even air circulation and consistent cooking performance. Its high-output design allows for efficient temperature recovery and uniform results. Replaci...
$134.40
In Stock
Questions And Answers for EW30ES6CGS4
Ask our experts a question about this model and we'll get back to you as soon as possible!
7 questions answered by our experts.
< Prev
1
2
Next >
Sort by:
Search filter:
Clear Filter
Your search term must have 3 or more characters.
Keep searches simple. Use keywords, e.g. "leaking", "pump", "broken" or "fit".
Sorry, we couldn't find any existing answers that matched.Try using some different or simpler keywords, or submit your new question by using the "Ask a Question" button above!
Roman
April 4, 2026
Bake & broil elements not turning on. Stove top elements all functioning normally. Oven lights working. *Warming drawer functioning normally.*
Oven elements are not the issue. TEMPERATURE SENSOR AND THERMAL SWITCH REPLACED AND ARE NOT THE ISSUE." Unplugging (re-booting) had no effect. No error codes found except UPO - 0 both up and down. All digitals on top of stove are functioning. Could it be RELAY CONTROL BOARD OR ELECTRONIC CONTROL BOARD? What do you think? If I placed this order, installed and still didn't work. Can I return for refund?
For model number EW30ES6CGS4
Hello Roman, thank you for reaching out. The relay board is the likely culprit. If this relay or its soldered connections fail, the oven brain may signal for heat, but no physical electricity reaches the bake or broil circuits. Replacing it can help fix the issue. The part number is PS1991657. We hope this helps!
Hello Bill, Thank you for the question. If both the bake and broil stopped working at the same time, this is normally an indication the Oven Control Board is faulty and may need to be replaced. If you need help placing an order, customer service is open 7 days a week. Please feel free to give us a call. We look forward to hearing from you!
Good Morning - the stove is showing an error E and 15 on the two front burners. can you please tell me what parts will be required to get this fixed
For model number EW30ES6CGS4
Hi Roslyn, thank you for contacting us. First, try to hard reset the unit. If this does not work, the error you are getting means that there is a communication error between the display board and the main relay power control board. It could be an issue with either board or the ribbon cable/wiring in between. If the wiring is ok, we suggest you replace the relay board, part number PS1991657. And if it does not fix the issue replace the electronic control board, part number PS2378973. If you require assistance placing an order, please contact customer service. We hope that helps!
What causes the top oven element to stay on and not mdulate to maintainthe set temperature? Fault 10 showing
For model number EW30ES6CGS4
Hello Bill, thank you for the question. According to our search, the F10 error code indicates that your electronic control board has detected a runaway temperature. It's possible that your range is not heating to the temperature that you set it at or that the control board may be reading the temperature incorrectly. You may need to replace the temperature sensor, part number PS820208, to fix the issue. We hope this solves your problem!
The induction cooktop no longer lights up on the right side. Left side oven lights up no problem so I don’t believe there’s a power supply issue
For model number EW30ES6CGS4
Hi Kyle, thank you for reaching out. Based on the description that you have provided, we would recommend checking the controller assembly, part number PS2333283, to fix this issue. We hope this solves your problem!
Replaced clock control by removing surface burner control knobs and plastic nuts, and then the cover over the oven control. Two screw hold the clock in place, after removal and disconnecting the plug-in you can reinstall the new clock control. The Heat Sensor inside the oven will also need to be replaced. It is located inside the oven and attached with two screws; the back of the oven will need to be removed to unplug. Reverse removal procedure and turn the power back on to the stove.
PF alarm appeared on display. Noticed clicking when cord was moved. Had arced for some time and melted original block. New part slightly different. Only has 3 lugs, old one had six. Stack using washers provided. Take note of colors before disassembly. Use caution while working through access opening. The edges are sharp. Only tools needed are phillips screwdriver, deep socket for lug nuts. Nut driver optional. Hope this is helpful.
First we removed two screws under the rim of the range top to open the lid. Lifted the lid and removed the screws from the bracket that holds the elements, Be careful with the clips that hold the element in, if you break them or bend them there aren't any more! Also note which holes they were in, they are marked according to the different sizes of elements. Disconnected the wires, needed needlenose pliers to grip them...connected new element, popped it back in place, replaced bracket, closed top ...Easy peasy!!!