This 18 ml bottle of white appliance touch-up paint is used to cover scratches or marks on your appliance. The white touch-up paint can be used on refrigerators, microwaves, ranges, clothes dryers, an...
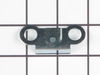
This hinge bracket, also known as a door stop, is attached to the bottom of the door and is used to limit how far the door swings out to protect the refrigerator itself, and any surrounding cabinets f...
The evaporator is found in the back of the freezer. This kit comes with two mounting grommets, two sleeves (not to be used on porcelain models), two #8 mounting screws, and a push-on fan blade.
NOT...
This kit includes both upper and lower door handle end caps for both freezer and fresh food door handles. This is only available in chrome. All other colors are discontinued. Handle is NOT included....
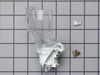
The water inlet valve is a solenoid-operated switch located at the bottom of the refrigerator. When it is energized by electrical power, water is released from the supply line through the water valve ...
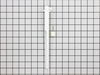
This is the replacement water tube kit for your refrigerator. This tubing is made of plastic, is 1/4 inch in diameter, and comes with 2 inserts. This tube may be longer than the original tube, and may...
$40.65
In Stock
Questions And Answers for ET16JM1MWR2
Be the first to ask our experts a question about this model!
✖
Ask a Question
Ask our experts a question on this model and we'll respond as soon as we can.
Removed 2 screws holding water fill tube to rear of refrigerator and pulled out, matched old part with new to make sure of proper match. Guide new fill tube thru hole, making sure it is aligned with slot in ice cube tray on inside of freezer. Install new plastic line from water pump outlet to water fill tube, check for leaks, job done.
First I removed the racks in the freezer. The rack supports on the sides lift off without tools. The evaporator cover is at the back of the freezer. 4 phillips head screws. The cover lifts up then forward to expose the evaporator, evaporator fan and duct. The duct is held by 3 hex head screws. The evaporator fan is attached to the duct with a wiring pigtail to a plug. Unplug the fan and remove the duct. The fan is held by 2 hexhead screws. The new fan is put in place and assembly is simply the reverse of disassembly. The unit is quiet and cools properly now. The new part fit perfectly.
I used a flat-head screwdriver to pop out the old light rocker switch. Then, I unplugged the wires, plugged them into the new light rocker switch, and then popped the new switch into the hole. That's it! Lights began working again.