If your dryer drum has stopped spinning and your clothes are coming out damp, it might be time to replace the belt. This essential part helps the drum rotate, allowing warm air to circulate and dry yo...
$84.00
In Stock
Order within the next 4 hrs and your part ships today!
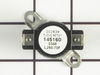
This high limit thermostat has a limit of 260 degrees Fahrenheit. Meaning that it will cut out when the internal dryer temperature reaches 260. This thermostat cuts back in when the temperature drops ...
$108.82
In Stock
Order within the next 4 hrs and your part ships today!
This is a replacement screw for your washer or dryer. The screw is approximately half an inch in length and is a Phillips-head screw. It screws in from the outside of the drum, into the vane/baffle. T...
$27.85
In Stock
Order within the next 4 hrs and your part ships today!
Need a way to keep your dryer safe and protected from overheating? Then the Frigidaire Thermal Limiter is your perfect go-to solution. This genuine part acts as a guard, automatically shutting off you...
$46.88
In Stock
Order within the next 4 hrs and your part ships today!
This genuine OEM dryer drum roller wheel assembly is designed to support the dryer drum and allow it to rotate smoothly and quietly during operation. A properly functioning roller helps keep the drum ...
$44.34
In Stock
Order within the next 4 hrs and your part ships today!
This moisture sensor assembly ensures your dryer delivers optimal performance by detecting the moisture level in each load. By accurately measuring dampness, it allows the appliance to adjust cycle ti...
$101.14
In Stock
Order within the next 4 hrs and your part ships today!
This dryer thermal fuse is a critical safety component designed to protect the appliance from overheating. It automatically shuts off power to the motor or heating system if excessive temperatures are...
$44.34
In Stock
Order within the next 4 hrs and your part ships today!
This element is strung with a coiled wire made of a nickel and a chrome alloy. This wire receives, but resists, a controlled electric current and as a result, the wire heats up. The heat produced is u...
$170.51
In Stock
Order within the next 4 hrs and your part ships today!
This is an authentic idler pulley, which works with dryers.
$59.37
In Stock
Order within the next 4 hrs and your part ships today!
Questions And Answers for EIMED60LT4
Ask our experts a question about this model and we'll get back to you as soon as possible!
7 questions answered by our experts.
< Prev
1
2
Next >
Sort by:
Search filter:
Clear Filter
Your search term must have 3 or more characters.
Keep searches simple. Use keywords, e.g. "leaking", "pump", "broken" or "fit".
Sorry, we couldn't find any existing answers that matched.Try using some different or simpler keywords, or submit your new question by using the "Ask a Question" button above!
Michael
January 2, 2024
E 52 Code. Will not come on when you push start button. You can hear a click like it's trying to engage.
For model number EIMED60LT4
Hello Michael, thank you for your inquiry. This error code indicates that there is a problem with the motor. You may need to replace the motor, part number PS16620747, to fix the issue. Glad to be of assistance!
Dryer module ( relay on electronic board for htr. burnt out ) need to buy module for customer appliance ... where is this available for purchase thanks ..
For model number EIMED60LT4
Hello Donaville, thank you for getting in touch. The main control board for your model is listed on our site with part number PS11704440. All the relays come as a part of it. Glad to be of assistance!
Dryer starts, beeps and stops within a few seconds. This process can be repeated over and over
For model number EIMED60LT4
Hello Wayne, thank you for the question. Based on our understanding of the issue, we would suggest checking the door switch, part number PS2367765, to solve the problem. A faulty door switch can cause this issue. Glad to be of help!
Is there a retrofit for the lint filter that will avoid lint getting clogged below the drum? My S/N is 4D53311697.
For model number EIMED60LT4
Hi Peter, thank you for your inquiry. The lint filter assembly for your model is part number PS8770145. If you require assistance to place an order, please contact customer service!
When I described the noise to a YouTube appliance diagnostician, I was directed to check the felt seals front and back of the rotating drum for wear, tears, or foreign objects. As it happens the felt seals looked find and there were foreign objects so, not wanting to disassemble and reassemble the dryer more than I had, I ended up replacing all the replaceable moving parts that I considered possible culprits: The idler tension spring, the idler tension bracket (which includes a nylon pulley wheel), the drum belt, the five rubber-tipped bearings that support the drum and keep it in place, and the foam seal on the blower housing which seemed a little brittle and old, as well as high-temperature adhesive for the latter. The instructional videos here and on YouTube were extremely helpful (I doubt that I would have attempted this job at all, had I not watched these ahead of time). The most time-consuming aspect was waiting for the arrival of the parts as I didn't order them all at the same time or all from the same place (I ordered from whomever could ship me a given part the fastest. Disassembly took less than an hour. Re-assembly with the new parts in place took about the same but was a little more awkward because this appliance sits in a very narrow closet and it's difficult to ensure that the 4" flexible duct stays in place when sliding the appliance back into the closet. No regrets. Now I know the basics if this dryer needs attention in future and I also know all the parts that I can eliminate as suspects in any future maintenance (the parts that I replaced)
1. Loosened the 3 screws inside of the drum 2. Removed the entire back of the dryer (lots of screws) 3. Removed the old vent (there are 2 screws at the bottom that hold it in) 4. Install new vent (put the screws back in) 5. Close up back and proceed to put all of the screws back
By undoing the single screw which holds the sensor in place, the old one falls off. To replace: simply pop the two wires on their connections (small metal studs on the back), slide clip/wire end of sensor in place and replace the screw. You are back in business! Very simple repair that a DIY can save a ton!