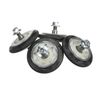
The drum support roller for your dryer holds the drum in place while the drum turns on the support wheels. The drum roller is round with a bearing in the middle and measures approximately 3 inches in ...
$182.93
In Stock
Order within the next 4 mins and your part ships today!
This part has the felt strip and is used to collect lint as it passes through the dryer vent. The lint filter in your dryer is used to collect lint as it passes through the dryer vent. If you notice t...
$84.67
In Stock
Order within the next 4 mins and your part ships today!
The moisture sensor, also known as a humidity sensor, works in conjunction with your dryer by helping determine the amount of moisture in the drum to reduce overdrying. If the timer doesn’t advance co...
$28.25
In Stock
Order within the next 4 mins and your part ships today!
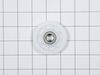
Looking to extend the lifespan of your LG electric dryer? Our authentic LG Idle Pulley could be the missing piece you need! This little thing plays a big role in keeping your dryer working smoothly an...
$42.99
In Stock
Order within the next 4 mins and your part ships today!
This plastic adjustable dryer leg is used to support the weight and adjust the height of your dryer to keep it level. To install the leg, tip the dryer back and screw it into the bottom of your dryer ...
$13.88
In Stock
Order within the next 4 mins and your part ships today!
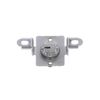
Take a look at this essential LG Dryer Safety Switch Assembly. A don't-miss fixture for your LG Dryer. This is more than just a part, it's a safeguard for you. If your dryer's door springs open, this ...
$56.87
In Stock
Order within the next 4 mins and your part ships today!
This motor works with the belt to drive your dryer's drum.
$398.22
In Stock
Order within the next 4 mins and your part ships today!
Questions And Answers for DLE5955W
Ask our experts a question about this model and we'll get back to you as soon as possible!
7 questions answered by our experts.
< Prev
1
2
Next >
Sort by:
Search filter:
Clear Filter
Your search term must have 3 or more characters.
Keep searches simple. Use keywords, e.g. "leaking", "pump", "broken" or "fit".
Sorry, we couldn't find any existing answers that matched.Try using some different or simpler keywords, or submit your new question by using the "Ask a Question" button above!
Vern
January 15, 2025
what is the ohm readings on heating element
For model number DLE5955W
Hello Vern, thank you for getting in touch. On testing through the multimeter, the resistance for the heating element of your model should be between 20-40 ohms, depending on the terminals being measured. We hope this information helps!
3 peoplefound this helpful.
Was this helpful?
Thank you for voting!
Mary
December 29, 2022
Sensor flow light is on….what does that mean?
For model number DLE5955W
Hello Mary, thank you for your question. To fix the flow sense error on your LG dryer, check whether lint filter could be clogged with lint. If the dryer filter is clogged with lint, the appliance will detect some air blockage. To clean, pull the lint filter straight up and roll any lint off the filter with your fingers. Push the lint filter firmly back into place. We hope this helps.
Was this helpful?
Thank you for voting!
John
January 28, 2024
Dryer is loud when in use. Are there belts that could cause this?
For model number DLE5955W
Hi John, thank you for reaching out. Based on our understanding, the issue could be with the dryer drum belt, part number PS11705916. It attaches to the motor pulley and spins the drum as the motor rotates. You may need to replace it to fix the issue. We hope this solves your problem!
I get an error message as soon as I turn it on. TE1
For model number DLE5955W
Hi Carolyn, thank you for the question. According to our research, the TE1 error code indicates a problem related to the thermistor. We would suggest checking the wire harness of the thermistor first. If it is fine, you may need to replace the high limit thermostat and thermistor kit, part number PS16878105. It monitors and helps regulate the dryer temperatures. We hope this solves your problem!
Hi Ken, Thank you for reaching out. According to the Manual the door swing can be reverses. Please see page 12 of the manual. Open the dryer door. Using a Phillips screwdriver, remove the 2 screws that secure the door hinge to the dryer door opening. Remove the 4 screws from the latch side of the dryer door opening, and remove the door latch. Turn the door around so the hinge is reversed, and reattach the door using the 2 screws previously removed. Reinstall the door latch and the 4 screws. Test the door swing to make sure the door moves freely and latches securely. Thank you for the inquiry, good luck with the repair!
Had to replace front drum support rollers. Removed screws underneath top in back that held bracket that keeps top in place. Slid top towards rear and lifted up. Removed 4 screws that hold plastic front panel in place (inside..2 on each corner) Unplugged front panel electric plugs to remove panel. Opened door..removed 2 screws at bottom of door opening. Removed screws on top of front panel. Unplugged door switch plug. Removed front panel. Removed right front roller with 9/16th wrench for nut. Adjustable for back of stud. Lifted up on drum to get roller out. Reversed to install. Left roller a bit harder to get to stud. Removed and installed same as right side. Did not attempt to replace rear rollers. Have them if needed but very much more involved to replace.
I actually went to mr fix it on u tube. Great instruction on how to take dryer apart. First I unplugged the dryer. I found I could reach the heating system by removing the lint tube in the back of the dryer. I put my I phone with the light on inside the back of the dryer and tested the connections to see if all were working. The thermal fuse was not working. I removed the two wires , red on top and white on the bottom. Then used a small Phillips screwdriver to remove the two mounting screws and removed the fuse. I then used a vacuum to clear any lint from the back of the dryer and inside the dryer. This took me about an hour and a half. I did it this way because I did not want to disassemble the entire dryer to get to the components. I received the fuse in 3 days and tested it. It was fine. I then put it in the dryer screwed it in place, connected the wires. Replaced the lint tube. This took about 10 minutes. Dryer is running great.
I followed video instruction in disassembling and set screws from each section into diferent small bowls in the order they were removed. Hardest part was some of the screws were really hard to get loose without stripping them and my control panel did not match video but I figured it out. Replacing the parts were easy and putting it back together. While it was apart I cleaned everything including fan blower wheel. Thanks for the right parts and your online video. With your help and a prayer this 62 year old woman fixed the problem and dryer runs like new.