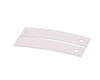
This authentic, white Drum Bearing Slide, also known as the bearing drum slide, glide, or pad, is a plastic, easy-to-install part for your dryer. It replaces the dryer's front drum slide to allow for ...
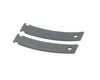
This original equipment manufacturer Drum Bearing Slide is a plastic, green, easy-to-install part for your dryer. It replaces the dryer's front drum slide to allow for easier movement. You'll know if...
This Drive Belt is 89.5" long and comes in black, featuring four ribs on the inside for a better grip. This is a long belt that wraps all the way around the dryer drum, around a tension pulley, and th...
The drum slides are not included with this part. The top bearing helps your dryer operate as quietly as possible. This part will require two green drum slides and 2 white drum slides.
If your dryer’s making loud noises or the drum seems shaky, this rear bearing sleeve might be the fix. It helps the drum spin smoothly and stay in place. When it wears out, you might hear squeaks or n...
TThe door strike for your dryer is mounted on the dryer frame that the door shuts onto. It fits into the door catch on the door and keeps the door closed. If the door strike is damaged or missing, the...
This Genuine OEM door latch is designed for use with a wide range of GE clothes dryers. Constructed from a combination of durable metal and plastic, the latch is mounted onto the dryer frame to secure...
This rear drum bearing kit comes with a shaft, bearing and installation instructions. The bearing plate comes with a slot in it for the ground strap. Helps keep your dryer running as smoothly as poss...
This part is the replacement high-limit thermostat or safety thermostat for your dryer. The high-limit thermostat is found on the upper right-hand side of the heater housing, and it cuts off power to ...
This is a replacement O-ring for the drum bearing retainer on your dryer. The drum bearing is found at the back of the dryer drum. The O-ring is designed to create a seal on the drum bearing. The O-r...
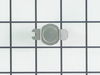
A door switch is a simple on/off mechanism that prohibits the dryer from operating when the door is open.
$39.78
Special Order
Questions And Answers for DCVH515EF0WW
Ask our experts a question about this model and we'll get back to you as soon as possible!
6 questions answered by our experts.
< Prev
1
2
Next >
Sort by:
Search filter:
Clear Filter
Your search term must have 3 or more characters.
Keep searches simple. Use keywords, e.g. "leaking", "pump", "broken" or "fit".
Sorry, we couldn't find any existing answers that matched.Try using some different or simpler keywords, or submit your new question by using the "Ask a Question" button above!
Brian
August 26, 2021
The top of the drum is trapping items between the drum and frame, causing the items to remain snagged as the drum continues to turn, usually just twisting and leaving marks, but also tearing some holes in clothes.What to do?
For model number DCVH515EF0WW
Hello Brian, Thank you for your inquiry. We have researched your model and recommend the following parts to fix your issue: top bearing, the dryer drum glides, the drum seal felt seal and the duct trap assembly. Also check the belt to make sure the drum is rotating properly and not out of place. Hope this helps.
Dryer will turn on and run a few minutes and shut off. Have to unplug and wait a few minutes and it will turn back on and run a few minutes and shut off again. It does this in all modes (at least the few i tried)
For model number DCVH515EF0WW
Hello Linda, thank you for writing. There are a few options with this issue. First, please take off the back of the dryer and thoroughly vacuum the inside and inside the vent tubing. Second, it may be a faulty Door Latch PartSelect Number PS3502777 or Door Switch PartSelect Number PS2344321 that the motion of the laundry is popping the door open. If the Moisture Sensor PartSelect Number PS1021860 is defective or dirty, it may fail to detect moisture and inadvertently tell the dryer to shut off when the laundry is still wet. Good luck with your repair.
1 personfound this helpful.
Was this helpful?
Thank you for voting!
Greg
October 28, 2025
Dryer interface lights up. Press start button and nothing happens. It worked just fine 2 days ago. Bearings were replaced last year.
For model number DCVH515EF0WW
Hello Greg, thank you for getting in touch. Based on the description that you have provided, we would recommend checking the door switch, part number PS2344321, to solve the issue. If the door switch is faulty, the machine's control board will not receive the signal that the door is closed, and it will prevent the motor from starting. We hope this helps!
Hello Ricky, thank you for contacting us. If you are looking for the lint filter for your model, then it is listed on our site with part number PS1022431. We hope this helps!
Dryer is very squeezy when running. A metal on metal sound. It also may catch clothes and twist them between the drum and the dryer. What parts shall I order to fix this?
For model number DCVH515EF0WW
Hi Eliza, thank you for contacting us. The issue could be with the bearings. The bearing kit for your model is part number PS267529. You may need to replace it to fix the issue. We hope this sorts out your problem!
It was pretty easy. After already taking apart the dryer to install a new belt I knew exactly my plan of action. I removed the two screws that hold the top panel of the dryer to the front panel. I then removed the top panel and removed the screws that hold the front to each side panel. I than pulled the front away from the cabinet and drum. I put the new slides in place and installed a new felt strip. I put it back together and that was that. Very easy.
1. Removed top cap on lid by removing the 3 - phillips screws. 2. removed front digital display panel from PC board. 3. removed bolts with nut-driver on the top of the front panel, removed bottom screws with #2 square bit. 4. removed "snap-in" plastic top bearing ( paying attention to where wiring is routed within this frame. 5. cleaned all areas of plastic and felt debris, installed new bearing, felt, and glides. 6. Re-installed all wiring and panels.
*** make sure to order all of the glides, there should be a total of 4 for the top assembly.
First of all, unplug the dryer. I removed the two screws on the front of the cabinet to remove the top. I then took out the screws to remove the dial panel. Release the belt for the drum through the access hole in the rear of the dryer. Remove the front cover and pull the drum assembly out.
Remove the element disc from the rear of the housing, take note of the the wireing placement. Replace disc and reverse order of disassembly.
This job was easy for me as I am a tinkerer by nature. The hardest part of the whole job was waiting on the part, which by the way was ordered on a Sunday evening and I had the replacement in my hands and back in the dryer running by 1:00 PM on the following Tuesday!
I book marked this website and WILL refer it to others who simply need a repair, not a costly new appliance!