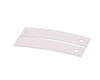
This authentic, white Drum Bearing Slide, also known as the bearing drum slide, glide, or pad, is a plastic, easy-to-install part for your dryer. It replaces the dryer's front drum slide to allow for ...
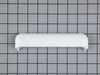
If your dryer’s making loud noises or the drum seems shaky, this rear bearing sleeve might be the fix. It helps the drum spin smoothly and stay in place. When it wears out, you might hear squeaks or n...
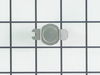
This part is used to start the dryer once you have selected a setting on the timer. The terminal locations on the new switch may be different, match up terminal numbers from old switch to new.
This part is the replacement high-limit thermostat or safety thermostat for your dryer. The high-limit thermostat is found on the upper right-hand side of the heater housing, and it cuts off power to ...
This is a replacement O-ring for the drum bearing retainer on your dryer. The drum bearing is found at the back of the dryer drum. The O-ring is designed to create a seal on the drum bearing. The O-r...
This is considered a high limit thermostat. Rating - L210 This thermostat acts as a safety mechanism that keeps the dryer from overheating. Once the dryer temperature reaches a certain point, this pie...
No Longer Available
Questions And Answers for DBSR453EB2WW
Ask our experts a question about this model and we'll get back to you as soon as possible!
3 questions answered by our experts.
< Prev
1
Next >
Sort by:
Search filter:
Clear Filter
Your search term must have 3 or more characters.
Keep searches simple. Use keywords, e.g. "leaking", "pump", "broken" or "fit".
Sorry, we couldn't find any existing answers that matched.Try using some different or simpler keywords, or submit your new question by using the "Ask a Question" button above!
James
February 26, 2020
Bottom plastic door liner includes the out let for air removal
For model number DBSR453EB2WW
Hello and thank you for writing.
The door gasket PS268333 does not include any outlet, it is just the gasket. We hope this information helps. Please contact us anytime if you require further assistance.
Start knob came off. When tried to put back on the rod it fits on disappeared. What part do I order
For model number DBSR453EB2WW
Hello Wanda, thank you for writing. The " rod" is part of the switch. The Rotary Start Switch is PS3487203 and we sell it here on our site. If you need help placing an order, customer service is open 7 days a week. Please feel free to give us a call. We look forward to hearing from you.
First of all, unplug the dryer. I removed the two screws on the front of the cabinet to remove the top. I then took out the screws to remove the dial panel. Release the belt for the drum through the access hole in the rear of the dryer. Remove the front cover and pull the drum assembly out.
Remove the element disc from the rear of the housing, take note of the the wireing placement. Replace disc and reverse order of disassembly.
This job was easy for me as I am a tinkerer by nature. The hardest part of the whole job was waiting on the part, which by the way was ordered on a Sunday evening and I had the replacement in my hands and back in the dryer running by 1:00 PM on the following Tuesday!
I book marked this website and WILL refer it to others who simply need a repair, not a costly new appliance!
I pried out the remaining pieces of the handle out of the door with a screwdriver. When the new part arrived, I snapped it into place and it was done. It fit perfectly.