This 18 ml bottle of white appliance touch-up paint is used to cover scratches or marks on your appliance. The white touch-up paint can be used on refrigerators, microwaves, ranges, clothes dryers, an...
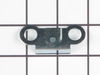
This hinge bracket, also known as a door stop, is attached to the bottom of the door and is used to limit how far the door swings out to protect the refrigerator itself, and any surrounding cabinets f...
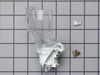
This evaporator fan motor is located in the back of the freezer, and circulates air over the refrigerator coils. These coils will convert the heat into cool air, which is then circulated.
The door shelf retainer bar end cap connects to the retainer bar on your refrigerator’s door shelf, and attaches it to the refrigerator door. If your shelf retainer bar has become disconnected, a dama...
Is your refrigerator not maintaining the perfect temperature for your food? The Whirlpool Thermistor could be exactly what you need. This temperature sensor plays a key role in your refrigerator, cons...
This part is the replacement compartment door for your refrigerator. It is made of clear plastic and is approximately 9 inches by 6 inches. The compartment door snaps into the walls of the dairy compa...
Are you looking to optimize storage in your refrigerator? We hear you ? that's why our Whirlpool Door Flip-Up Shelf could be just what you need. This genuine, OEM-approved part is crafted to work seam...
Have a Whirlpool refrigerator that's not functioning properly due to a faulty door hinge? We understand your problem and we have just the right solution for you ? the authentic OEM Insert Hinge Shim, ...
$17.80
In Stock
Questions And Answers for ART308FFDM10
Ask our experts a question about this model and we'll get back to you as soon as possible!
6 questions answered by our experts.
< Prev
1
2
Next >
Sort by:
Search filter:
Clear Filter
Your search term must have 3 or more characters.
Keep searches simple. Use keywords, e.g. "leaking", "pump", "broken" or "fit".
Sorry, we couldn't find any existing answers that matched.Try using some different or simpler keywords, or submit your new question by using the "Ask a Question" button above!
John
November 24, 2023
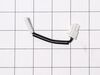
The on-off switch assembly for the light broke off. I need a replacement part. I see that it is listed as out of stock. Can you find me a compatible part for this plastic switch assembly?
For model number ART308FFDM10
Hi John,
Thank you for your question. The light switch is still currently available and the part number for it is PS12728638. We hope this helps!
1 personfound this helpful.
Was this helpful?
Thank you for voting!
Shiqi
May 12, 2024
Does this top freezer shelf also work with this Amana refrigerator Model # ART308FFDM11?
For model number ART308FFDM10
Hi Shiqi, thank you for your question! You have not mentioned which top freezer shelf you are referring to. The compatible freezer wire shelf for your model is part number PS10066902. Glad to be of assistance!
Hi Debbie,
Thank you for your question. It is not recommended to keep this refrigerator in a garage and there are no garage heater kits made for it. We hope this helps!
Was this helpful?
Thank you for voting!
Ezequiel
July 10, 2025
Hey my light switch toggle broke off i went to replace and could not remove the old switch at all without damaging the fridge itself how can i remove?
For model number ART308FFDM10
Hi Ezequiel, thank you for reaching out. We have attached the link to the video regarding the replacement of the door switch. This video may not be of the same model but will help you in understanding the process. We hope that helps!
Was this helpful?
Thank you for voting!
Timothy
March 30, 2026
I’m adding an ice maker. I’m looking for a 5 pin connector that goes to the frig
For model number ART308FFDM10
Hello Timothy, thank you for reaching out. The 5-pin connector that you are looking for does not come separately; it comes as a part with the ice maker field install kit, part number PS17917059. We hope this helps!
The reason I repaired it myself was because the repairman that diagnosed the problem.didn't come back in two weeks. The evaporator fan sits behind a vented wall in the freezer and directs cold air into freezer and refrigerator.I removed the ice make assembly first and then the freezer wall held in place by two sheet metal nuts. Then removed wires from fan motor. Removed the fan blade from fan motor,which was press fitted on,then removed fan motor from bracket assembly(make sure and retain the two vibration rubber washers on back and front of motor. Reinstall new motor with vibration washers and press fan blade on new motor. Install in bracket assemble and reassemnble.
I used a flat-head screwdriver to pop out the old light rocker switch. Then, I unplugged the wires, plugged them into the new light rocker switch, and then popped the new switch into the hole. That's it! Lights began working again.
First I removed the old lightbulb from the socket and replaced it with a new one to confirm that the bulb was not the problem. I then pryed the socket out with a flat-head screwdriver. I could tell that the socket was anchored in its hole with clips so it was relatively easy to pry it out. Once the socket was out, I disconnected the lead wires and ordered a replacement socket kit from Partselect. When the new one arrived, I reconnected the lead wires to it, snapped it back into its hole, screwed in a new lightbulb, and presto!! The light was back on with no further problem. Thank you, Partselect!! A $15.00 part saved me what probably would have been at least a $100. service call and heaven knows what the technician would have told me I needed!!!


 – Part Number: W11678256")