


AER6603SFB5 Amana Range - Overview
Sections of the AER6603SFB5
[Viewing 1 of 1]
Keep searches simple, eg. "belt" or "pump".

Oven Sensor
PartSelect #: PS11749737
Manufacturer #: WPW10181986
This temperature sensor detects the temperature within the oven cavity. This oven temperature sensor, for ranges, works together with the oven control board to measure and regulate the oven temperatur...
$111.52
In Stock
Order within the next 4 hrs and your part ships today!

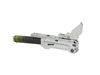
Dual Element Control Switch
PartSelect #: PS11754687
Manufacturer #: WPW10434452
If your range’s burner isn’t heating properly or the temperature seems off, this dual element control switch could be the fix. It’s designed to manage heat for dual surface elements and fits a variety...
$119.97
In Stock
Order within the next 4 hrs and your part ships today!

Range Safety Thermostat
PartSelect #: PS11740991
Manufacturer #: WP3196548
This part is used as a safety feature. If your range overheats this part will shut the range down.
$46.15
In Stock
Order within the next 4 hrs and your part ships today!

Screw
PartSelect #: PS12349731
Manufacturer #: W11233072
This is a multi-use and multi-appliance screw. It can be used on a microwave, refrigerator, range/oven, air conditioner, dehumidifier, washer, or dryer. The measurements of this screw are 8 x 1/2 inch...
$28.95
In Stock
Order within the next 4 hrs and your part ships today!

Infinite Control Switch, 6"
PartSelect #: PS11740785
Manufacturer #: WP3149404
If your stove burner won’t heat up, stays on high, or won’t adjust, this switch might be the fix. It controls the heat for 6-inch electric burners and fits many Whirlpool, Maytag, and KitchenAid range...
$63.75
In Stock
Order within the next 4 hrs and your part ships today!

Infinite Switch - 8 Inch
PartSelect #: PS11740775
Manufacturer #: WP3148953
This switch helps you control the heat on your stove’s 8-inch burner. If your burner isn’t heating up or won’t adjust properly, this part could be the fix. It works by sending the right amount of powe...
$72.03
In Stock
Order within the next 4 hrs and your part ships today!

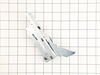
Range Rear Leveling Leg
PartSelect #: PS11748094
Manufacturer #: WPW10058460
Sold individually.
$14.63
In Stock
Order within the next 4 hrs and your part ships today!

Range Inner Oven Door Glass
PartSelect #: PS11744843
Manufacturer #: WP8053948
This is the innermost piece of glass on your door.
$181.62
In Stock
Order within the next 4 hrs and your part ships today!

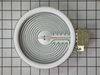
6" Surface Element, 1200 W
PartSelect #: PS12348164
Manufacturer #: W11171119
Sold individually.
$200.09
In Stock
Order within the next 4 hrs and your part ships today!

Range Terminal Block
PartSelect #: PS11750972
Manufacturer #: WPW10245259
It provides a way of connecting individual electrical wires and offers protection of the device from electrical surges (voltages and/or currents).
$39.55
In Stock
Order within the next 4 hrs and your part ships today!

Broil Element
PartSelect #: PS11731333
Manufacturer #: W10856603
This broil element is a genuine replacement component located at the top of the oven cavity, designed to supply direct heat for broiling and high-temperature cooking. Engineered for select range model...
$207.91
In Stock
Order within the next 4 hrs and your part ships today!

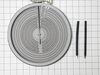
Dual Surface Element - Front-Right
PartSelect #: PS16543522
Manufacturer #: W11517959
$140.66
In Stock
Order within the next 4 hrs and your part ships today!
Common Symptoms of the AER6603SFB5
[Viewing 9 of 9]Element will not heat
Fixed by
these parts
these parts

Show All
Little to no heat when baking
Fixed by
these parts
these parts


Show All
Oven is too hot
Fixed by
these parts
these parts

Show All
Oven not heating evenly
Fixed by
these parts
these parts

Show All
Little to no heat when broiling
Fixed by
these parts
these parts
Show All
Will Not Start
Fixed by
these parts
these parts
Show All
Door won’t close
Fixed by
these parts
these parts

Show All
Touchpad does not respond
Fixed by
these parts
these parts
Show All
Door won’t open after self cleaning cycle
Fixed by
these parts
these parts

Show All


Keep searches simple. Use keywords, e.g. "leaking", "pump", "broken" or "fit".
temperature not accurate after 3 1/2 years of happy usage
Opened up the back of the stove. Unpluged the sensor. Replaced the sensor. Replace the back of the stove.
The sensor that has been replaced is not what is expected. After reading all of the instructions for adjusting the temperatures, the only temp that stays steady is when we first turn on the oven to 350 degrees. That stays steady but when I turn it to 400 it slowly goes up to 425 degrees.
The sensor that has been replaced is not what is expected. After reading all of the instructions for adjusting the temperatures, the only temp that stays steady is when we first turn on the oven to 350 degrees. That stays steady but when I turn it to 400 it slowly goes up to 425 degrees.
Parts Used:
-
Ruth from Oregon, IL
-
Difficulty Level:Really Easy
-
Total Repair Time:15 - 30 mins
-
Tools:Screw drivers
144 of 272 people
found this instruction helpful.
Was this instruction helpful to you?
Thank you for voting!
The burner would keep heating after turning off the switch
Start by turning off the power to the range.
It was fairly easy to take the "Control Deck" off the top of the range by removing about 8 screws. I leaned the deck forward without removing any wires except a green ground that was held on by one of the screws.
There are two small screws under the switch knob holding the Infinite Switch to the panel. I removed these and let the switch hang on the wires. To avoid missplacing or crossing the wires... I moved one wire at a time to the new switch, then attached the switch to the panel and put it all back together.
Whole job was done in about 15 minutes
Parts Used:
-
RON from KAUFMAN, TX
-
Difficulty Level:Easy
-
Total Repair Time:15 - 30 mins
-
Tools:Nutdriver, Pliers, Screw drivers
61 of 68 people
found this instruction helpful.
Was this instruction helpful to you?
Thank you for voting!
Surface Element Out
Took 2 screws under front edge of smooth top. Unscrewed ground wire from back of smooth top unit. Unplugged 2 wire bundles, from back. Took bad element out , put in new one. Put back together. About 10 min's tops. Easy peasy.
Parts Used:

-
Terry from Rockwall, TX
-
Difficulty Level:Really Easy
-
Total Repair Time:Less than 15 mins
-
Tools:Screw drivers
61 of 82 people
found this instruction helpful.
Was this instruction helpful to you?
Thank you for voting!