This dryer drum belt from Amana has five ridges and is 93-3/8" inches in length, and 3/8 of an inch wide. It is flat, black in color, and is made entirely of rubber.
$20.95
In Stock
Order within the next 6 hrs and your part ships today!
The spring for this part is sold separately.
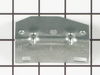
This idler assembly is for dryers.
Idler assembly includes the idler arm and the idler pulley that maintains tension on the drive belt, allowing the ...
$53.95
In Stock
Order within the next 6 hrs and your part ships today!
This part senses if the igniter is hot enough to ignite the flame for heat, allowing the gas valve to open. The sensor is three inches long and is used for many gas clothes dryers. If your dryer is no...
$49.45
In Stock
Order within the next 6 hrs and your part ships today!
Meant as a backup to a high limit thermostat, this fuse is typically set to trip at a higher temperature than that of a high limit thermostat. This is a one-time use fuse, so when it does trip, you do...
$16.43
In Stock
Order within the next 6 hrs and your part ships today!
If your dryer’s taking longer to dry clothes or making strange noises, this felt seal might be the issue. It sits between the drum and the back panel, keeping hot air inside and helping the drum spin ...
$57.15
In Stock
Order within the next 6 hrs and your part ships today!
These brackets support each side of the tub. Order quantity needed.
$62.47
In Stock
Order within the next 6 hrs and your part ships today!
Questions And Answers for ADG7005AWW
Ask our experts a question about this model and we'll get back to you as soon as possible!
2 questions answered by our experts.
< Prev
1
Next >
Sort by:
Search filter:
Clear Filter
Your search term must have 3 or more characters.
Keep searches simple. Use keywords, e.g. "leaking", "pump", "broken" or "fit".
Sorry, we couldn't find any existing answers that matched.Try using some different or simpler keywords, or submit your new question by using the "Ask a Question" button above!
Emil
July 21, 2021
What might be the cause of dryer do not dry completely in one load? 1. The load was only 1/2 of capacity
2. After a full cycle the load still damped. Is there any temperature control, or regulator or fuse which might not work properly?
For model number ADG7005AWW
Hello Emil, Thank you for the question. If there is heat but not enough heat to dry the clothes after the end of the cycle, we suggest testing the Cycling Thermostat, PartSelect Number PS11741918. Disconnect the power source to your dryer before you conduct this or any other test. Either unplug the unit from the wall outlet, remove the appropriate fuse from the fuse box, or flip the appropriate breaker in the circuit breaker panel. Your dryer uses multiple thermostats to regulate its internal temperature. The cycle selected determines which thermostat is used. A cycling thermostat can be found somewhere in the path of air that is leaving the drum. It could be found on the blower wheel housing or inside the venting/exhaust system. Dryer thermostats are usually oval shaped and about an inch and a half in length. Also, there should be two wires leading to each thermostat. Label these wires before you remove them so that you are able to correctly reconnect them later. The wires leading to the thermostat are connected using metal slip on connectors. Remove the wires by pulling on the connectors, and not the wires themselves. It may be a good idea to use a pair of needle nosed pliers to help you. Set your multimeter to the R X 1 setting. Take each of your meter's probes and touch one to each terminal. You are testing for continuity, and you should receive a reading of either zero or infinity. At room temperature, testing the thermostat should produce a reading of zero. But if a thermostat is tested when it is heated to its limit, a reading of infinity should be produced. We strongly recommend that you test your thermostat at room temperature. If the test you conduct with your thermostat does not produce these results, then you should replace the component. I hope this helps. Thank you and have a great day!
The belt keeps coming off within a minute or two (sometimes longer, sometimes it's almost immediately) after starting. The idler pulley looked pretty worn on one side so i replaced that to prevent the belt from coming off the side, but it's still happening. The belt is only a year old or so and looks to be in good condition. Is it possible that it was slipping off the idler causing it to get stretched out and is now too long? Any other ideas as to why the belt keeps slipping off?
For model number ADG7005AWW
Hello Joe, thank you for writing. Usually when you replace a dryer belt, the new one is so tight that most people comment that it may be too small. So, the first thing I would check is if the correct belt was put on and if it went on exactly the was it should. Please see the installation video provided for the Belt part
PS11742271. We hope this helps.
The first thing I did was to unplug the dryer from the wall. Then I removed the bottom two screws and slid the bottom cover off so i could see all the way to the back, I tipped the dryer back against the wall and searched for the problem with a flashlight. I noticed that one of the guide wheels that held the drum in place was sheared off. I took the new drum support roller out and carefully slid it over the shaft, I had to jiggle it around for a bit, but then it finally was seated correctly. I replaced the washer and then the clip using a pair of needle nose pliers and a regular screw driver and then turned the dryer by hand to see if the wheel came off. After confirming that it worked, I put the cover back on, and plugged it in and tested it.
I pulled the bottom panel and the door panel to replace the manifold and felt gasket around the drum. I removed old gasket very easily, it peeled right off. I use brake cleaning fluid (Spray Can from Auto Zone about $1.45) to remove old glue. Used spray contact cement (Elmer's about 4.50 at Ace) and sprayed the panel and gasket surfaces and let dry. I then applied a 2nd coat and let get "tacky" and installed the gasket. You will need an extra set of hands to hold the gasket in place while you stretch it over the the panel. The vent manifold is held in place with 3 phillips screws and was installed in about 10 minutes. The only gripe I had was in the Parts-Select illustrated breakdown they don't tell you the lint screen comes with the manifold assembly, so I bought one of them too. Now have an extra lint screen
Wasn't the belt!! Changed it anyway. Should have come here earlier. That mistake added several days to the repair waiting for a second batch of the right parts. Became a pro at taking the dryer apart and reassembling, though! Easy job, just take your time and mark your wires, if you need to. Followed other people's excellent instructions. Clean out all the dust bunnies. Schematics were a great resource. Those and the prices made me a repeat customer. The shaft of the Idler Lever wheel was the cause, but decided, since I had it apart, to spend a little more money and replace both Drum Support Rollers and the Roller Bracket and Shaft Assembly. They showed some wear, and the parts were very inexpensive. Make sure you have snap ring pliers with prongs that are smaller than the standard 0.40 to save some aggravation with the Drum Rollers. $5 tool. Total parts were less than $60. Probably saved $150+ in labor. Quieter than ever now. Thanks!


 Diagram and Parts List for Admiral Dryer")


.gif "SUPPLEMENTAL INFORMATION Diagram and Parts List for Admiral Dryer")