The Dryer's Lint Filter is used to collect lint during the dryer cycle as it passes through the dryer vent, in order to prevent damage to the machine. This manufacturer-approved part comes in gray, me...
$68.81
In Stock
Order within the next 11 hrs and your part ships today!
This is an authentic dryer lint filter cover sourced directly from the manufacturer. It protects the more delicate lint filter in your dryer, so that it doesn’t get damaged and lint can’t mix in with ...
$74.40
In Stock
Order within the next 11 hrs and your part ships today!
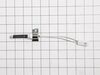
The moisture sensor, also known as a humidity sensor, works in conjunction with your dryer by helping determine the amount of moisture in the drum to reduce overdrying. If the timer doesn’t advance co...
$28.25
In Stock
Order within the next 11 hrs and your part ships today!
This is a replacement lint screen guide for your dryer. The lint screen guide attaches to the front bulkhead and supports the lint screen. If your lint screen will not stay in place, or if you are not...
$54.95
In Stock
Order within the next 11 hrs and your part ships today!
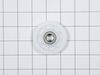
Looking to extend the lifespan of your LG electric dryer? Our authentic LG Idle Pulley could be the missing piece you need! This little thing plays a big role in keeping your dryer working smoothly an...
$42.99
In Stock
Order within the next 11 hrs and your part ships today!
Take a look at this essential LG Dryer Safety Switch Assembly. A don't-miss fixture for your LG Dryer. This is more than just a part, it's a safeguard for you. If your dryer's door springs open, this ...
$56.87
In Stock
Order within the next 11 hrs and your part ships today!
Don't let a faulty door latch disrupt your laundry routine! Our genuine LG Dryer Door Latch Replacement is just the solution you need to bring your LG dryer back to life. This essential part functio...
$39.90
In Stock
Order within the next 11 hrs and your part ships today!
Removed existing parts using screwdriver, positioned new parts in dryer and re-inserted screws, tightened - done. Piece of cake, even for someone who cannot saw a straight line with a chop saw.
I bought the whole dryer filter kit, but turns out I only needed the dryer filter and am very happy about that. No tools necessary I just slid it right in. It fit perfectly and I no longer have anxiety about my clothes coming out ripped.
I watched a You Tube Video. It instructed me to take the top, front, and door off. Not necessary!!! But definitely unplug it as there is a moisture sensor attached inside this housing. Remove current Filter. Remove all screws holding the two key pieces in (Filter Cover and Guide). Disconnect the moisture sensor (mine is white wires connected to two metal prongs). Remove the Filter Cover and Filter Guide and discard. Get a long vaccum hose and remove all visible lint in the area below where the Filter Guide resides. Replace the Filter Guide and reconnect the moisture sensor, replace the Filter Cover. You may find it easier to snap these two pieces together before installing. Make sure the small plastic guides on the inside of the drum snap in tightly to the tei guide holes, then replace all screws. Note- Part Select does not send screws, so save your screws from the old parts and take note which are longer and go where. Tighten, but do not over tighten. If you were successful, the Filter Cover and Guide should be smooth with the edge of the drum and door. Install your new Filter, plug back in, and enjoy! I can FINALLY dry tank tops, open shoulder, and key hole tops, as well as sheets without my dryer eating them. Only problem is that I wish I had done it sooner. Note, I'm a female with no electrical or appliance repair experience. I did this on my lunch break and surprised my husband when he got home! Easy peasy!