


79074403995 Kenmore Range - Overview
Sections of the 79074403995
[Viewing 7 of 7]
Manuals & Care Guides for 79074403995
Click to downloadKeep searches simple, eg. "belt" or "pump".


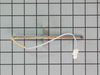
Temperature Sensor
PartSelect #: PS820208
Manufacturer #: 316217002
Also known as Probe. The quick connect on this part may be different than your original part. If it doesn't fit, you have to cut off the quick connect and wire together with porcelain wire nuts.
$81.59
In Stock

Light Bulb
PartSelect #: PS12751166
Manufacturer #: 316538904
This 40-watt appliance light bulb is a reliable replacement for use in select ranges, refrigerators, freezers, and microwaves. It provides bright, consistent lighting to help you see clearly inside yo...
$33.95
In Stock

Main Terminal Block Kit
PartSelect #: PS471605
Manufacturer #: 5304409888
Terminal blocks (also called terminal boards or strips) provide a convenient means of connecting individual electrical wires.
$45.61
In Stock

LENS
PartSelect #: PS16218465
Manufacturer #: 5304524341
This lens covers the interior oven light bulb.
$31.95
In Stock

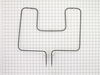
Broil Element
PartSelect #: PS3506411
Manufacturer #: 318255605
This broil element is found on the roof of the oven and heats food. The most common reasons you would need to replace this part is due to the oven not giving off enough heat, not turning on, or not ba...
$224.10
In Stock


Oven Rack
PartSelect #: PS1146745
Manufacturer #: 318025314
Having trouble with your Frigidaire, Electrolux, White Westinghouse, or Tappan oven range performing below par? Our genuine Frigidaire oven rack could be just what you need to get your appliance back ...
$183.24
In Stock


Light Lens Retainer Clip
PartSelect #: PS470510
Manufacturer #: 5304400195
This retainer secures the light lens to the oven cavity.
No Longer Available

Levelling Leg with Rubber Pad
PartSelect #: PS444123
Manufacturer #: 318175503
Sold Individually.
$39.95
Special Order
Common Symptoms of the 79074403995
[Viewing 7 of 7]Little to no heat when baking
Fixed by
these parts
these parts

Show All
Element will not heat
Fixed by
these parts
these parts
Show All
Oven is too hot
Fixed by
these parts
these parts
Show All
Oven not heating evenly
Fixed by
these parts
these parts
Show All
Will Not Start
Fixed by
these parts
these parts
Show All
Little to no heat when broiling
Fixed by
these parts
these parts
Show All
Door won’t close
Fixed by
these parts
these parts


Show All


Keep searches simple. Use keywords, e.g. "leaking", "pump", "broken" or "fit".
oven element broken
The repair was simple; first I removed the 2 screws from the old element and disconnected the wires and then I inserted the new element reconnected the wires and replaced the screws . The repair was easy and took less that 15 min. The oven works as good as new and I saved alot of money by doing it myself.
Parts Used:
-
Van from Sanford, NC
-
Difficulty Level:Really Easy
-
Total Repair Time:Less than 15 mins
-
Tools:Screw drivers
169 of 194 people
found this instruction helpful.
Was this instruction helpful to you?
Thank you for voting!
Oven not heating to desired temperature
Replaced clock control by removing surface burner control knobs and plastic nuts, and then the cover over the oven control. Two screw hold the clock in place, after removal and disconnecting the plug-in you can reinstall the new clock control. The Heat Sensor inside the oven will also need to be replaced. It is located inside the oven and attached with two screws; the back of the oven will need to be removed to unplug. Reverse removal procedure and turn the power back on to the stove.
Parts Used:
-
Dan from Bellevue, ID
-
Difficulty Level:Easy
-
Total Repair Time:15 - 30 mins
-
Tools:Screw drivers
155 of 242 people
found this instruction helpful.
Was this instruction helpful to you?
Thank you for voting!
Cord was not tightened enough by delivery crew.
PF alarm appeared on display. Noticed clicking when cord was moved. Had arced for some time and melted original block. New part slightly different. Only has 3 lugs, old one had six. Stack using washers provided. Take note of colors before disassembly. Use caution while working through access opening. The edges are sharp. Only tools needed are phillips screwdriver, deep socket for lug nuts. Nut driver optional. Hope this is helpful.
Parts Used:
-
Timothy from Spring Valley, AL
-
Difficulty Level:Really Easy
-
Total Repair Time:15 - 30 mins
-
Tools:Screw drivers, Socket set
109 of 174 people
found this instruction helpful.
Was this instruction helpful to you?
Thank you for voting!