


79045489501 Kenmore Range - Overview
Sections of the 79045489501
[Viewing 4 of 4]
Manuals & Care Guides for 79045489501
Click to downloadKeep searches simple, eg. "belt" or "pump".

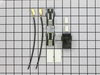
Terminal Block Kit
PartSelect #: PS470125
Manufacturer #: 5303935058
This surface burner terminal block kit comes with interchangeable mounting brackets, terminal box, ceramic wire nuts, heat shrink protective tubing and wires.
$19.49
In Stock

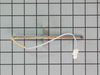
Temperature Sensor
PartSelect #: PS820208
Manufacturer #: 316217002
Also known as Probe. The quick connect on this part may be different than your original part. If it doesn't fit, you have to cut off the quick connect and wire together with porcelain wire nuts.
$81.59
In Stock

Drip Bowl - 8 Inch
PartSelect #: PS1537685
Manufacturer #: A316222301
This is an 8-inch drip bowl for your range or cooktop. It is made of porcelain and is black in color. Place the drip pan under your burner to catch food that may drip or spill while you cook. It is 10...
$19.75
In Stock

Light Bulb
PartSelect #: PS12751166
Manufacturer #: 316538904
This 40-watt appliance light bulb is a reliable replacement for use in select ranges, refrigerators, freezers, and microwaves. It provides bright, consistent lighting to help you see clearly inside yo...
$33.95
In Stock

Drip Bowl - 6 Inch
PartSelect #: PS1537684
Manufacturer #: A316222201
This drip bowl is a genuine OEM replacement part for your stovetop. It is black in color, made of porcelain, and six inches in diameter. To replace the drip pan, you simply need to remove the burner e...
$16.45
In Stock

6-Inch Coil Burner Element
PartSelect #: PS2368974
Manufacturer #: 318372211
This element has looped terminal ends and comes with a black medallion center. This element is a genuine OEM replacement part, has looped terminal ends, comes with a black medallion center, and fits m...
$40.65
In Stock

LENS
PartSelect #: PS16218465
Manufacturer #: 5304524341
This lens covers the interior oven light bulb.
$31.95
In Stock

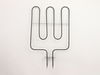
Broil Element
PartSelect #: PS3506411
Manufacturer #: 318255605
This broil element is found on the roof of the oven and heats food. The most common reasons you would need to replace this part is due to the oven not giving off enough heat, not turning on, or not ba...
$224.10
In Stock

GLASS
PartSelect #: PS11728351
Manufacturer #: 5304503232
This is also called the heat barrier glass.
$135.91
In Stock

Surface Burner Infinite Switch - 240V
PartSelect #: PS2350014
Manufacturer #: 903136-9020
This is a 240-volt surface burner infinite switch for a range or oven. It is for an 8-inch element. This part turns your surface element on and off, and regulates the desired heat of your element. The...
$144.67
In Stock

Surface Burner Infinite Switch Kit
PartSelect #: PS2350013
Manufacturer #: 903136-9010
This is a surface burner infinite switch kit for your range or oven. This replacement part activates and deactivates your burner, and controls the burner heat. If you are not getting any heat to your ...
$147.50
In Stock

Range Rack
PartSelect #: PS3495822
Manufacturer #: 318262516
Struggling with an unstable or worn-out oven rack? We have the simple solution to get your oven back to perfect working order - the robust Frigidaire Oven Rack. This dependable part offers a sturdy pl...
No Longer Available
Common Symptoms of the 79045489501
[Viewing 8 of 8]Element will not heat
Fixed by
these parts
these parts

Show All
Little to no heat when baking
Fixed by
these parts
these parts
Show All
Oven is too hot
Fixed by
these parts
these parts
Show All
Oven not heating evenly
Fixed by
these parts
these parts
Show All
Will Not Start
Fixed by
these parts
these parts

Show All
Little to no heat when broiling
Fixed by
these parts
these parts
Show All
Door won’t close
Fixed by
these parts
these parts


Show All
Touchpad does not respond
Fixed by
these parts
these parts

Show All


Keep searches simple. Use keywords, e.g. "leaking", "pump", "broken" or "fit".
Oven not heating to desired temperature
Replaced clock control by removing surface burner control knobs and plastic nuts, and then the cover over the oven control. Two screw hold the clock in place, after removal and disconnecting the plug-in you can reinstall the new clock control. The Heat Sensor inside the oven will also need to be replaced. It is located inside the oven and attached with two screws; the back of the oven will need to be removed to unplug. Reverse removal procedure and turn the power back on to the stove.
Parts Used:
-
Dan from Bellevue, ID
-
Difficulty Level:Easy
-
Total Repair Time:15 - 30 mins
-
Tools:Screw drivers
155 of 242 people
found this instruction helpful.
Was this instruction helpful to you?
Thank you for voting!
Broil element wasn't working...
I pulled my unit out of the wall and noticed that the insulation around the top broiler element was a bit brown. Closer inspection revealed that the element had shorted somehow to the oven itself and caused the element to become non-functional. I tried measuring the resistance first, and it was within typical values for the other elements, but I decided to replace the element anyway.
I ordered from PD and the part arrived just a few days letter by regular shipping. I undid the screws holding in the element, undid the wire connectors and replaced the broken element with the new one. The element worked like a charm and I was back in business for cooking.
I ordered from PD and the part arrived just a few days letter by regular shipping. I undid the screws holding in the element, undid the wire connectors and replaced the broken element with the new one. The element worked like a charm and I was back in business for cooking.
Parts Used:
-
Kevin from Alexandria, VA
-
Difficulty Level:Really Easy
-
Total Repair Time:Less than 15 mins
-
Tools:Screw drivers
93 of 132 people
found this instruction helpful.
Was this instruction helpful to you?
Thank you for voting!
Cracked oven door inner glass
Repair was quite easy, as long as you have the instructions for removing the door. The screws that hold the bottom of the door to the fixed hinge are placed into the side of the hinge assembly after removal; this holds the door at a 45 degree angle for easy removal. After that, just place the door on a flat surface and dismantle the door from the inside. The inner glass is contained in a metal frame with another piece of glass; this frame comes apart easily using the clips in each side. The door assembles easily after the glass is replaced; just take your time and give yourself enough room to lay out the parts as you go. Good luck!
Parts Used:
-
Mitch from Fernandina Beach, FL
-
Difficulty Level:Easy
-
Total Repair Time:15 - 30 mins
-
Tools:Screw drivers
76 of 132 people
found this instruction helpful.
Was this instruction helpful to you?
Thank you for voting!