79041209903 Kenmore Cooktop - Overview
Sections of the 79041209903
[Viewing 3 of 3]Keep searches simple, eg. "belt" or "pump".
Terminal Block Kit
PartSelect #: PS470125
Manufacturer #: 5303935058
This surface burner terminal block kit comes with interchangeable mounting brackets, terminal box, ceramic wire nuts, heat shrink protective tubing and wires.
$19.49
In Stock
Drip Bowl - 8"
PartSelect #: PS437595
Manufacturer #: 316048413
This drip bowl is located beneath the element and catches any spills. It is sold individually and has a diameter of approximately 10 inches.
$24.05
In Stock
Chrome Drip Bowl - 6"
PartSelect #: PS437596
Manufacturer #: 316048414
This drip bowl is sold individually. This part is located beneath the element and catches spills from cooking.
$17.70
In Stock
Surface Burner Switch
PartSelect #: PS2342883
Manufacturer #: 318293827
Cook with confidence using this surface element switch for your electric range. It lets you adjust the heat on your large burner for perfect cooking results every time. Designed for an 8-inch element,...
$104.28
In Stock
Surface Element - 6"
PartSelect #: PS2342726
Manufacturer #: 316439802
Is your range not cooking as it used to? The 6-inch Frigidaire Surface Element is your solution. This genuine OEM part is specifically designed to restore heat to the cooking area on the top of your r...
$212.74
In Stock
Burner Infinite Switch - 240V
PartSelect #: PS1529263
Manufacturer #: 318293818
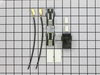
This infinite control switch regulates power to a surface burner, allowing smooth and adjustable heat control. Reliable switching improves cooking accuracy and safety. Replacing a faulty switch helps ...
$95.85
In Stock
Questions And Answers for 79041209903
We're sorry, but our Q&A experts are temporarily unavailable.
Please check back later if you still haven't found the answer you need.
Common Symptoms of the 79041209903
[Viewing 3 of 3]Element will not heat
Fixed by
these parts
these parts
Show All
Will Not Start
Fixed by
these parts
these parts
Show All
Oven not heating evenly
Fixed by
these parts
these parts
Show All
Keep searches simple. Use keywords, e.g. "leaking", "pump", "broken" or "fit".
Old pans/bowls were corroded
Very easy---simply unplug the burners, remove the old pans and replace with the new ones
I was extremely pleased with the easy ordering and prompt delivery of parts that actually fit as they should!
Parts Used:
-
John from Nisswa, MN
-
Difficulty Level:Really Easy
-
Total Repair Time:Less than 15 mins
48 of 53 people
found this instruction helpful.
Was this instruction helpful to you?
Thank you for voting!
Burner would consistantly go to high no matter where the dial was positioned.
First I unplugged the stove.Removed the upper control panel back (10 phillips screws). Removed the plastic dial( pulls straight off). Removed the 2 screws behind the dial that is holding the switch in the control panel. Took one wire at a time off the old switch and put them on the new switch according to each electrical spade marking. L1, L2, H1, H2 and P. Installed the new switch in the control panel securing it with the 2 screws. Installed the dial, installed the upper back panel using the old screws. Plugged the stove back in and tested it.
Note: My new switches shaft was 1/8 of an inch longer so it does put the dial a little further away from the control panel. Wife says: It's OK, don't worry about it.
Parts Used:
-
Gary from Herrick, IL
-
Difficulty Level:Really Easy
-
Total Repair Time:15 - 30 mins
-
Tools:Screw drivers
33 of 38 people
found this instruction helpful.
Was this instruction helpful to you?
Thank you for voting!
corroded terminals
was more of a job of splicing wires together than anything else. Loved the heat shrink electrical tubing
to put over the wires for insulation. used a hair
dryer. must buy more of that amazing stuff
to put over the wires for insulation. used a hair
dryer. must buy more of that amazing stuff
Parts Used:
-
Gary from hollywood, FL
-
Difficulty Level:Easy
-
Total Repair Time:15 - 30 mins
22 of 25 people
found this instruction helpful.
Was this instruction helpful to you?
Thank you for voting!