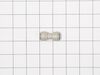
Having trouble with your LG fridge's ice or water dispenser? We have a solution: the Refrigerator Ice Water Line Tube Assembly is ready to get your fridge back in top shape. Why is this part crucial...
This OEM filter measures 2.5 inches deep, 12.5 inches high, 5 inches wide and roughly 1.5 lbs. It is recommended to replace this filter every six months or 300 gallons, whichever comes first. If you n...
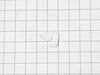
Having trouble keeping your food fresh because your refrigerator is not cooling properly? The LG Refrigerator Compressor Start Relay Thermistor Assembly could be the answer. This sturdy thermistor ass...
Having trouble with your LG refrigerators icemaker or water dispenser? Our Primary Water Valve - Single Coil is here to solve your problem. Its an original OEM part, making it a perfect fit for your L...
This 13-volt evaporator fan motor helps circulate air over the refrigerator coils. These coils will then convert the heat into cool air, which is then circulated from the freezer section to the fresh ...
This valve helps your fridge deliver water to the ice maker and dispenser. If you’re not getting ice, the dispenser isn’t working, or you hear strange noises, this part might be the fix. It’s easy to ...
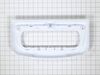
Are you tired of wrestling with a sagging freezer basket? Say goodbye to these days thanks to the Left Side Connector Rail, a genuine replacement part from LG. This freezer basket support rail speeds ...
$27.69
In Stock
Questions And Answers for 78503
Be the first to ask our experts a question about this model!
✖
Ask a Question
Ask our experts a question on this model and we'll respond as soon as we can.
Turn off power, remove upper and lower drawers (may need to open upper refrigerator doors to remove large freezer bin,) remove drawer supports (upper and lower), remove rear freezer panel (trick is to loosen 4 screws on fan bumpout to get the panel to come free from the freezer side wall), test thermistor with multimeter (should have continuity or near zero resistance across 2 orange fuse wires) before cutting zip ties, cut zip ties holding Thermistor in place, remove old Thermistor, install new Thermistor, install new zip ties, replace rear freezer panel, install upper and lower drawer supports, install drawers, turn on power, should be fixed if error code doesn't return after 6 hours.
The Refrigerator now runs very quite. After watching several videos I started on mine and found that it was a bit different than any in the videos. However all but the back panel was shown and that was helpful. The back panel was a bit difficult but a hair dryer seemed to help . All in all it was a good choice to do it myself as it was done quicker than waiting on a repair man.
Shut off water supply. Disconnect main supply line. Remove rear lower panel on back of refrigerator. Remove all tubing clamps on back. Disconnect leaking tubing from water supply valve. Remove water filter and unscrew/remove water filter housing. Replace tubing - connect to water filter housing then to water supply valve. Reconnect filter housing and filter. Reinstall lower panel, then main water supply line, then all tubing clamps. Turn water back on and check for leaks after discarding several glasses of water to fill filter. Job complete!