Having issues with your LG refrigerators shelving? Our genuine OEM Retractable Glass Shelf is here to help. Its not just an ordinary shelfthis sleek and sturdy glass panel is a practical solution spec...
$58.25
In Stock
Order within the next 4 hrs and your part ships today!
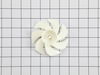
This 13-volt evaporator fan motor helps circulate air over the refrigerator coils. These coils will then convert the heat into cool air, which is then circulated from the freezer section to the fresh ...
$216.10
In Stock
Order within the next 4 hrs and your part ships today!
This refrigerator door gasket is a durable, flexible rubber seal designed to create a tight closure around the door, helping maintain proper temperatures and overall cooling efficiency. It replaces wo...
$72.55
In Stock
Order within the next 4 hrs and your part ships today!
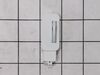
Looking for a reliable solution to keep your LG refrigerator or freezer in prime condition? Our genuine OEM Defrost Sensor Assembly from LG could be just what you need. Designed specifically to fit ...
$57.15
In Stock
Order within the next 4 hrs and your part ships today!
Keep your fridge organized with this sturdy door bin. Perfect for holding milk, condiments, and bottles, it’s a quick and easy replacement for a broken or missing shelf. Just slide it into place on th...
$82.45
In Stock
Order within the next 4 hrs and your part ships today!
Feel the difference a premium part like the FAN ASSEMBLY from LG can make in getting your appliance back in optimal shape. This isn't your run-of-the-mill replacement - this is an original OEM item de...
This center hinge assembly is a replacement hardware component designed to support smooth door movement and proper alignment. It is commonly replaced when doors sag, bind, or fail to move correctly.
$67.05
In Stock
Order within the next 4 hrs and your part ships today!
Video makes it look easy. Kenmore refrigerator does not have "groove" along the right hand side of switch that allows for pushing down on release. Used a thin screwdriver to get under to push while holding switch edge with pliers. Kept slipping. Tape sides to avoid scratching inside of refrigerator.
Soak new gasket in hot water in bathtub to soften while removing old gasket. No tools required, it was a little difficult pulling old gasket out but once you get it started part way out it will come out real easy. By the time you get the old gasket out the new gasket will be warm and easy to get started into the groove it pops into. Starting on back (hinged) side is of door, begin pushing new gasket into groove. Work up and down pushing gasket into place working towards the corners and around to the front side of door. Your all done. This is a job I went into a little nervous thinking I might be calling a service man out to fix, but it turned out to be really easy.