72049 (AWBCSE0) LG Refrigerator - Overview

Sections of the 72049

[Viewing 7 of 7]

Exact Part matches for your search term

[Viewing 1 of 1]
NLASUB 0068033 – Part Number: 72049
NLASUB 0068033
This part number matches the current model number 72049
PartSelect #: PS17183746
Manufacturer #: 72049
  No Longer Available
Keep searches simple, eg. "belt" or "pump".
Door Bin – Part Number: AAP73252202
Door Bin
★★★★★
★★★★★
(2)
PartSelect #: PS3637058
Manufacturer #: AAP73252202
Refrigerator door bin AAP73252202 is an original equipment manufacturer (OEM) part that fits some Kenmore Elite bottom-freezer refrigerators in the following series: 7957204, 7957205, 7957209, 7957218...
$95.12
  In Stock
Handle Screw – Part Number: MJB63190001
Handle Screw
★★★★★
★★★★★
(2)
PartSelect #: PS8752913
Manufacturer #: MJB63190001
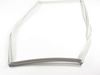
This handle screw, also known as a mounting bolt, is a mounting screw to help secure the door handle to your refrigerator door. If your handle is loose, you may just need to tighten the screw. If your...
$18.96
  In Stock
Door Shelf Bin Assembly – Part Number: AAP73252302
Door Shelf Bin Assembly
★★★★★
★★★★★
(2)
PartSelect #: PS3637059
Manufacturer #: AAP73252302
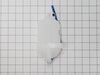
This refrigerator door shelf bin is a clear, gallon-sized storage accessory designed for installation on the right-side door of select refrigerator models. Crafted from durable, food-safe resin, it fe...
$79.89
  In Stock
Primary Water Valve - Single Coil – Part Number: MJX41178908
Primary Water Valve - Single Coil
★★★★★
★★★★★
(3)
PartSelect #: PS3536019
Manufacturer #: MJX41178908
Having trouble with your LG refrigerators icemaker or water dispenser? Our Primary Water Valve - Single Coil is here to solve your problem. Its an original OEM part, making it a perfect fit for your L...
$82.51
  In Stock
Evaporator Fan Motor – Part Number: 4681JB1027C
Evaporator Fan Motor
★★★★★
★★★★★
(1)
PartSelect #: PS3523323
Manufacturer #: 4681JB1027C
This 13-volt evaporator fan motor helps circulate air over the refrigerator coils. These coils will then convert the heat into cool air, which is then circulated from the freezer section to the fresh ...
$243.17
  In Stock
Connector,Tube – Part Number: 4932JA3009A
Connector,Tube
PartSelect #: PS3524389
Manufacturer #: 4932JA3009A
$37.76
  Special Order
Refrigerator Water Reservoir – Part Number: AJL72911502
Refrigerator Water Reservoir
★★★★★
★★★★★
(2)
PartSelect #: PS3618757
Manufacturer #: AJL72911502
The water reservoir holds the water for the water dispenser as the water chills.
$82.45
  In Stock
Micro Switch – Part Number: 6600JB3001C
Micro Switch
PartSelect #: PS3529276
Manufacturer #: 6600JB3001C
$42.49
  In Stock
Refrigerator Compressor Overload Protector – Part Number: 6750CL0001D
Refrigerator Compressor Overload Protector
PartSelect #: PS3603394
Manufacturer #: 6750CL0001D
The compressor overload protector attaches to the compressor and shuts off the compressor if the compressor motor draws too much current.
$53.89
  In Stock
Refrigerator Lever Spring – Part Number: 4970JA3011K
Refrigerator Lever Spring
PartSelect #: PS3524589
Manufacturer #: 4970JA3011K
$19.33
  In Stock
Defrost Sensor Assembly – Part Number: 6615JB2005N
Defrost Sensor Assembly
★★★★★
★★★★★
(1)
PartSelect #: PS3636324
Manufacturer #: 6615JB2005N
Looking for a reliable solution to keep your LG refrigerator or freezer in prime condition? Our genuine OEM Defrost Sensor Assembly from LG could be just what you need. Designed specifically to fit ...
$58.16
  In Stock
Door Gasket – Part Number: MDS38201426
Door Gasket
PartSelect #: PS11758511
Manufacturer #: MDS38201426
Freezer door gasket is on the inner door panel and creates a seal around the door to prevent warm air from entering the freezer compartment.
$113.73
  Special Order

Questions And Answers for 72049

Be the first to ask our experts a question about this model!

Common Symptoms of the 72049

[Viewing 12 of 12]
Leaking
Fixed by
these parts
Fixing Fixing Fixing
Show All
Not dispensing water
Fixed by
these parts
Fixing
Show All
Noisy
Fixed by
these parts
Fixing
Show All
Fridge too warm
Fixed by
these parts
Fixing
Show All
Ice maker won’t dispense ice
Fixed by
these parts
Fixing
Show All
Ice maker not making ice
Fixed by
these parts
Fixing Fixing
Show All
Door Sweating
Fixed by
these parts
Fixing
Show All
Frost buildup
Fixed by
these parts
Fixing
Show All
Door won’t open or close
Fixed by
these parts
Fixing
Show All
Fridge and Freezer are too warm
Fixed by
these parts
Fixing
Show All
Freezer section too warm
Fixed by
these parts
Fixing
Show All
Ice maker dispenses too much ice
Fixed by
these parts
Fixing
Show All
Keep searches simple. Use keywords, e.g. "leaking", "pump", "broken" or "fit".
Our refrigerator was not dispencing water or ice.
Turned of water to refrigerator and unplugged refrigerator. Removed the water line from refrigerator. Removed back panel. Removed mounting screw from the water valve, Unhooked wire harness from valve and removed the water line on back of valve. Reconnected wiring harness to new valve, reconnected water line on back of valve. Replaced the back panel to refrigerator and put the water line back on the new valve. Turned on water valve and checked for leaks. It's now dispensing water and ice.
Parts Used:
Primary Water Valve - Single Coil
  • Nancy from NEW ALBANY, IN
  • Difficulty Level:
    Very Easy
  • Total Repair Time:
    Less than 15 mins
  • Tools:
    Pliers, Screw drivers, Wrench (Adjustable)
10 of 19 people found this instruction helpful.
Was this instruction helpful to you?
Thank you for voting!
Water inlet valve was leaking
0) Look on the internet for a DIY/or pro-shop Video
1) Pull the refrigerator away from the wall, unplug the power cable
2) Shut off the water at the wall valve
3) Disconnect the water line at the inlet valve on the refrigerator (lower corner, right side), this is a threaded pipe fitting requiring a small open end wrench
4) Remove the lower rear panel
5) Remove the water inlet and distribution valve assembly, there is one sheet-metal screw holding the assembly to the back edge of the refrigerator.
6) Carefully pull the assembly out of the back of the refrigerator, leave the distribution water lines attached, note the orientation
7) Disconnect the electrical connectors, note the orientation/types
8) Disconnect the water line from the inlet valve, remove the retaining clip, then pull out the line. Note - a small metal star shaped tube fitting may come out with the valve, this is fine and will not be used again.
9) Remove the inlet valve from the assembly (there are two small sheet-metal screws that are very tight, the correct/precise size, good quality Philips head screw driver is necessary or use a small set of vice-grips to grab the head of the screw)
10) Attach the new valve to the valve assembly, connect the electrical connectors, note - at the plastic refrigerator water line that connects to the inlet valve, trim/cut a small section off the end of the water line before connecting it to the valve. This will provide a fresh interface for the connection. Push the line in firmly and then install the retaining clip.
11) Perform a quick functional check before putting everything back together - Attach the water line from the wall, turn on the water, attach the electrical connectors, plug in the refrigerator power cable and test for operation and leaks.
12) Assuming no leaks/operational issues, unplug the refrigerator power cable again, turn off the water at the wall, disconnect the water line at the inlet valve and reinstall the valve assembly and rear panel. Reconnect the water line and plug in the power cable and you should be good to go.!
Parts Used:
Primary Water Valve - Single Coil
  • JONATHAN from ROSWELL, GA
  • Difficulty Level:
    A Bit Difficult
  • Total Repair Time:
    30 - 60 mins
  • Tools:
    Screw drivers, Wrench set
5 of 6 people found this instruction helpful.
Was this instruction helpful to you?
Thank you for voting!
Ice maker wore out.
I installed the new 3 wire ice maker very easily, but it was defective. I was told that instructions for the return of the defective part would be sent later due to the virus. I have never received the return instruction.
I did receive a credit for the defective part. VERY Satisfied with y’all’s service.
Waiting for return instructions if y’all still want it back.
Thanks,
Thomas Pennebaker
Parts Used:
Ice Maker Assembly - 3 Wire
  • Thomas from LA PLACE, LA
  • Difficulty Level:
    Really Easy
  • Total Repair Time:
    30 - 60 mins
  • Tools:
    Screw drivers
3 of 3 people found this instruction helpful.
Was this instruction helpful to you?
Thank you for voting!