This kit includes one bearing, one ball shaft, one ball bearing, one ball bearing retainer, a small tube of high temperature lubricant, and installation screws.
$56.05
In Stock
Order within the next 1 hr and 40 mins and your part ships today!
The rear drum support bearing helps support the dryer drum to rotate quietly and smoothly during operation. The bearing attaches on the inside of the rear panel of the dryer cabinet. If your dryer is ...
$12.62
In Stock
Order within the next 1 hr and 40 mins and your part ships today!
If your washer isn’t filling properly, leaking, or not cleaning clothes like it should, the water inlet valve might be the issue. This part controls how hot and cold water flows into your machine. It’...
$177.60
In Stock
Order within the next 1 hr and 40 mins and your part ships today!
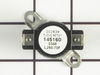
This high limit thermostat has a limit of 260 degrees Fahrenheit. Meaning that it will cut out when the internal dryer temperature reaches 260. This thermostat cuts back in when the temperature drops ...
$68.15
In Stock
Order within the next 1 hr and 40 mins and your part ships today!
This is a replacement screw for your washer or dryer. The screw is approximately half an inch in length and is a Phillips-head screw. It screws in from the outside of the drum, into the vane/baffle. T...
$28.95
In Stock
Order within the next 1 hr and 40 mins and your part ships today!
1. Unplug dryer from outlet 2. Using Lg. flat screwdriver, pry under the front edge of the top and release two spring tabs 3. Lift up top and tilt back out of your way 4. Unscrew two phillips scews on inside of front panel 5. Lift up and out the front panel. Two spring clips at bottom. 6. Rlease tension on drum belt at the motor. Access panel at rear of dryer. 7.Unscrew 3 screws from inside, center rear of drum. 8. Remove drum through the front of the dryer. You may have to spread the sides apart a little bit for it to fit 9. Lift up on the rear drum bearing to remove it from the bearing retainer. ( U shaped plastic socket) 10. unsrew 2 screws and remove the bearing retainer, ground ball. Ball retainer is on outside of dryer. 11. Vacuum everything--duct, blower, lint trap, ect. 12. Intall new bearing retainer and grounding ball, an assistant is helpful at this time, one to hold ball retainer on rear of dryer, one to screw it in from the inside 13. reassemble remainder of parts in reverse order.
carefully pry up on front washer top to release plastic keeper pins,remove 2 phillips screws from beneath lower front washer panel,slightly lift upward on panel to release.remove old broken belt,push new belt beneath large tub pulley,put belt on small motor pulley,push back belt tension /idler arm,start belt on large tub pulley,turn tub pulley by hand to run belt on,release tension on idler arm.replace front panel and lower top.WALAAH!!!! you are done.
First, I removed the top panel which is held on at the front by pressure clips. Second, I removed the entire front panel which entailed removing 2 screws and 2 wire couplings. Third, I removed the 3 screws on the inside center of the drum which turned out to be unnecessary. Fourth, I slid the drum forward in order to access the rear bearing. Lastly, I replaced the entire bearing assembly including the shaft, bracket, bearing, grounding ball and clip. Again, probably not needed but I had ordered the parts in advance in preparation for the worst.