This kit includes one bearing, one ball shaft, one ball bearing, one ball bearing retainer, a small tube of high temperature lubricant, and installation screws.
$56.05
In Stock
Order within the next 12 hrs and your part ships today!
The rear drum support bearing helps support the dryer drum to rotate quietly and smoothly during operation. The bearing attaches on the inside of the rear panel of the dryer cabinet. If your dryer is ...
$12.62
In Stock
Order within the next 12 hrs and your part ships today!
This dryer lint screen is for laundry centers.
Dryer lint screen captures lint and debris from the exhaust air flowing from the dryer.
Follow the instructions in the owner's manual when installing this part.
$58.25
In Stock
Order within the next 12 hrs and your part ships today!
The upper felt seal for your dryer is attached to the top edge of the drum support area, and is held there by a high temperature adhesive. It creates a seal where the dryer door opens and closes, so t...
$46.95
In Stock
Order within the next 12 hrs and your part ships today!
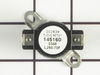
This high limit thermostat has a limit of 260 degrees Fahrenheit. Meaning that it will cut out when the internal dryer temperature reaches 260. This thermostat cuts back in when the temperature drops ...
$68.15
In Stock
Order within the next 12 hrs and your part ships today!
This part controls the temperature of the inside of the dryer drum and prevents the dryer from overheating. This part is located in the blower housing.
$69.02
In Stock
Order within the next 12 hrs and your part ships today!
This is a replacement screw for your washer or dryer. The screw is approximately half an inch in length and is a Phillips-head screw. It screws in from the outside of the drum, into the vane/baffle. T...
$28.95
In Stock
Order within the next 12 hrs and your part ships today!
Questions And Answers for 41761712510
Ask our experts a question about this model and we'll get back to you as soon as possible!
16 questions answered by our experts.
< Prev
1
2
3
Next >
Sort by:
Search filter:
Clear Filter
Your search term must have 3 or more characters.
Keep searches simple. Use keywords, e.g. "leaking", "pump", "broken" or "fit".
Sorry, we couldn't find any existing answers that matched.Try using some different or simpler keywords, or submit your new question by using the "Ask a Question" button above!
Giselle
November 2, 2021
Did all the washer diagnostic steps. Everything worked but the washer will not spin. What could be wrong?
For model number 41761712510
Hello Giselle, Thank you for the question. We suggest checking the Lid Lock. The washer lid lock prevents the washer lid from opening during the wash cycle and spin cycle and may not allow the tub to spin if defective. We hope this helps!
Hello. I have a combo washer. It is a Kenmore from the year 2018. It maintains loading the water and it does not start the cycle.
For model number 41761712510
Hi Kleisver. Please read this guide here: https://www.partselect.com/Repair/Washer/Will-Not-Start/. Thank you for your question and good luck with your repair.
1 personfound this helpful.
Was this helpful?
Thank you for voting!
Phil
December 2, 2023
Washer intermittently will not spin or drain
For model number 41761712510
Hi Phil, thank you for contacting us. Based on the description that you have provided, we would recommend checking the drain hose for any clogging. If this is not the issue, we would suggest replacing the drain pump, part number PS16218540, to solve the problem. It removes water from the washer during the drain portion of the cycle. We hope this helps!
My dryer is not starting. It makes no noise at all except for knob beeps when turning or pushing it.
For model number 41761712510
Hello Miguel, thank you for your inquiry. It means the dryer does not think your door is shut. Make sure the door is securely shut and, if so, flick the door lock a few times to see if it will reset. If your dryer still will not work, you need to order and replace the door lock, part number PS11703540, because it is not sensing that the door is shut. We hope this is helpful!
Hi Renee, thank you for reaching out. We would suggest checking the drain hose for clogging first. If it is fine, the issue could be with the drain pump, part number PS16218540. It removes water from the washer during the drain portion of the cycle. You may need to replace it to fix the issue. We hope this sorts out your problem!
1. Unplug dryer from outlet 2. Using Lg. flat screwdriver, pry under the front edge of the top and release two spring tabs 3. Lift up top and tilt back out of your way 4. Unscrew two phillips scews on inside of front panel 5. Lift up and out the front panel. Two spring clips at bottom. 6. Rlease tension on drum belt at the motor. Access panel at rear of dryer. 7.Unscrew 3 screws from inside, center rear of drum. 8. Remove drum through the front of the dryer. You may have to spread the sides apart a little bit for it to fit 9. Lift up on the rear drum bearing to remove it from the bearing retainer. ( U shaped plastic socket) 10. unsrew 2 screws and remove the bearing retainer, ground ball. Ball retainer is on outside of dryer. 11. Vacuum everything--duct, blower, lint trap, ect. 12. Intall new bearing retainer and grounding ball, an assistant is helpful at this time, one to hold ball retainer on rear of dryer, one to screw it in from the inside 13. reassemble remainder of parts in reverse order.
First, I removed the top panel which is held on at the front by pressure clips. Second, I removed the entire front panel which entailed removing 2 screws and 2 wire couplings. Third, I removed the 3 screws on the inside center of the drum which turned out to be unnecessary. Fourth, I slid the drum forward in order to access the rear bearing. Lastly, I replaced the entire bearing assembly including the shaft, bracket, bearing, grounding ball and clip. Again, probably not needed but I had ordered the parts in advance in preparation for the worst.
For the glide, I want to advise people that to replace the entire glide you need to order two front drum glide parts as each is only half.
First, unplug the dryer. Then, open the top so that you can get access to the work area. On each side of the inside front, there is a screw that connects the front panel to the side panels. Unscrew those screws and pull the front panel until it disconnects from the side panels. Be careful as there are wires that are secured to the bottom of the top inside lip of the front panel. One set of wires goes to the light bulb in the dryer door. You don't need to disconnect the wires, but be sure you don't damage the wires by pulling the front panel too far away from the dryer.
Once you have the front panel out of the way, you can see the front drum glide. In my case, one half was loose as the plastic plugs that pop into recesses to hold the glide in place had broken off. Remove the damaged glide section and replace it with the new section, popping the plastic plugs into the recesses. Don't be afraid to slap the glide to lock the plugs in place.
For the felt, I cut the part of the old felt that was pulling away from the front panel. I then used a flat-head screwdriver and wire brush to remove as much of the old adhesive as I could. Then, using the high-heat adhesive that came with the new felt, I put a generous amount on the front panel where the felt needed to go. I used a toothpick to spread the adhesive to get maximum area coverage. I let it set for a minute or two, and then placed the new felt. I used small clamps to keep the felt in place until the adhesive had time to bond. I only kept the clamps in place for 10 minutes.
Once I removed the clamps, I let the felt continue to adhere to the front panel for 24 hours before reassembling the dryer. Again, be careful of the wires connected to the front panel as it appears very easy for them to be pinched or cut when putting the front panel back in place.
When the dryer was reassembled, I plugged it back in and have had no more troubles.