This kit includes one bearing, one ball shaft, one ball bearing, one ball bearing retainer, a small tube of high temperature lubricant, and installation screws.
$56.05
In Stock
Order within the next 6 hrs and your part ships today!
The upper drum felt glide kit helps to support the front drum as it rotates smoothly and quietly while operating. This kit includes three glides with the adhesive. If your dryer won’t tumble or is noi...
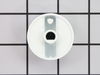
The rear drum support bearing helps support the dryer drum to rotate quietly and smoothly during operation. The bearing attaches on the inside of the rear panel of the dryer cabinet. If your dryer is ...
$12.62
In Stock
Order within the next 6 hrs and your part ships today!
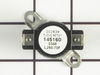
This thermal fuse limiter, with a limit of 220 degrees Fahrenheit, is manufactured for both gas and electric clothes dryers. Once the internal temperature of the dryer reaches 220 degrees, the heating element cuts out.
$22.95
In Stock
Order within the next 6 hrs and your part ships today!
Order within the next 6 hrs and your part ships today!
Questions And Answers for 41749022890
Ask our experts a question about this model and we'll get back to you as soon as possible!
1 question answered by our experts.
< Prev
1
Next >
Sort by:
Search filter:
Clear Filter
Your search term must have 3 or more characters.
Keep searches simple. Use keywords, e.g. "leaking", "pump", "broken" or "fit".
Sorry, we couldn't find any existing answers that matched.Try using some different or simpler keywords, or submit your new question by using the "Ask a Question" button above!
Julie
January 6, 2020
The dryer starts and after 10 minutes or longer it stops and has the 3 buttons above start and a few others are flashing. Clothes isn't drying. What could be wrong?
For model number 41749022890
Hello Julie, thank you for your question. The most likely issue causing that problem would be one of the thermostats. We would recommend testing the following parts first. Thermal Limiter - Limit 220
Part Number: 134120900, High Limit Thermostat Part Number: 3204267. Testing these parts is an easy process. Set your multimeter to the R X 1 setting. Take each of your meter's probes and touch one to each terminal. You are testing for continuity, and you should receive a reading of either zero or infinity. At room temperature, testing the thermostat should produce a reading of zero. But if a thermostat is tested when it is heated to its limit, a reading of infinity should be produced. We strongly recommend that you test your thermostat at room temperature. If the test you conduct with your thermostat does not produce these results, then you should replace the component. I hope this helps. Thank you and have a great day!
Was this helpful?
Thank you for voting!
< Prev
1
Next >
✖
Ask a Question
Ask our experts a question on this model and we'll respond as soon as we can.
We followed the instructions for the drum glide replacement and changed the belt and drum support bearing piece, cleaned it out too. Works like a charm. Thanks for saving us a bundle.
1. Unplug dryer from outlet 2. Using Lg. flat screwdriver, pry under the front edge of the top and release two spring tabs 3. Lift up top and tilt back out of your way 4. Unscrew two phillips scews on inside of front panel 5. Lift up and out the front panel. Two spring clips at bottom. 6. Rlease tension on drum belt at the motor. Access panel at rear of dryer. 7.Unscrew 3 screws from inside, center rear of drum. 8. Remove drum through the front of the dryer. You may have to spread the sides apart a little bit for it to fit 9. Lift up on the rear drum bearing to remove it from the bearing retainer. ( U shaped plastic socket) 10. unsrew 2 screws and remove the bearing retainer, ground ball. Ball retainer is on outside of dryer. 11. Vacuum everything--duct, blower, lint trap, ect. 12. Intall new bearing retainer and grounding ball, an assistant is helpful at this time, one to hold ball retainer on rear of dryer, one to screw it in from the inside 13. reassemble remainder of parts in reverse order.